


November 19, 2018
Lesson 2: Qualify and Assign Leads to Sales
As a marketer, how do you qualify leads for sales? You start with a lead qualification framework.
How many sales teams have you overheard saying, “Our marketing team is amazing — they have our backs and send us more qualified leads than we know what to do with”?
Not many, I’d imagine. A more typical response is, “Marketing is clueless. We have to generate all of our pipeline.” Or, “We have too many leads—but they’re all tiny and unqualified.” The reason for this all-too-common sales vs. marketing dynamic is that merely supplying leads isn’t good enough . Growth is driven by a steady supply of qualified leads—those with a pressing need, committed budget, and defined timeline.
The magic of a lead qualification framework
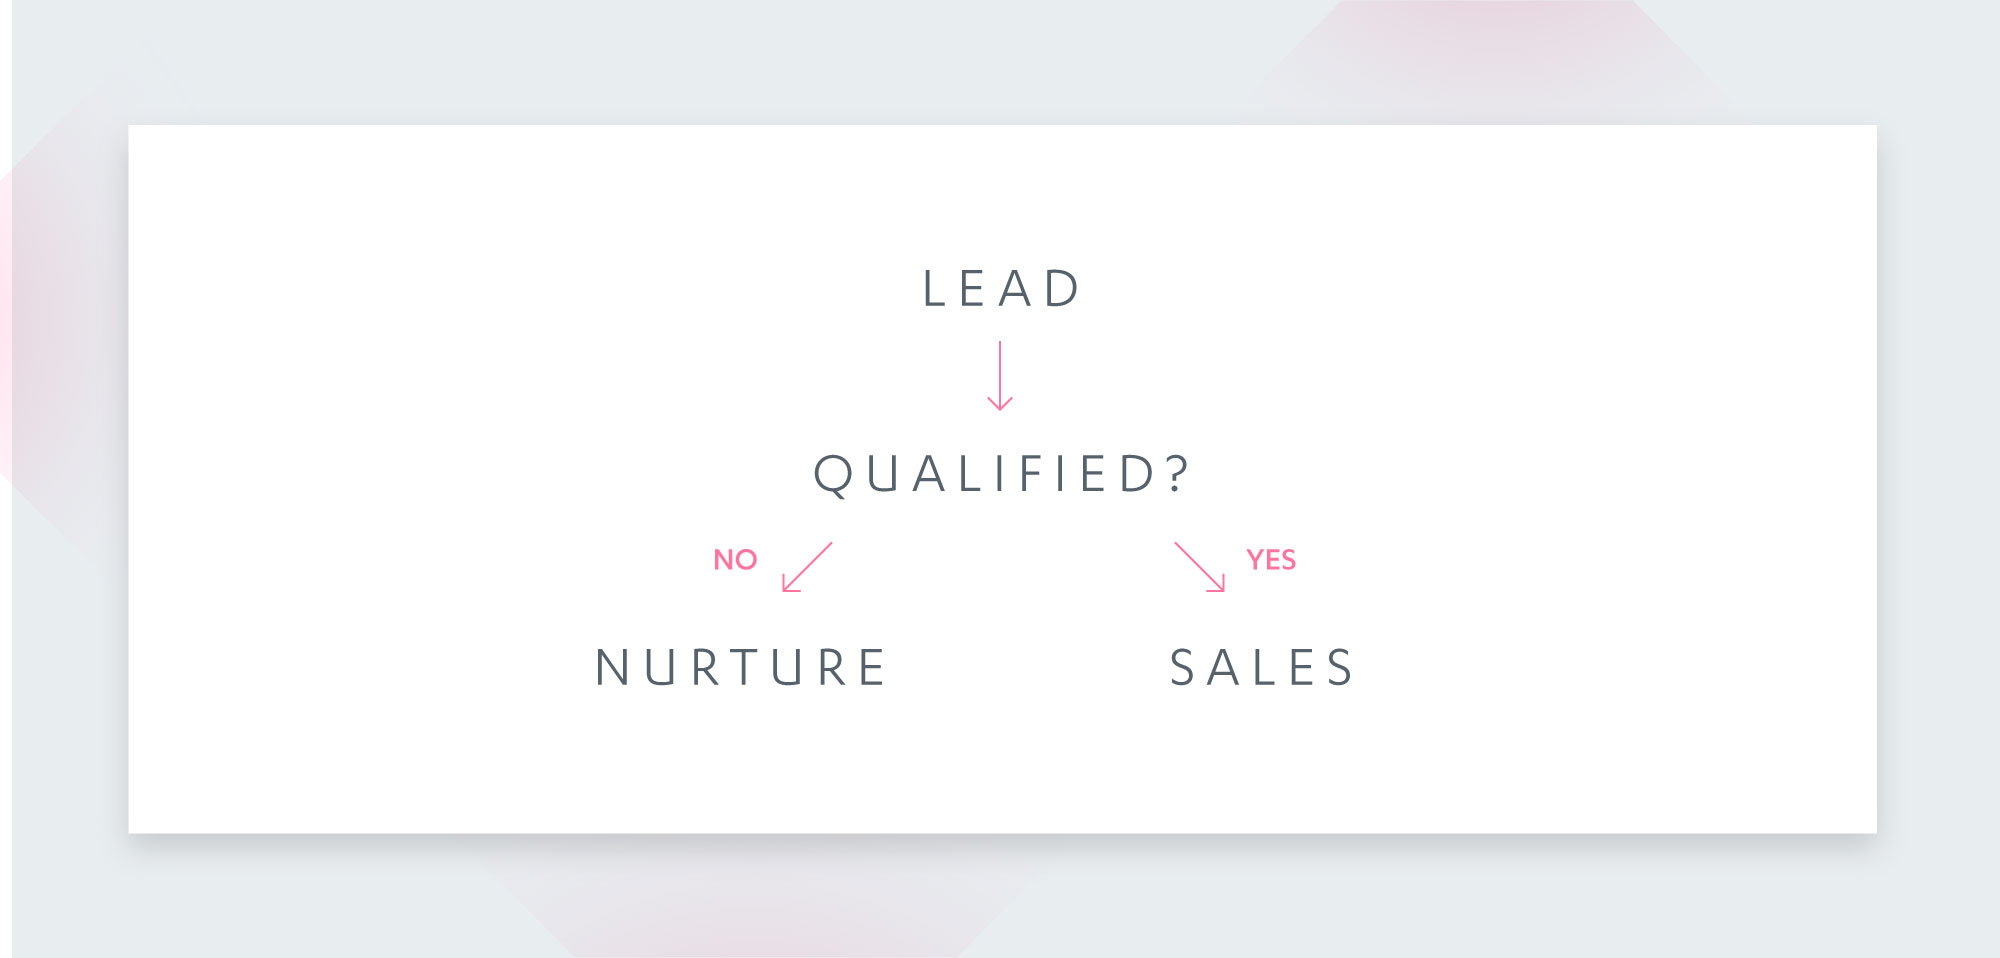
The first step to growing revenue faster (and more predictably ) is to focus on filling the lead funnel. But the important second step, which many marketers neglect, is to route qualified leads to sales and unqualified leads to nurture (for later requalification) using an automated qualification or scoring framework.
Once tested, low-quality lead channels can be systematically improved or eliminated.
The expected result is threefold :
- Sales reps won’t waste time.
- Early-stage buyers are shielded from pushy sales calls.
- Marketers better understand their audience and profile their buyer personas.
To foster flexibility and creativity, Autopilot takes a “build it yourself” approach to lead scoring. You’ll first need to define your ideal lead and the criteria used to qualify the lead. Once that’s done, you’ll set up behavior scoring using the change score action and others. Next, you’ll combine your qualification lists and smart segments with behavior scoring to assign only the right leads to sales. Finally, you’ll learn how to recycle disqualified leads for reactivation. We outline how to take action on these six steps in the next section.
An important step to growing revenue faster (and more predictably ) is qualifying and routing leads to sales
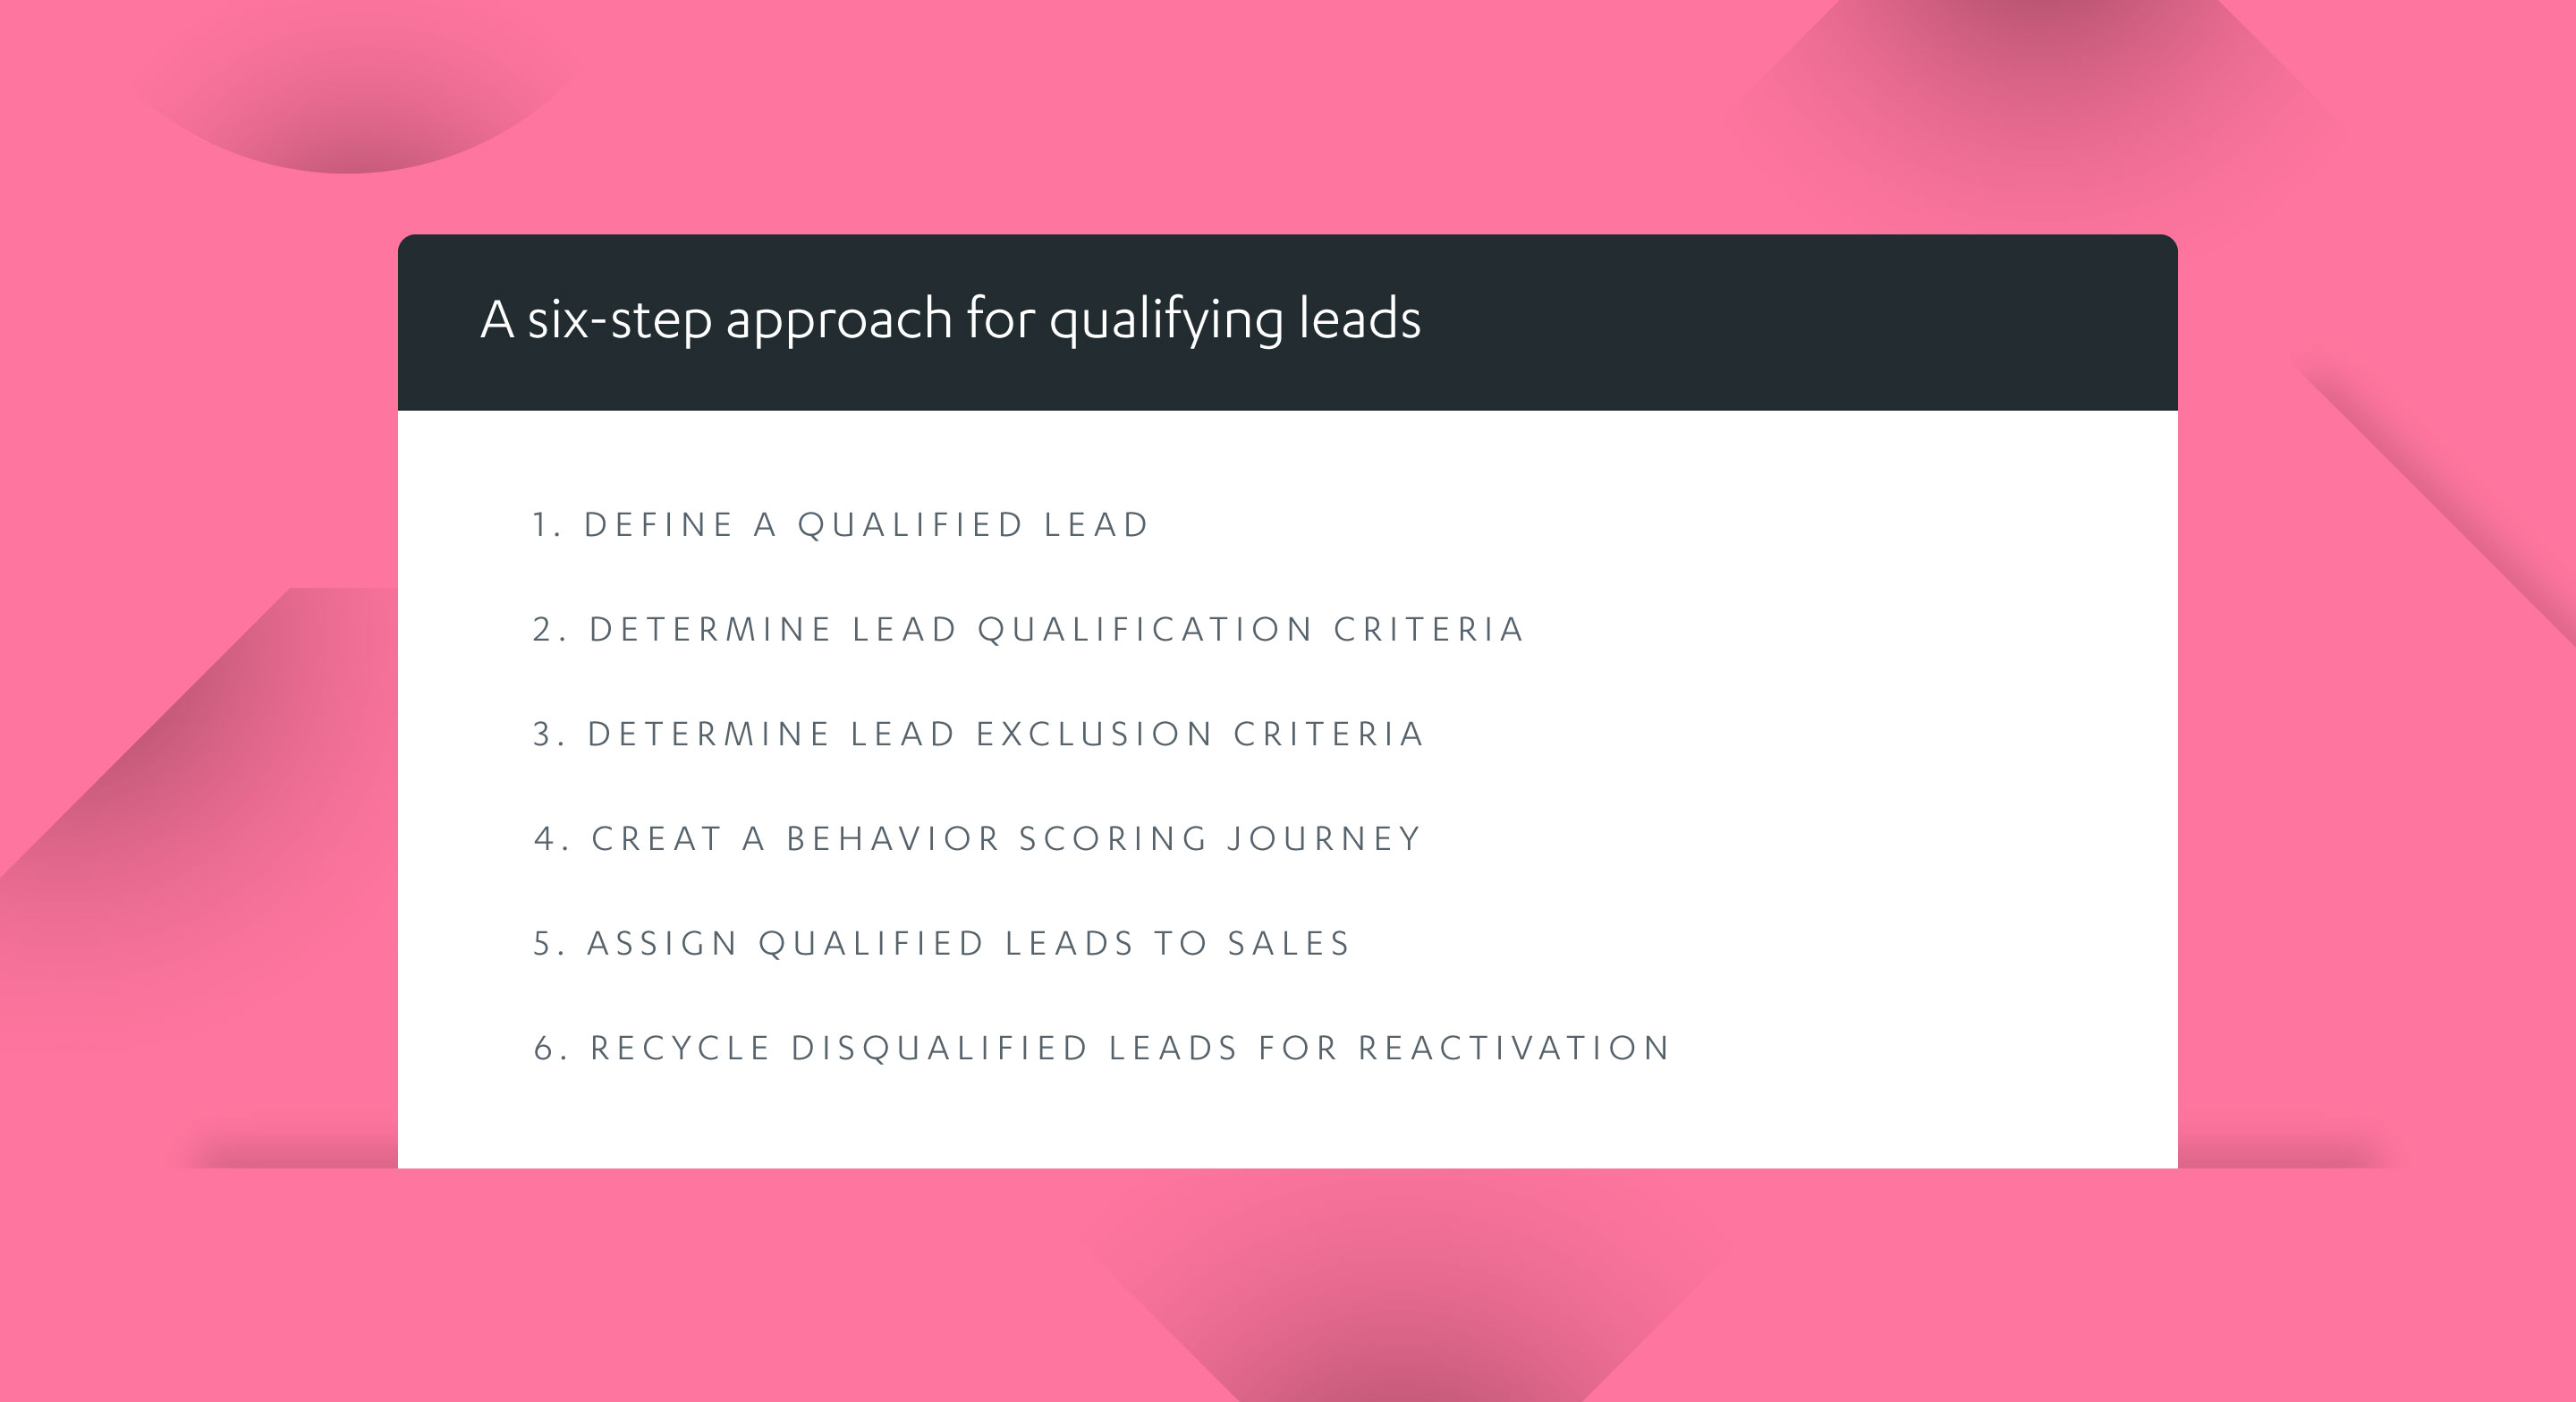
A six-step approach for qualifying leads with Autopilot
- Define a qualified lead
- Determine lead qualification criteria
- Determine lead exclusion criteria
- Create a behavior scoring journey
- Assign qualified leads to sales
- Recycle disqualified leads for reactivation
Step 1. Define a qualified lead
The first thing you need to do is define a qualified or sales-ready lead, also sometimes called a marketing qualified lead (MQL).
Qualified leads typically fall into one of two categories:
- Directly assigned leads. Leads that are always assigned to sales. These leads typically enter your database from your “Contact Sales” or “Demo Request” forms, which we discuss in step five.
- Marketing qualified leads. Leads that are first qualified (on the basis of demographic fit, high levels of engagement, or both) and then assigned to sales, which we cover in steps two to four.
Assign qualified leads directly to sales and any non-qualified leads into your nurture journey
Ideally, you should automate the daily, weekly, and monthly tracking of qualified leads using Salesforce, MixPanel, Autopilot Insights, and/or other systems.
Step 2: Determine your lead qualification criteria
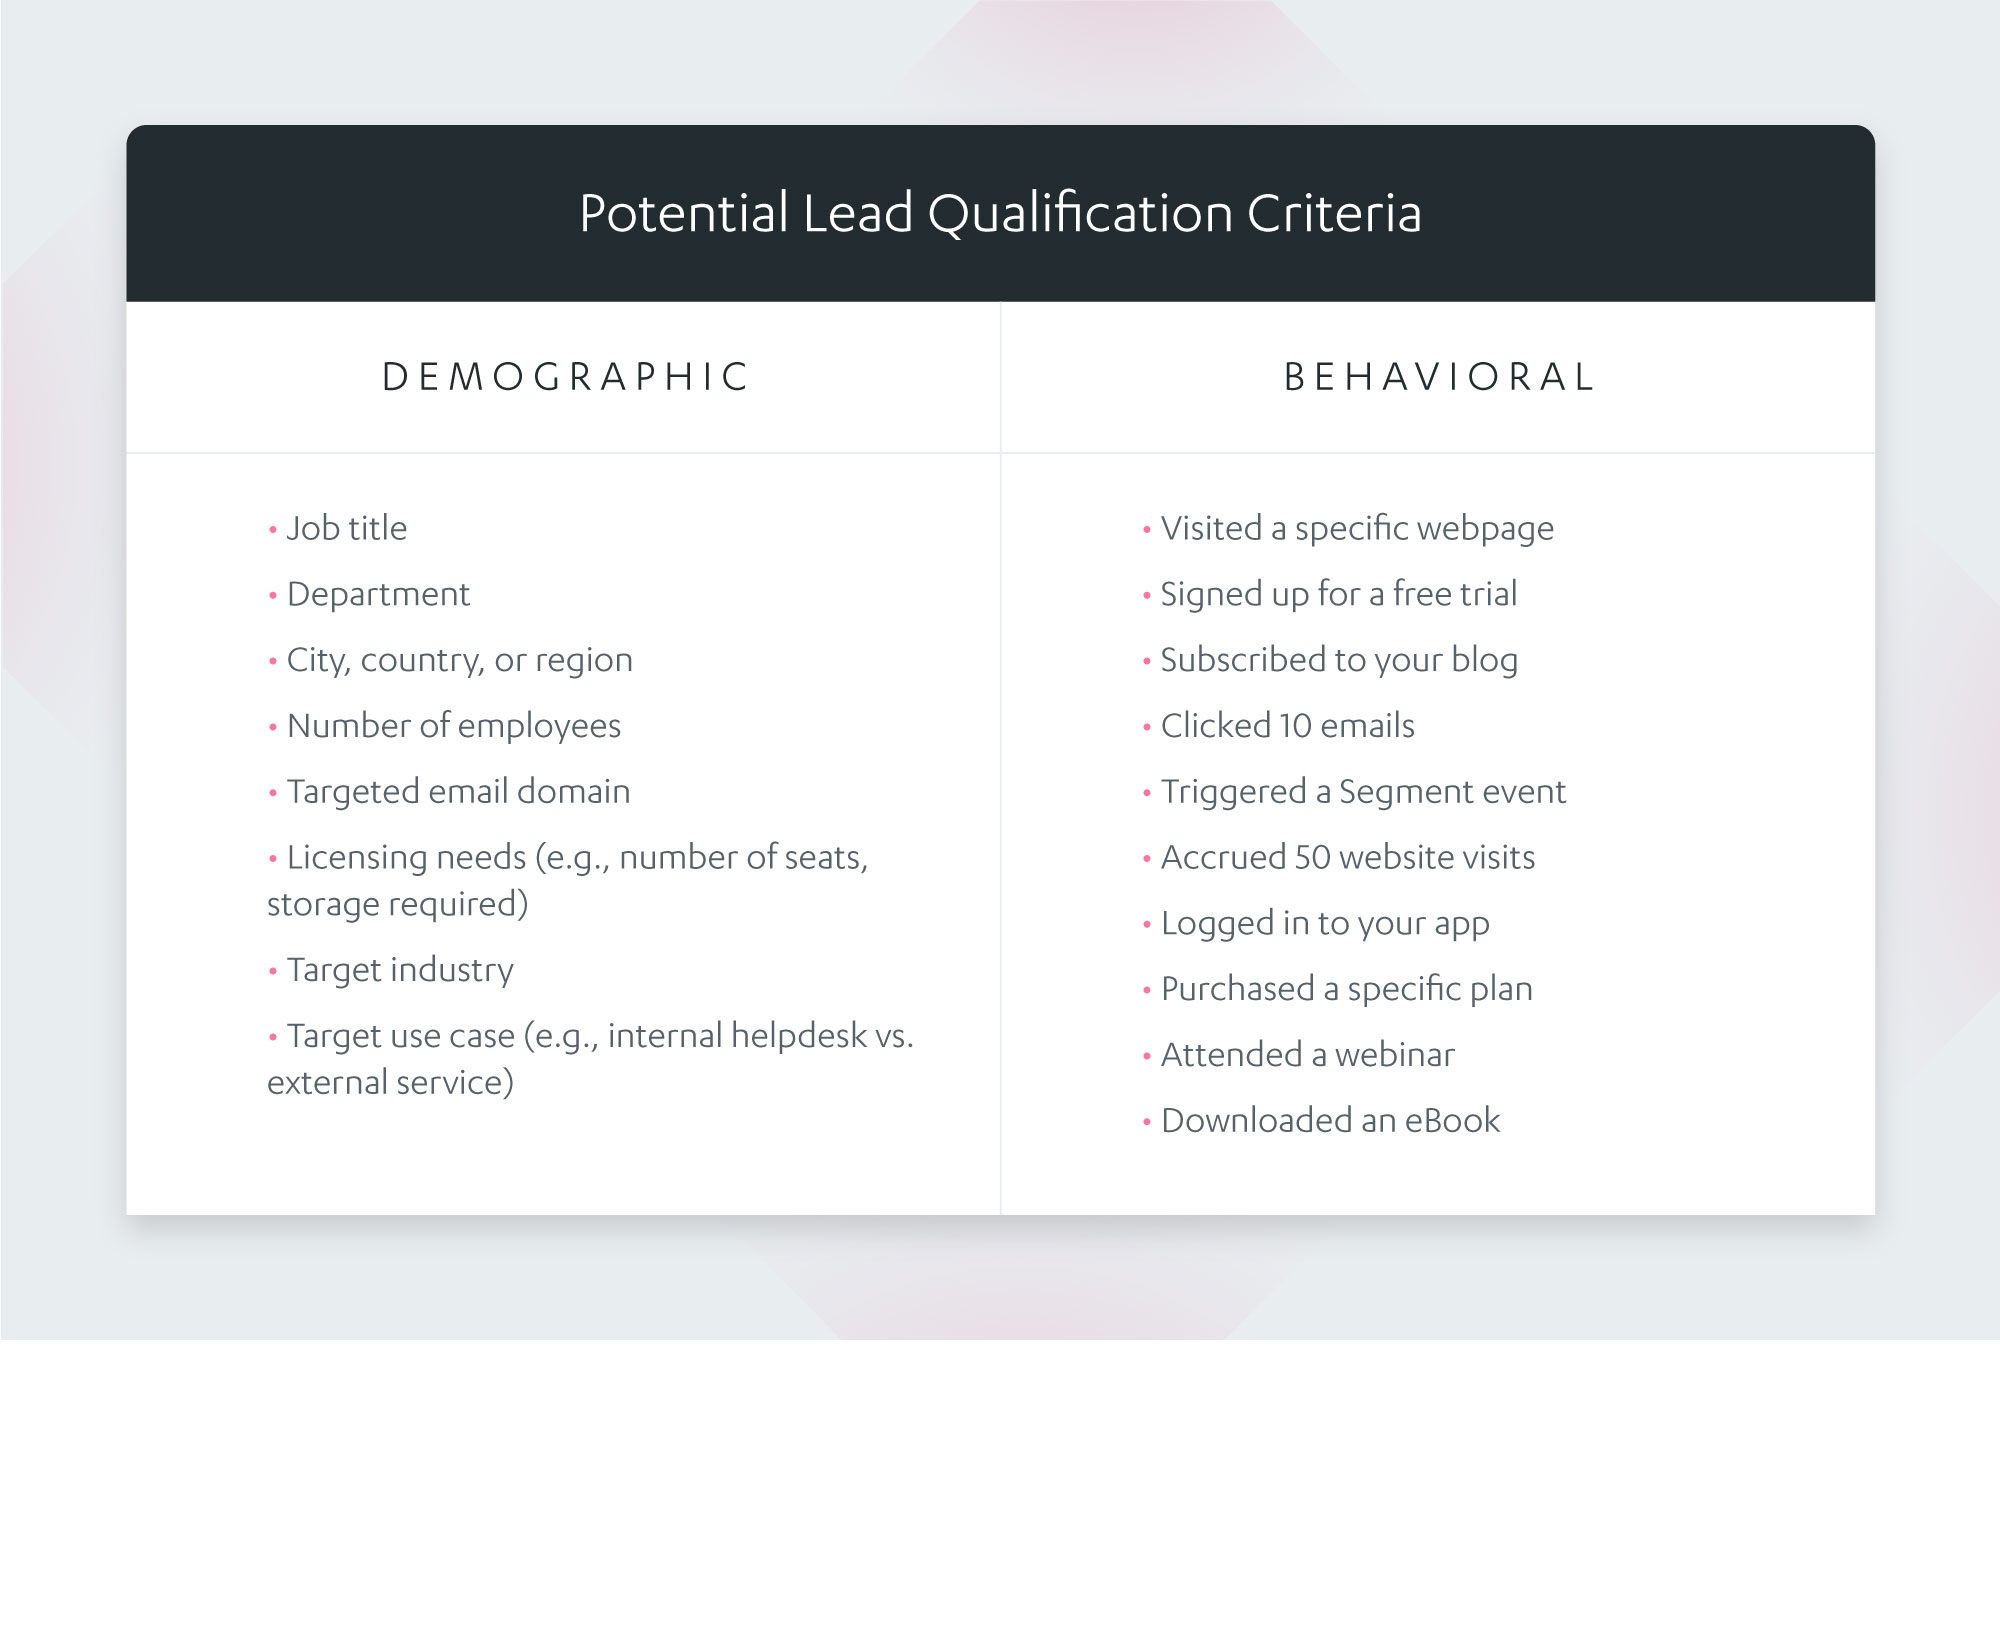
Now it’s time to define a qualified lead. Drill into past customer wins and losses to help identify the demographic and behavioral signals that might predict lead quality. It’s best to partner with sales or product to identify these signals.
Drill into past customer wins and losses to help identify the demographic and behavioral signals that might predict lead quality
Qualification criteria can be quite simple. For example, it might be any person from a financial services company with over 5,000 employees who’s using a corporate email address.
Start with demographics. What industries, company sizes, job titles, needs, use cases, and related technologies are common amongst successfully won customers?
Next, consider key behaviors. Do leads who’ve completed specific action(s) in your product or on your website have a greater likelihood of converting? How regularly do top leads click into high-value purchase evaluation content? Are past buyers of another product more likely to purchase?
The table below summarizes common demographic and behavioral signals used for lead scoring.
Step 3: Determine lead exclusion criteria
Once you’ve narrowed down the qualification criteria that you’ll use to find and assign leads to sales, it’s time to add criteria that will _dis_qualify leads, such as leads using personal email addresses or leads who’ve unsubscribed from receiving your emails.
For example, this Autopilot smart segment excludes anyone with a personal email (gmail, hotmail, yahoo, etc.):
Smart segment excluding non-work email addresses
As a result, only leads using corporate email addresses are qualified and assigned to sales.
Here are some other common fields, segments, lists, or statuses used to exclude non-qualified leads:
- Paying customers
- Unsubscribes
- Competitors
- Test accounts (i.e. those created by your team)
- Junk phone numbers (e.g., 1-111-1111 or 1-234-5678)
- Junk emails (e.g., those without an @ symbol)
- Investors, analysts, journalists, and bloggers
- Personal friends
Determining what qualifies and disqualifies leads is an ongoing project. With regular testing and data enrichment, your qualification criteria will become more accurate and refined.
As you experiment with and combine the signals that work best for your business, keep these tips in mind:
- Start simple by focusing on the “no brainers”
- Check in regularly with sales (they’re the litmus test)
With regular testing and data enrichment, your qualification criteria will become more accurate and refined
An alternative approach to defining your ideal demographic fit is to use modern predictive scoring solutions like Infer (which Autopilot uses internally by connecting via Salesforce), Lattice, or MadKudu. These systems overcome some of the limitations of manual lead scoring by using machine learning in combination with extensive data enrichment, which can increase prediction accuracy and significantly reduce testing time.
Step 4: Create a behavior scoring journey in Autopilot
Now that you’ve nailed down your lead qualification and exclusion criteria, it’s time to build a behavior scoring journey. Behavior scoring helps you identify and engage your most active leads.
Scoring journeys grade contact activity based on the following:
- on-site and in-app engagement
- email opens, clicks, and replies
- product usage
- form completions
- field value changes
- Salesforce campaign membership changes
Here’s a sample of the events you can include in your scoring journey:
Increase behavior score after a website visit
Use the page visited trigger to add contacts who’ve either (a) visited any page on your website or (b) visited one or more specific pages on your website to your scoring journey. (Note that each page must contain Autopilot’s tracking code.)
Left: Change lead score journey for any page visit
Right: Increase lead score journey after specific page visits
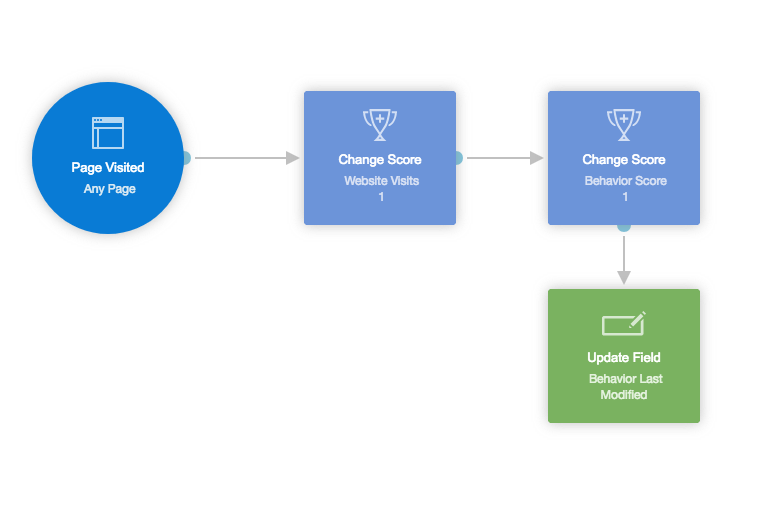
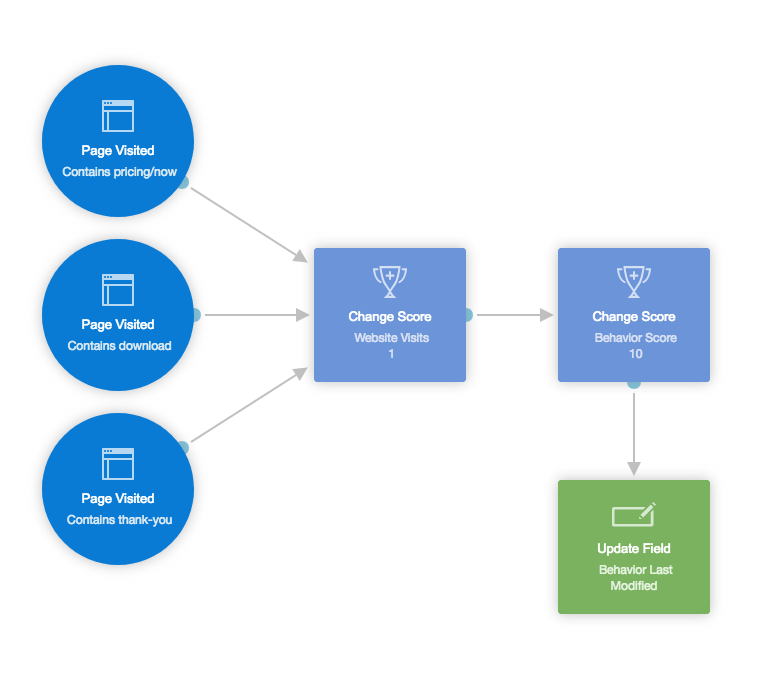
Then use the same action to increase the generic “Behavior Score”, which can be used to tabulate activity across all behavior types (e.g., website visits, email activity, product events, etc.). If the contact visited any page on your website, increase their score by one. If the contact visited a specific, important page on your website, increase their score by 10.
Finally, use the update field action to update the “Behavior Last Modified” field to “–today–”, which enables you to create a smart segment of contacts who’ve taken action today or decrease a contact’s behavior score after a period of inactivity (see below).
Increase behavior score after an email click or reply
Use the email activity trigger to add contacts who’ve clicked or replied either (a) any email or (b) one or more specific emails to your scoring journey.
Left: Increase lead score journey for any email click
Middle: Increase lead score journey after specific email clicks
Right: Increase lead score journey after any email reply

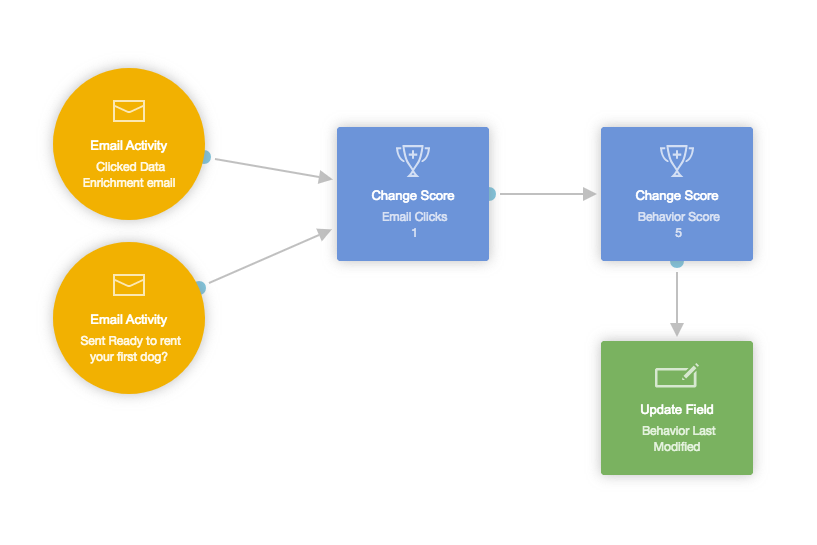
Then use the same action to increase the generic “Behavior Score”, which helps identify active contacts based on any type of behavior (e.g., website visits, email activity, product events, etc.). If the contact clicked on or replied to any email, increase their score by the number of your choosing. If the contact clicked on or replied to a specific, high-value email, increase their score by a larger number.
Keep in mind: You may want to give more weight to replies than clicks. For example, while you might increase the contact’s behavior score by one for a generic email click, you might increase their score by five for replying to any email. The same theory applies to high-value emails. For clicks, you might increase the contact’s score by five, whereas you might increase their score by 10 for a reply.
Finally, use the update field action to update the “Behavior Last Modified” field to “–today–”, which enables you to create a smart segment of contacts who’ve taken action today or decrease a contact’s behavior score after a period of inactivity (see below).
Decrease behavior score after a period of inactivity
To reduce a contact’s behavior score after a period of inactivity, use the field changed trigger in combination with add delay and change score actions.
First, configure the trigger to activate when the “Behavior Last Modified” field does not equal zero.
Next, set up the actions to decrease the contact’s behavior score by a fixed number after a specific period of time. That way, once active leads who decide against proceeding with your service and/or cease to engage with your content don’t keep perpetually high scores.
In this example, we’ve decreased the contact’s behavior score by five after a 10-day delay:
Decrease lead score journey after inactivity

Finally, use the update field action to update the “Behavior Last Modified” field to “–today–”, which re-triggers the degradation process.
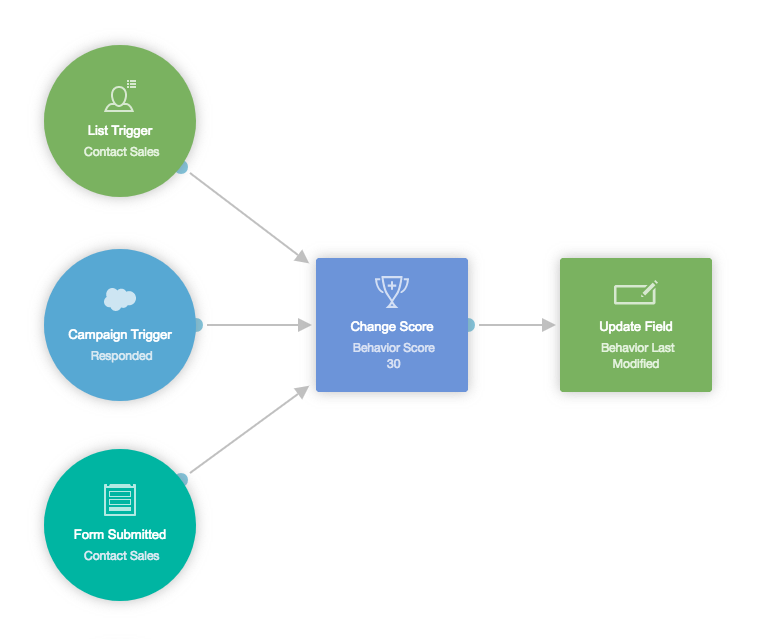
Increase behavior score after important marketing events
When a contact completes an important marketing event, such as a attending a webinar or requesting a sales call, use a relevant trigger in combination with the change score action to increase their behavior score. Because these are considered important marketing events, it’s important to give them more weight than a website visit or email activity.
In this example, we’ve increased the contact’s behavior score by 30 for completing key marketing events:
Increase lead score journey after completing key marketing events
Change lead score based on product usage
Similarly, when an important product usage event occurs, use a relevant triggerin combination with the change score action to increase the contact’s “Product Score”. (If you’d prefer to maintain a single score for all activity, increase the contact’s behavior score instead.)
For example, at Autopilot, we might change a contact’s score when they login or publish a journey. You could do the same if the contact enters your shopping cart or visits a specific page within your app.
In this example, we’ve changed the contact’s product score by five when a specific Segment event occurs:
Increase lead score journey based on product usage
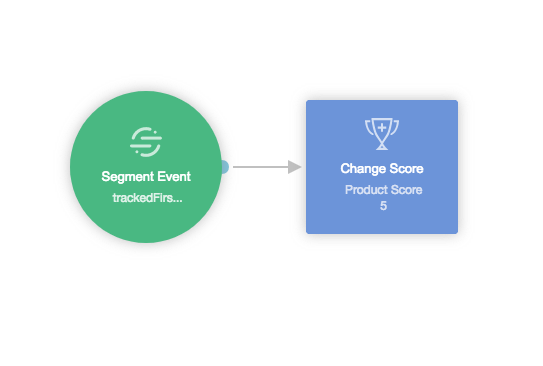
Including product events in your scoring journey enables you to maintain three measures of qualification: demographic, behavioral, and product usage.
The main advantage of creating a behavior scoring journey is that it keeps everything centralized in one place. As a result, you’ll know exactly where to go to modify your lead scoring criteria, which saves you time and reduces the likelihood of error.
Don’t forget: Much of the value of lead nurturing comes from simply keeping in touch. Done well, this will drive sales inquiries and demo requests directly. That’s not to say you shouldn’t score leads or immediately qualify and assign active lead segments to sales. But you may benefit from starting with nurturing, and later diving into scoring.
Including product events in your scoring journey enables you to maintain three measures of qualification: demographic, behavioral, and product usage.
Step 5: Assign qualified leads to sales
In this step, the results of your previous steps come together: You’ll combine your target segments with behavior scoring to route qualified leads to sales.
Like the behavior scoring journey, we recommend building a single operational MQL journey that includes all of your routing criteria. Working from a single canvas allows you to update how leads are routed and assigned to sales, and makes it easier to troubleshoot.
Scenario #1: Qualify and assign direct sales requests (triggered by a form submission)
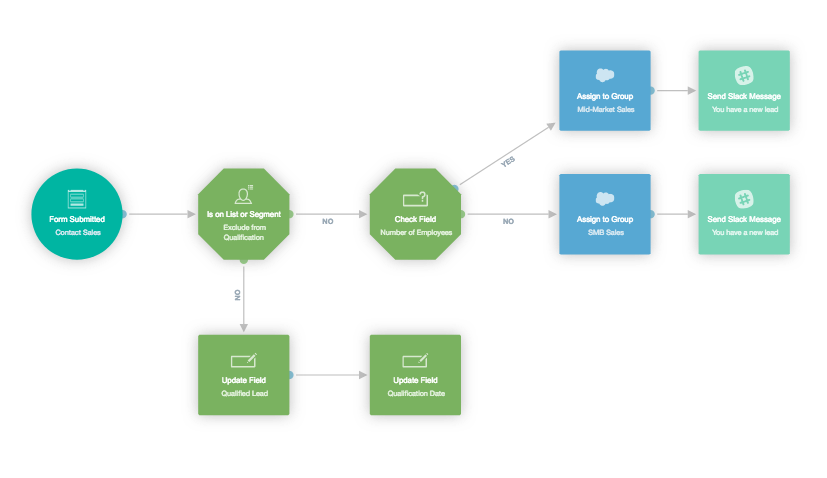
MQL journey to qualify and assign direct sales requests
Sometimes leads make a direct request for a sales touch by submitting a form. Common examples include your “Contact Sales” and “Demo Request” forms. Unless they’re wildly unqualified, you’re expected to follow up, which simplifies the process of routing these leads.
Once you’ve placed the form submitted action on the canvas and configured it, add the following conditions and actions:
- Use the is on list or segment condition to exclude unqualified contacts.When configuring this condition, choose the “Exclude from Qualification” smart segment to exclude competitors, test accounts, and other unqualified contacts.
- Use a check field condition to assign leads to the right team. In this example, we’ve routed leads based on employee count. Leads who work for companies with more than 500 employees are routed to mid-market sales, while those who work for companies with under 500 employees are routed to SMB sales
- Use the send Slack message action to notify your team. If you have a specific channel where you’d like to be notified of new leads, set up a custom Slack message that includes lead source, owner, and other details of your choosing.
- Use the update field action to record the results of your qualification process. For example, you might update your “Qualified Lead” field to “Yes” and your “Qualification Date” to “–today–“. These can also be synced to Salesforce, which enables you to create qualified lead reports in the future.
- Use the set Salesforce campaign member status action to add the lead to a Salesforce campaign. This is helpful for future reporting and attribution.
Scenario 2: Route and assign qualified leads triggered by fit (e.g., enterprise leads)
Once qualified, leads must be routed and assigned to the appropriate salesperson.
In this example, we’ve built a “strong fit” smart segment. This dynamic list includes executives of companies with at least 2,500 employees that are located in North America, who signed up with a corporate email, are not on our suppression list, and have engaged in some manner, resulting in a minimal behavior score.
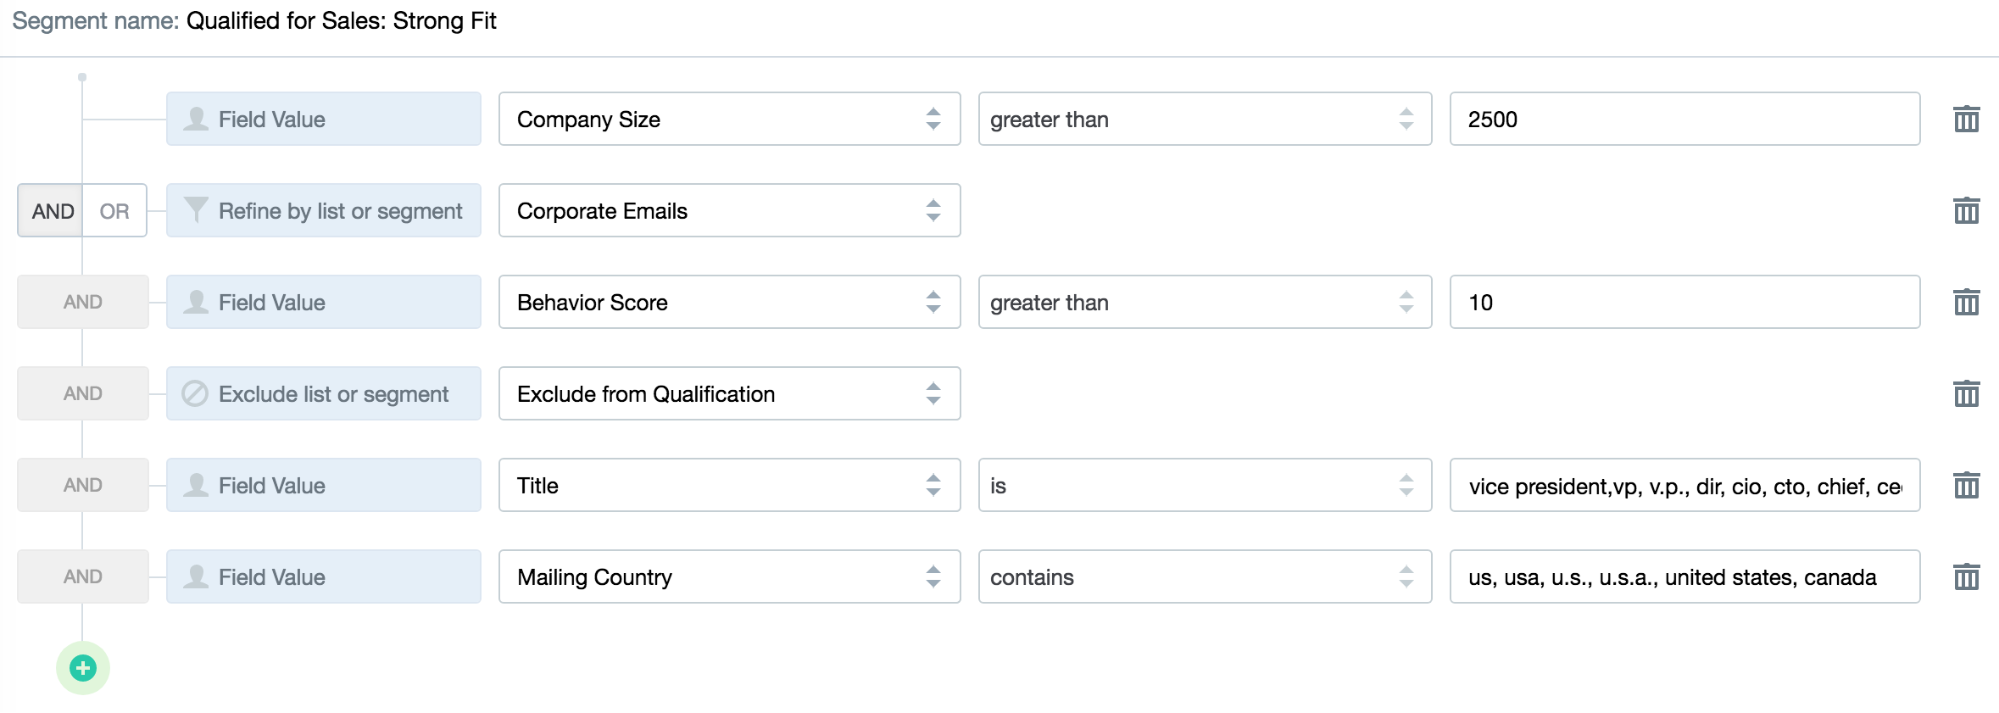
A peek into the smart segment criteria for leads with a strong fit
Note that the segment criteria we’ve used above could be replaced by a single “fit score” if you’re using a predictive platform like Infer. In that case, the criterion may be that the “fit score” value is NOT “D” (where lead quality is identified by A/B/C/Ds).
Next, let’s use the smart segment we just created as a trigger to assign new enterprise leads to the enterprise account executive (who handles leads who work for companies with more than 5,000 employees) and assign the rest to the mid-market team (which handles leads who work for companies with fewer than 5,000 employees) round-robin style:
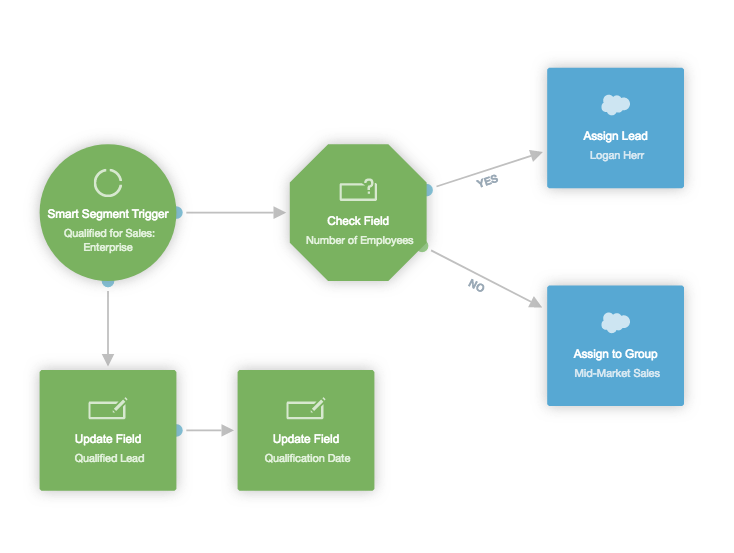
MQL journey to qualify and assign leads by fit
Scenario #3: Route and assign qualified leads triggered by behavior (e.g., highly engaged leads)
In this example, we’ve built a “highly engaged” segment of leads, who have a behavior score of 50 or greater and meet your sales team’s minimal demographic requirements. For example, your sales team might request that leads work for companies with at least 500 employees, signed up with a corporate email, and are not on our suppression list.
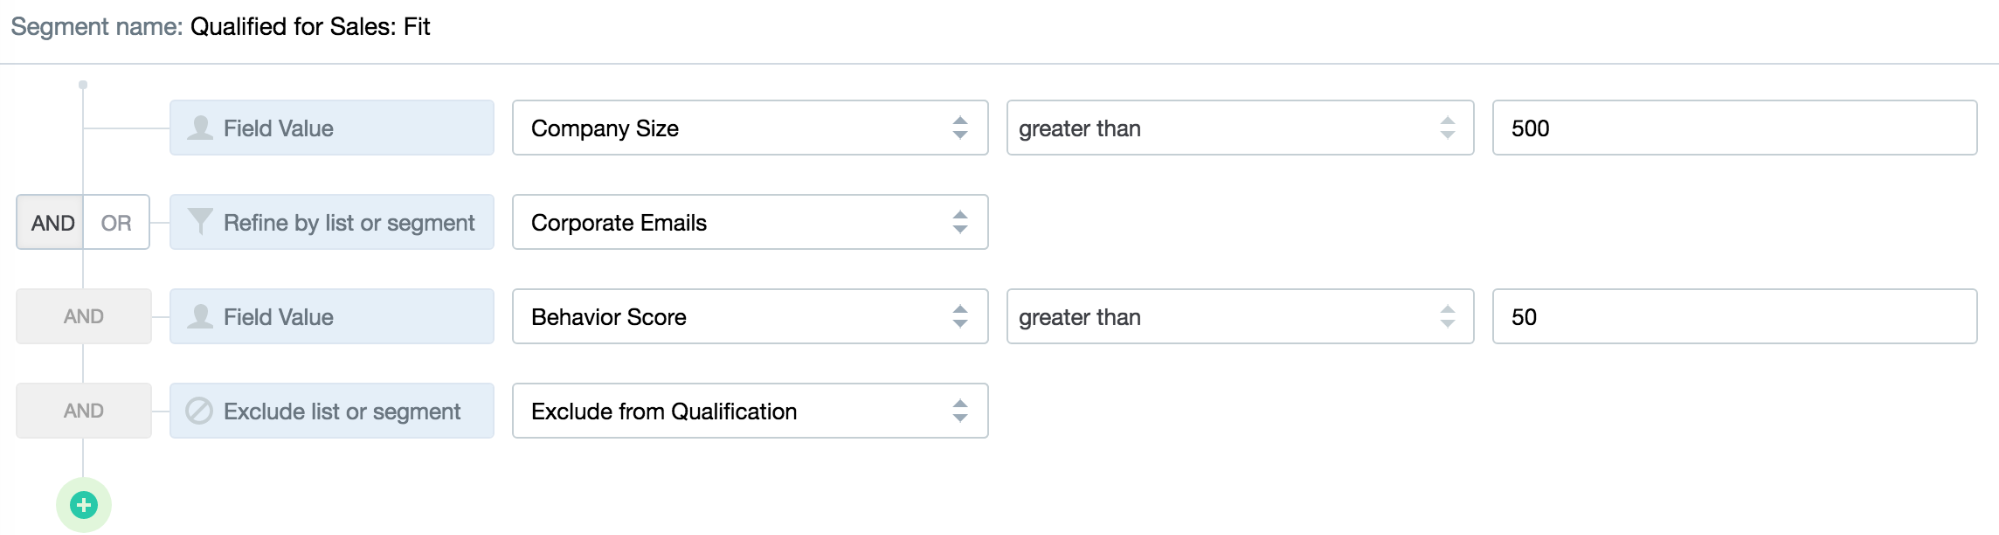
A peek into the smart segment criteria for leads with an okay fit
Like in the last example, we’ll use this smart segment as a trigger to assign engaged leads to either the enterprise account executive or the mid-market team:
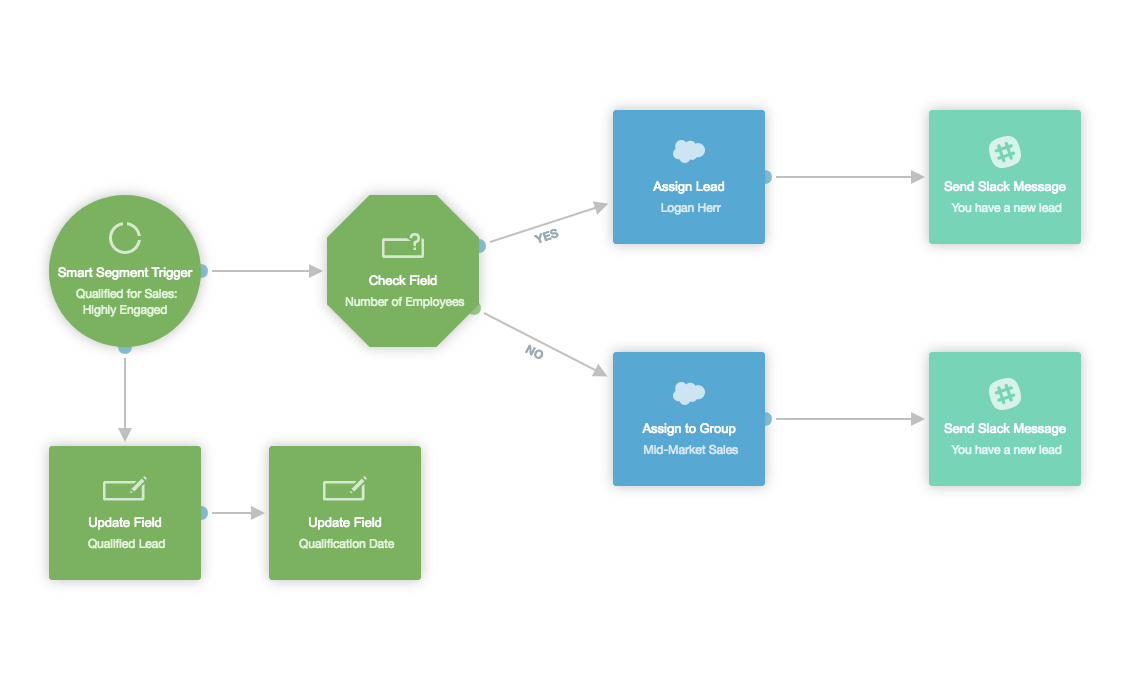
MQL journey to qualify and assign leads by behavior
These three scenarios are commonly used by Autopilot customers to qualify and assign leads to sales based on the demographic and behavioral signals outlined above. Most successful customers start with assigning direct sales requests and creating one key qualification scenario, such as assigning free trials to either a self-service or sales-managed track.
Step 6: Recycle disqualified leads for reactivation
It’s good to have a game plan in place for recycling your leads. When sales disqualifies or closes out a lead, be sure to reset their qualified status. That way, if they take another action in the future, they can be re-qualified and passed back to sales.
Sometimes it makes sense to require some time to pass before a lead can become re-qualified. Depending on your sales cycle, this might be anywhere from 30 to 90 days. In extreme cases, it might be somewhere between 6 months and a year.
To make this simple, add a “Qualification Date” field that is updated once the qualification process is complete. That way, you can check against your defined time frame to see if the reactivated lead is eligible for requalification before assigning back to sales.
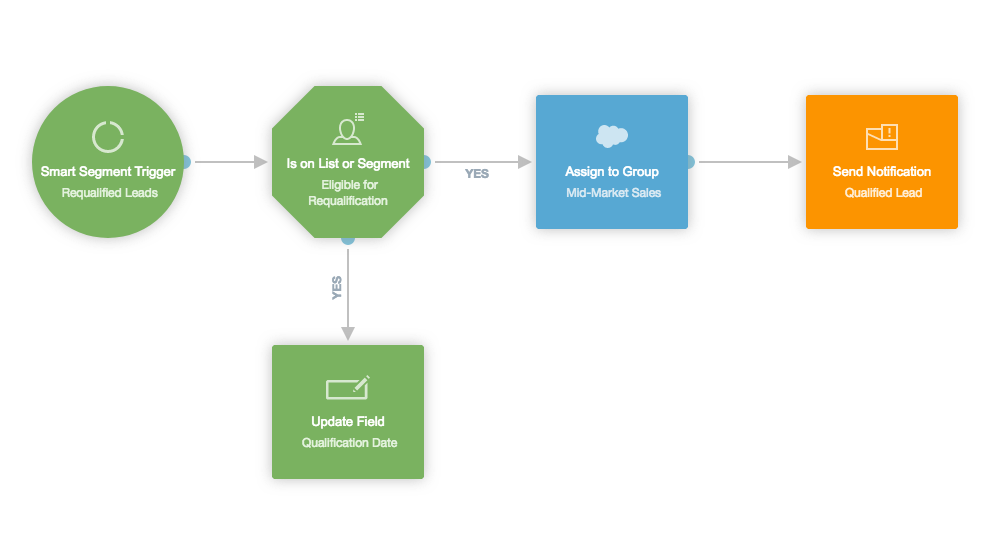
Re-qualification journey for disqualified leads
Wrapping it all up
Congratulations on making it through this important lesson on qualifying leads that are acquired and nurtured through Autopilot. This 6-step process will help you qualify, route, and assign leads to sales. Aim to set qualification thresholds that produce about 10-15% lead-to-purchase conversion rates, and don’t forget to trigger lost or unqualified leads into your lifecycle nurture journey for reactivation, which is the subject of the next lesson.


