September 27, 2017
Lesson: Convert Free Trialists
Best-in-class SaaS products convert >15% of free trial signups into paying customers. Get there with these proven journeys.
Successfully activated trialists convert into buyers at higher rates—often without costly manual sales and success efforts. Plus, they typically have higher product engagement, upgrade, and retention rates. The key? Building an effective, automated SaaS trial that helps users reach their “Aha!” moment.
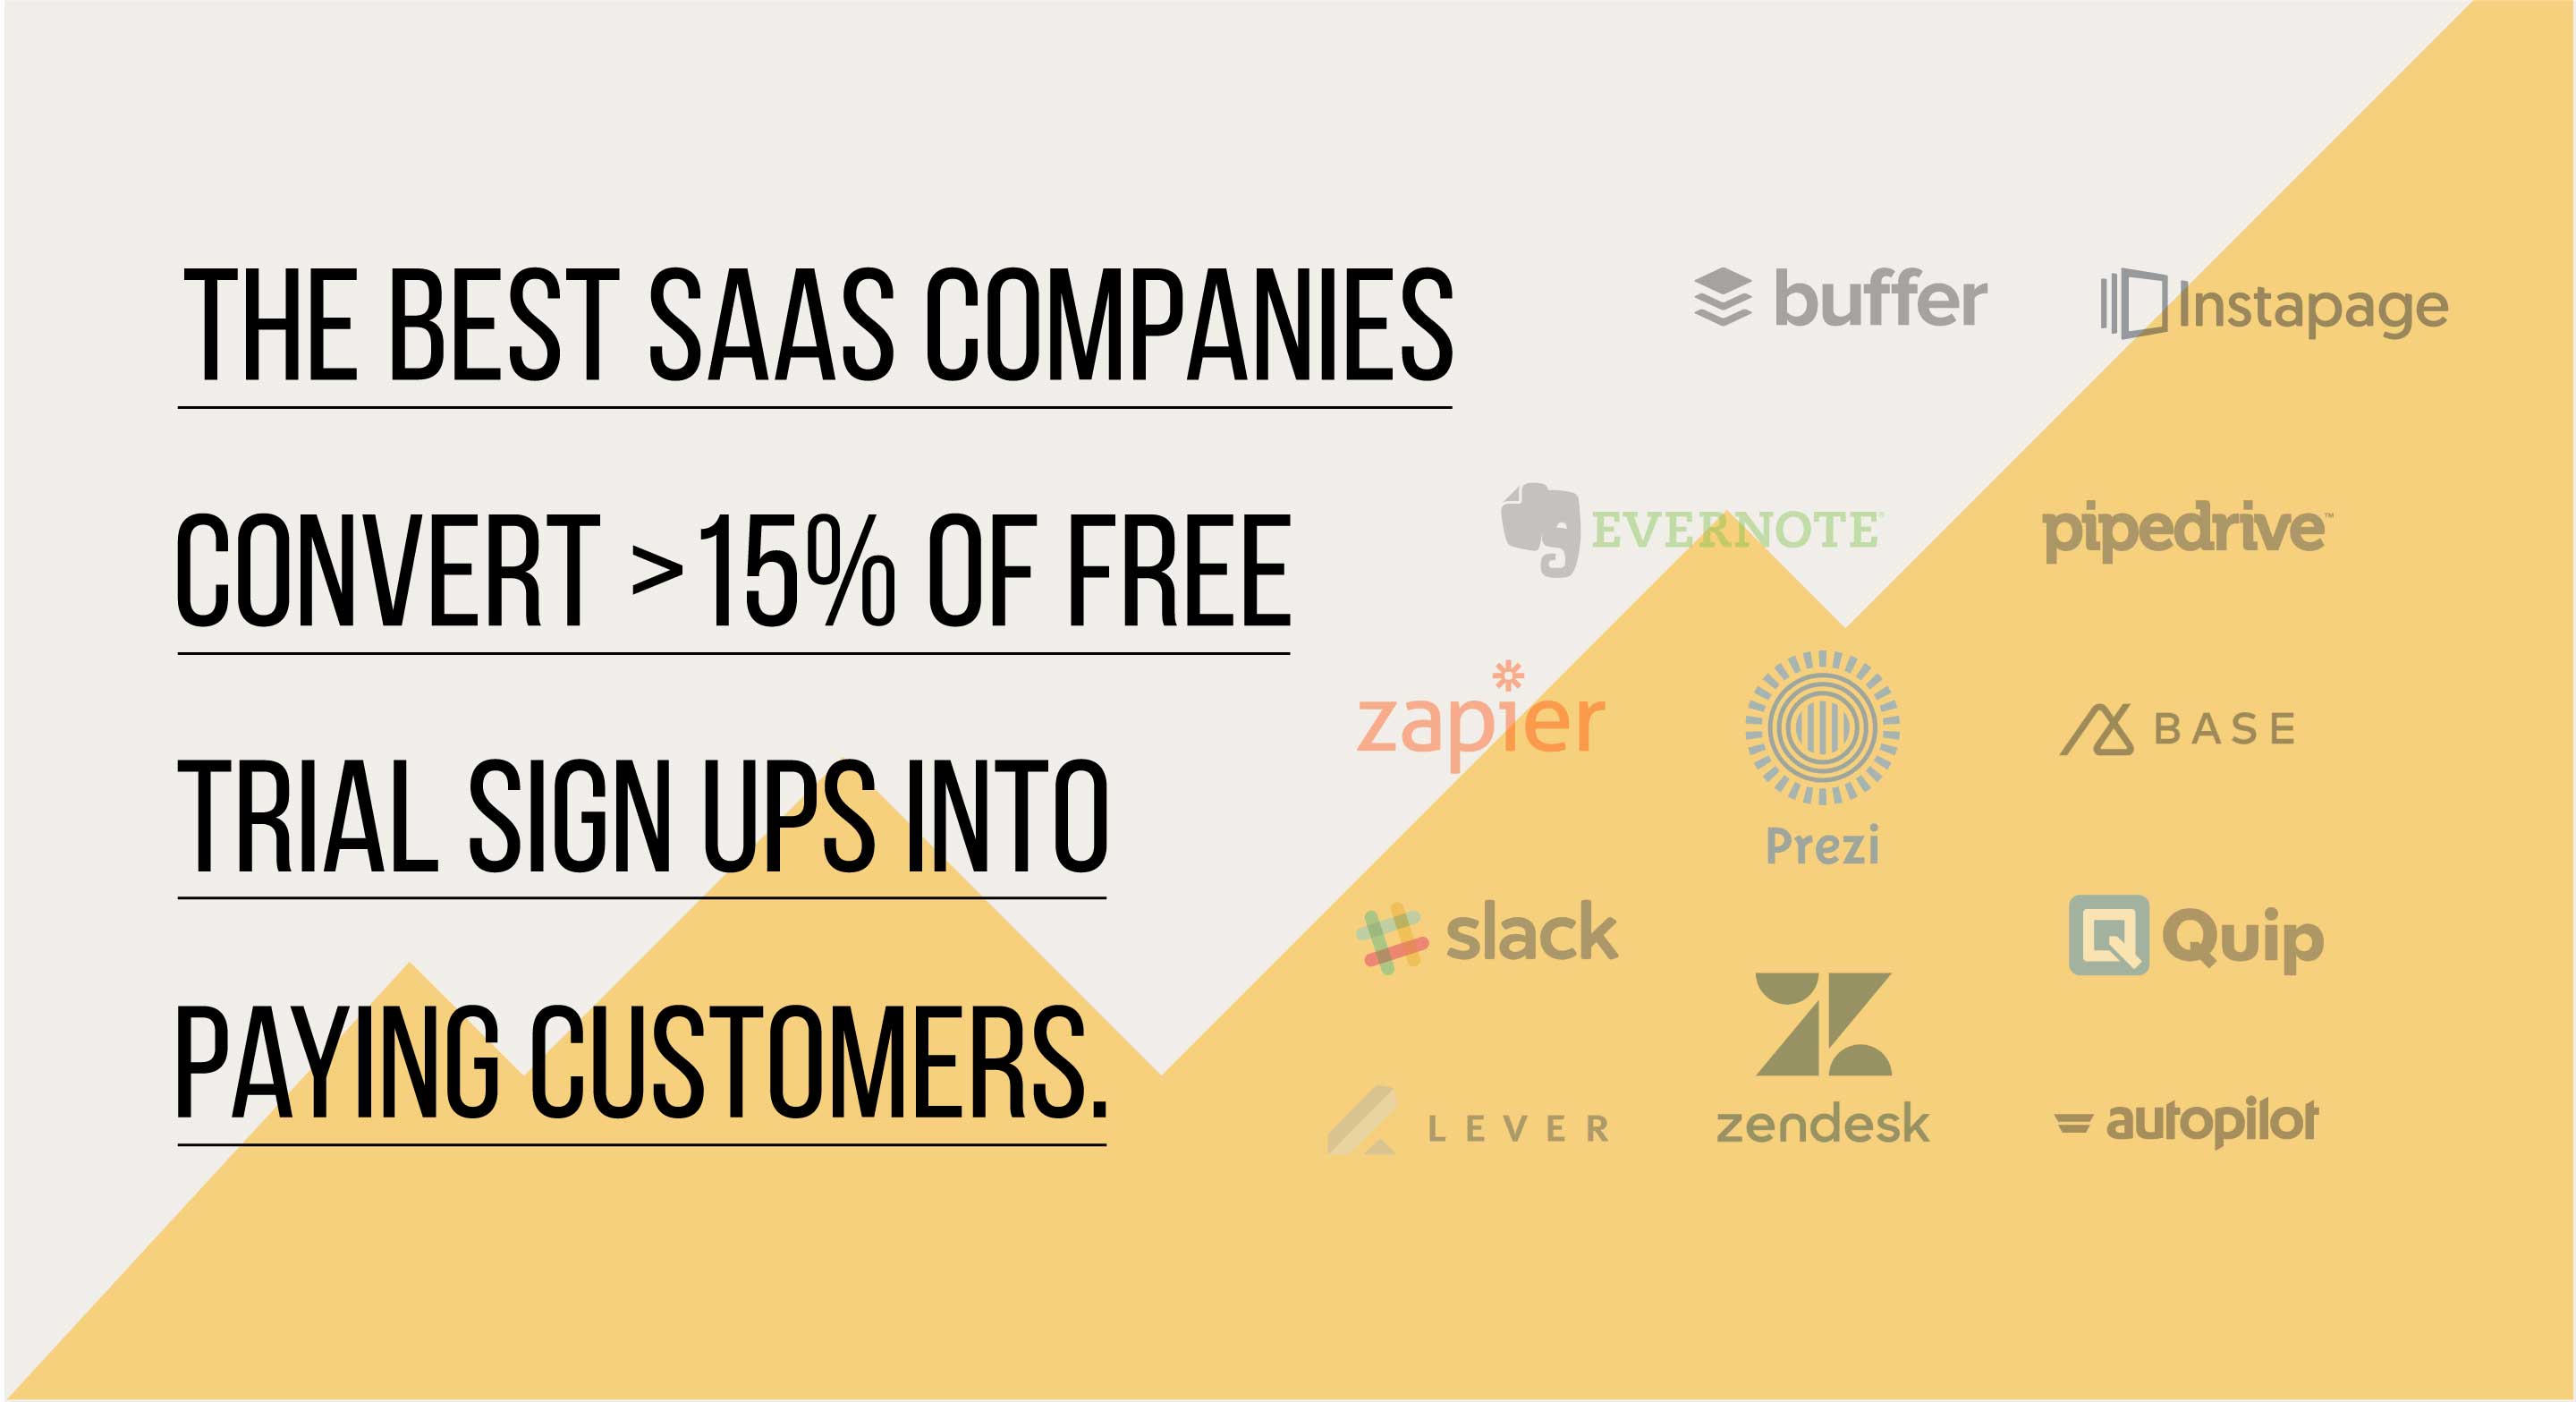
How does your free trial conversion rate compare?
The most important trial conversion goals
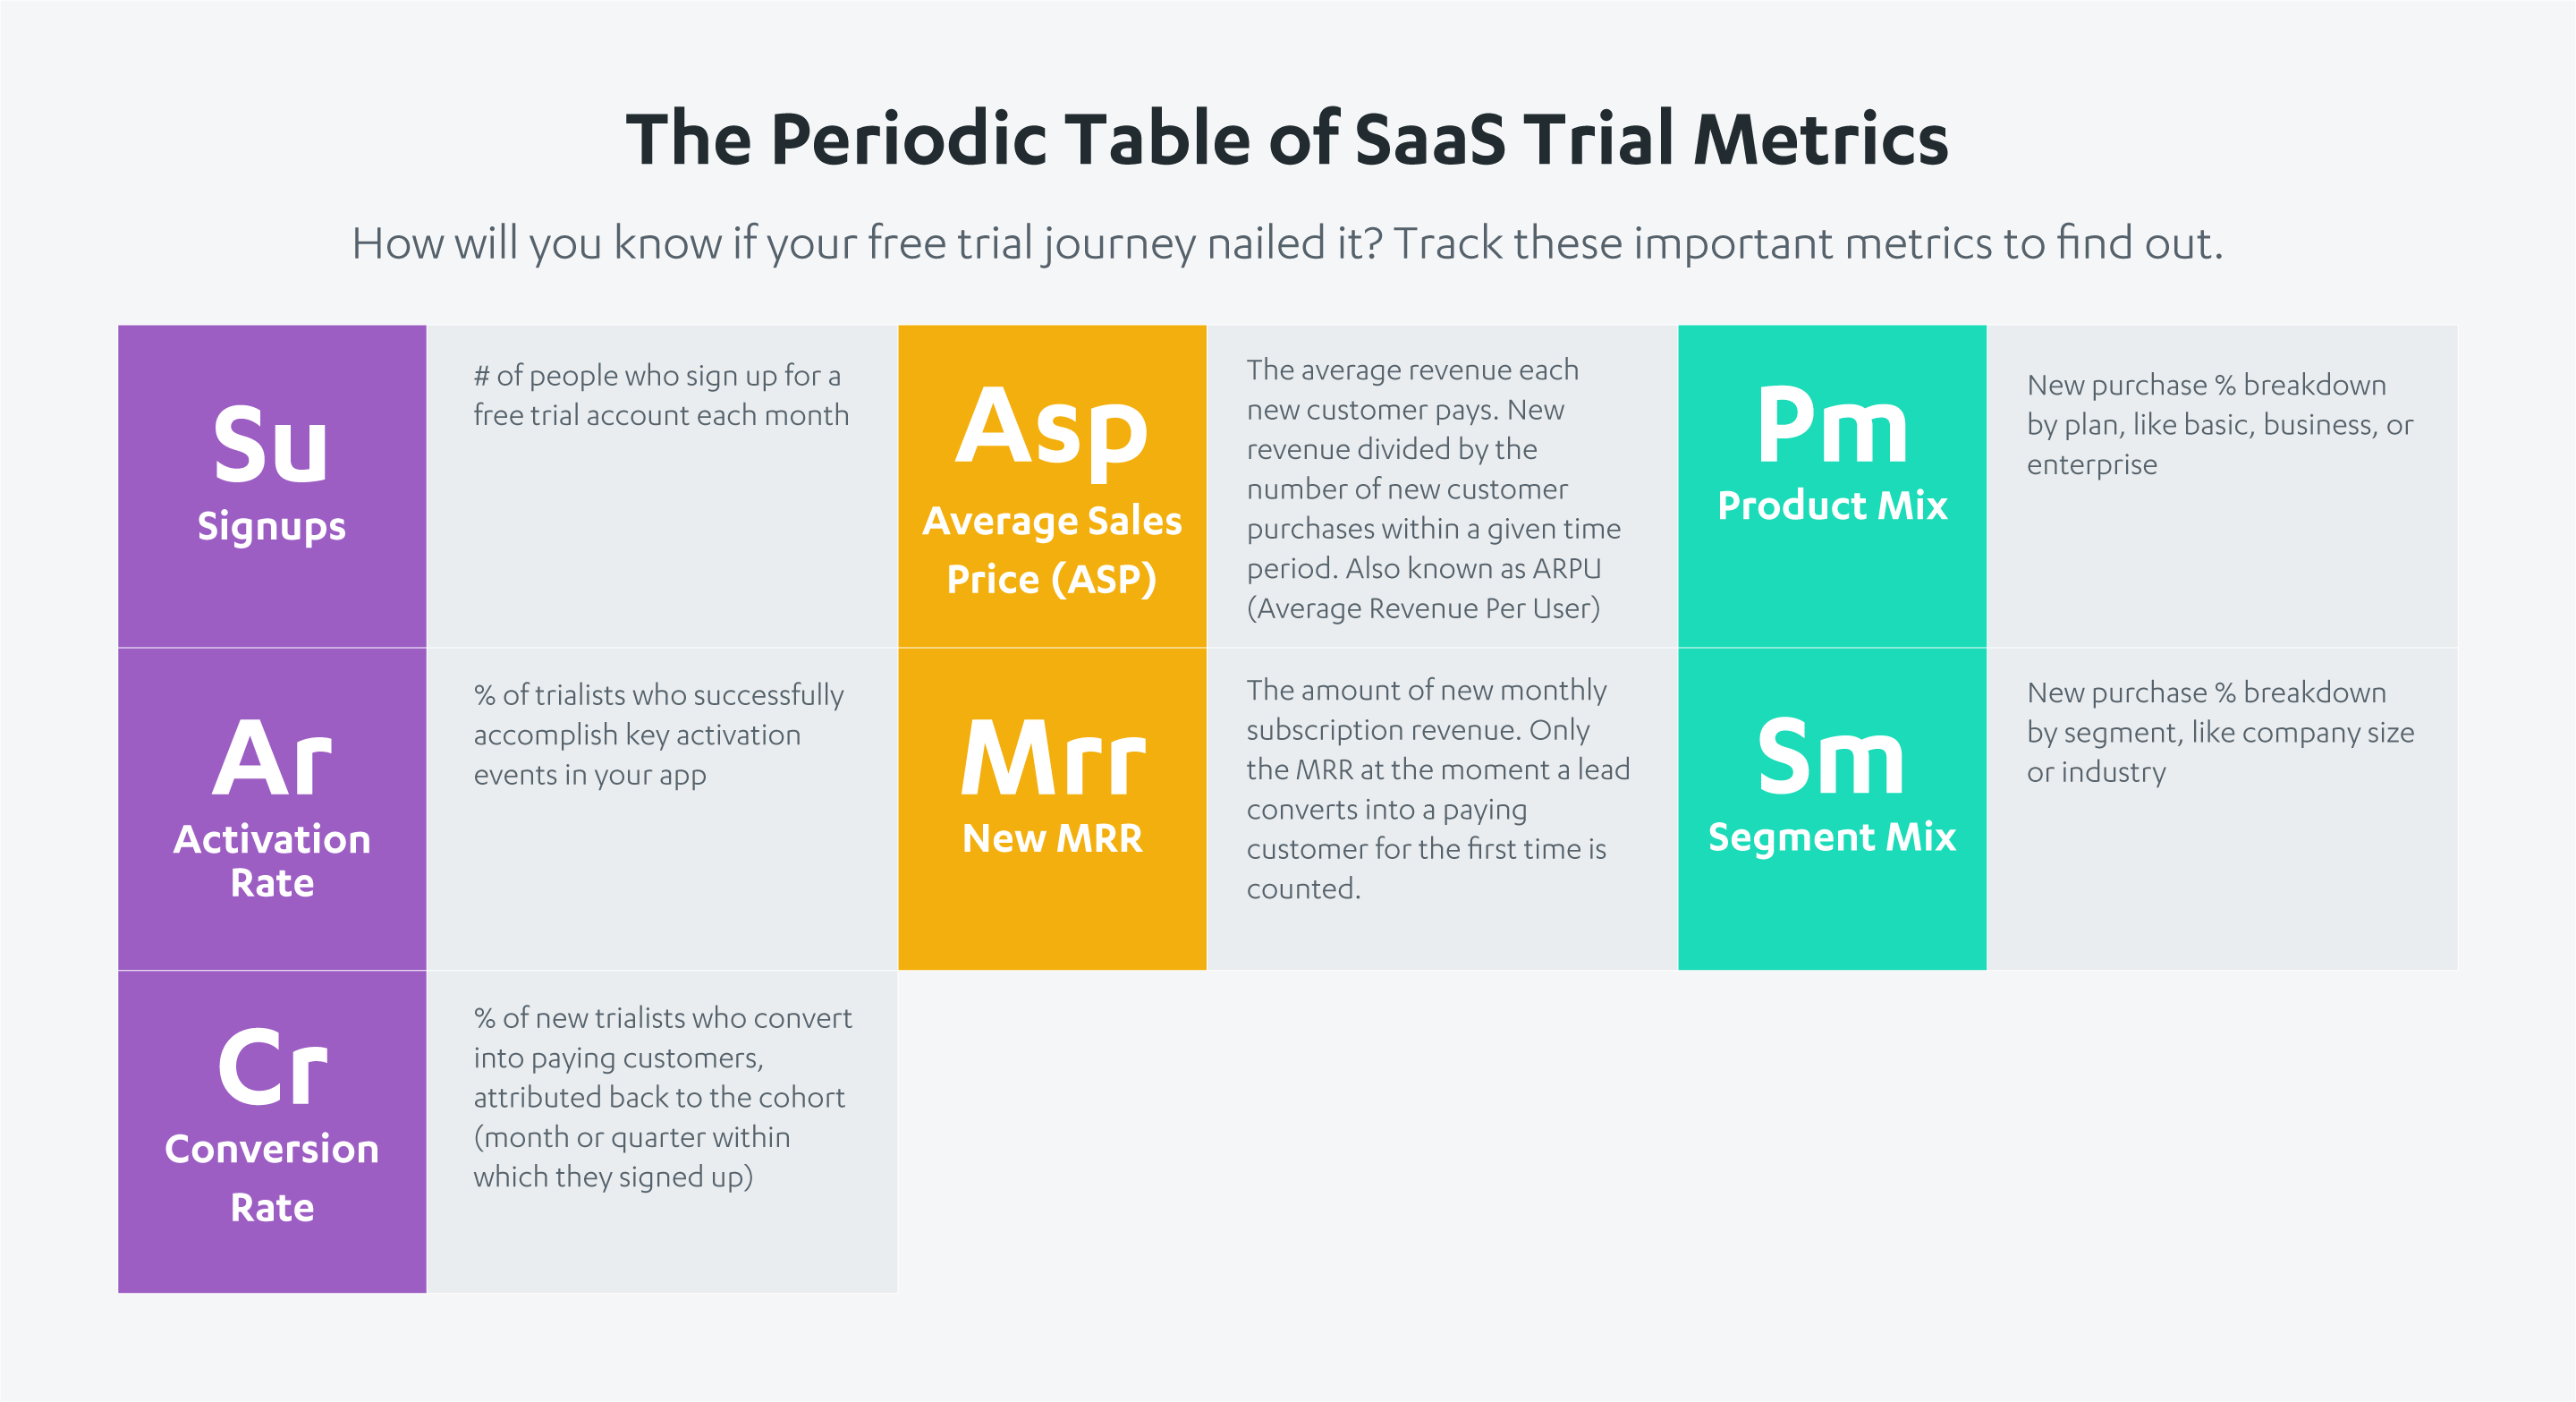
What are you trying to accomplish with your trial, and how will you know if your SaaS trial nailed it? You’ll need to track these important metrics:
- Signups: number of people who sign up for a free trial account each month
- Activation Rate: percentage of trialists who successfully accomplish key activation events in your app
- Conversion Rate: percentage of new trialists who convert into paying customers, attributed back to the cohort (month or quarter within which they signed up)
- Average Sales Price (ASP) or Average Revenue Per User (ARPU): average revenue each new customer pays. New revenue divided by the number of new customer purchases within a given time period
- New MRR: amount of new monthly subscription revenue. Only the MRR at the moment a lead converts into a paying customer for the first time is counted
- Product Mix: New purchase percentage breakdown by plan, like basic, business, or enterprise
- Segment Mix: New purchase percentage breakdown by segment, like company size or industry
Time-based free trials
A time-based free trial journey contains a series of emails (and/or in-app messages, texts, postcards) dripped through the course of a free trial, which are designed to activate and convert free trialists into paid users. It is an easy place to start if you’re beginning from scratch, helps you get baseline conversion data fast, and can be quickly updated.
Below we walk through how to build a time-based free trial in Autopilot, step by step. Our example is based off of a 30-day free trial, since that’s the most common trial length. If you have a 14-day or 7-day free trial, simply adjust the delay steps, messaging, and timing accordingly.
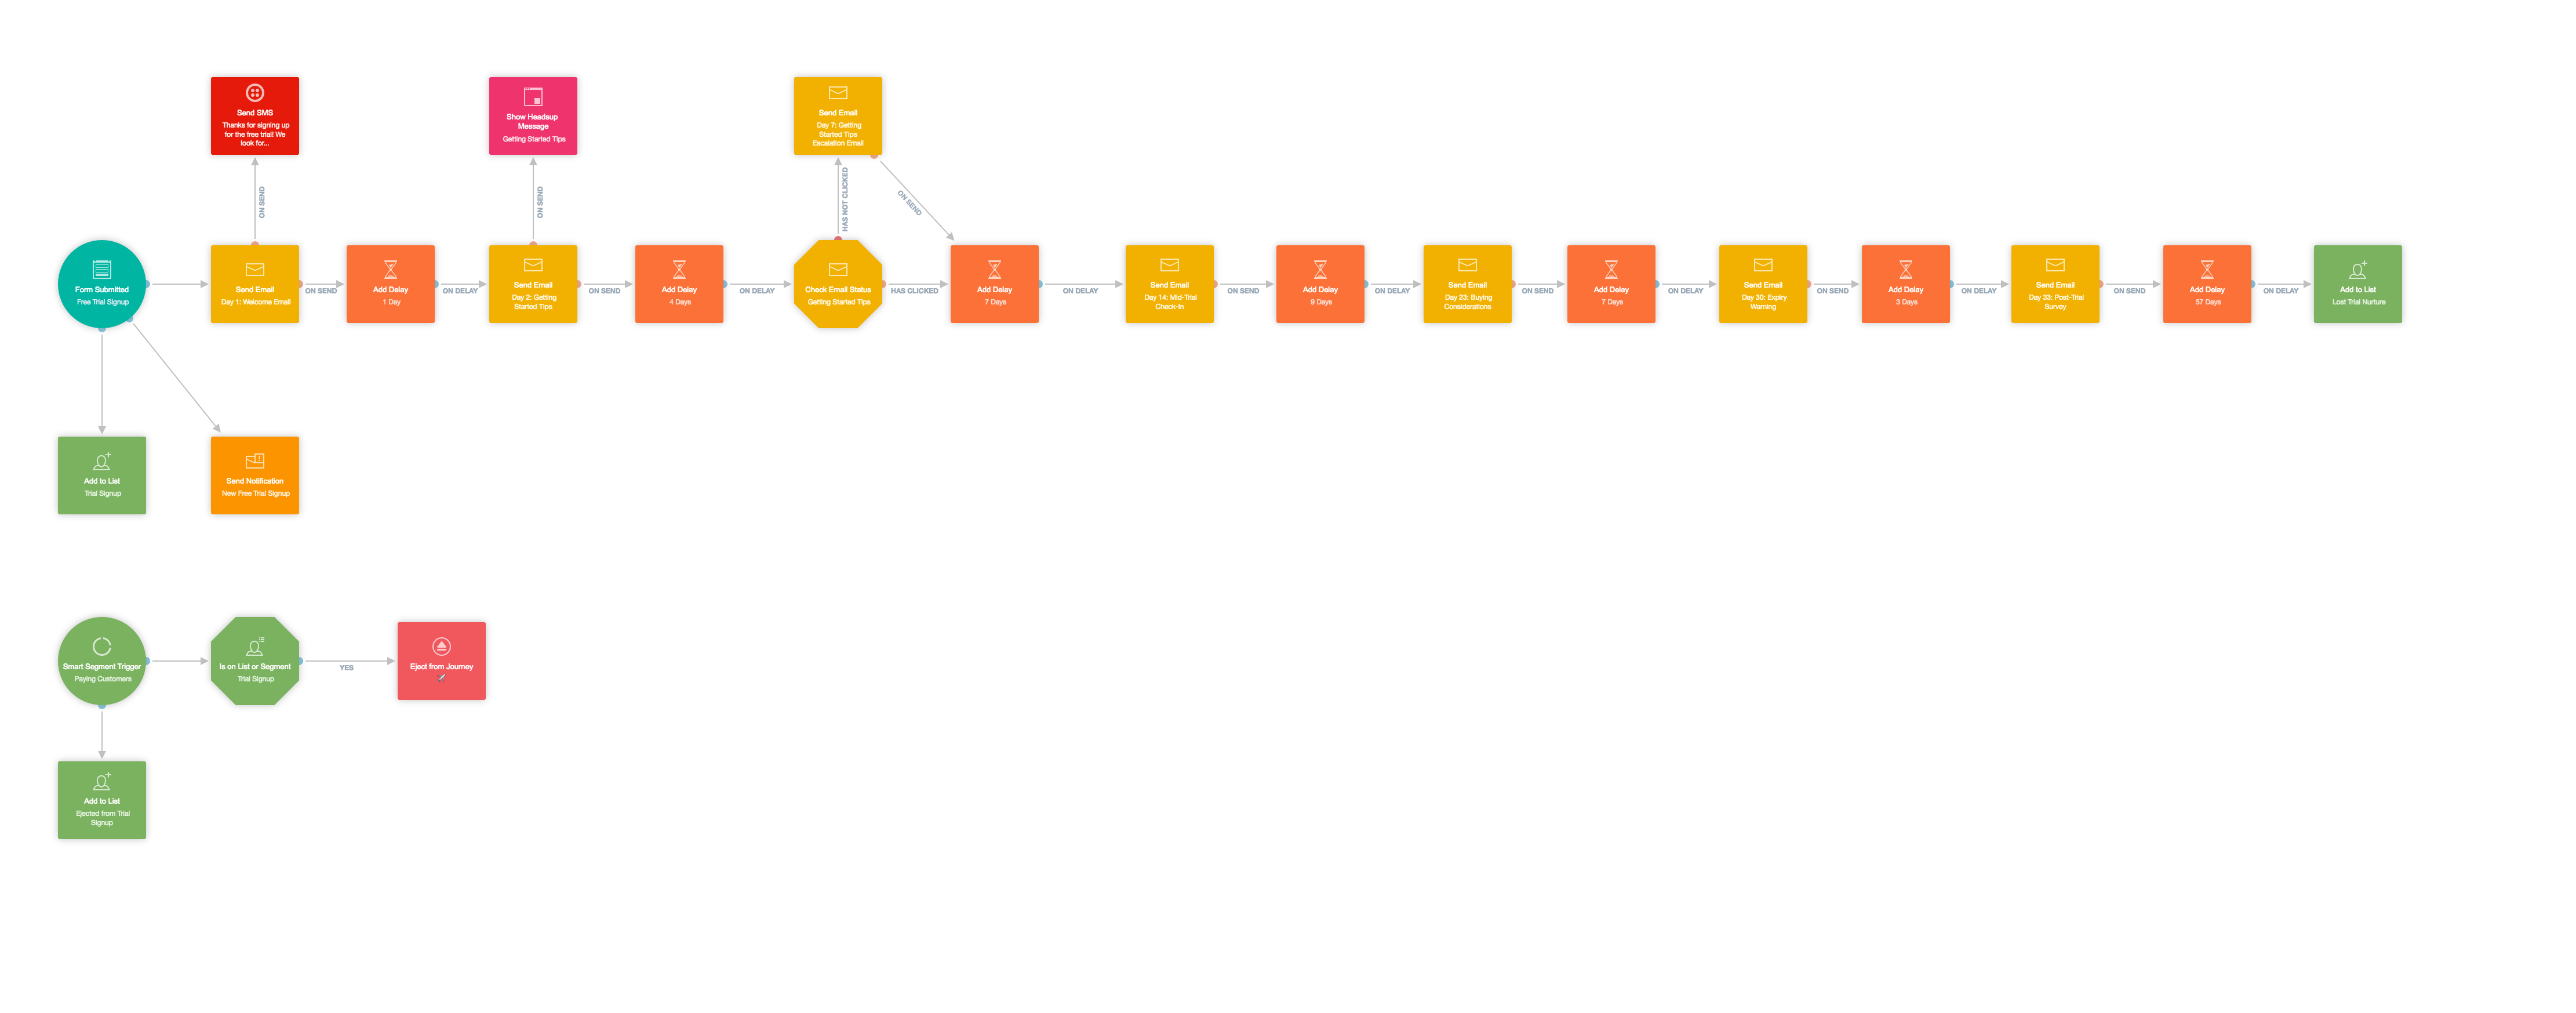
Time-based free trial journey, click to view high-res image
Here’s a breakdown of the steps:
Day 1: Welcome email, SMS message, and internal email notification
Day 2: Tips for getting started email and Headsup in-app message
Day 7: Tips for getting started escalation email
Day 14: Mid-trial check-in email
Day 23: Buying considerations email
Day 30: Expiry warning email
Day 33: Post-trial survey email
Day 90: Add to “Lost Trial Nurture” list
A time-based free trial journey contains a series of emails dripped through the course of a free trial
Day 1: Welcome email, SMS message, internal email notification
This journey triggers when a person submits the free trial signup form. Depending on how you set it up, it could also trigger off of a manually uploaded list, an automatically updated smart segment, or even a Segment event. Assuming you’ve installed the Autopilot tracking code, the “Form Submitted” trigger is your best bet.
Once a person signs up for a free trial, four things happen immediately:
- The user is added to the “Trial Signup” list
- The user receives a welcome email
- The user receives an SMS message
- Your team receives an email notification to celebrate the new signup
After a free trial form is submitted, trigger an email follow up, SMS message, team notification, and add the contact to a list (click to view high-res image)
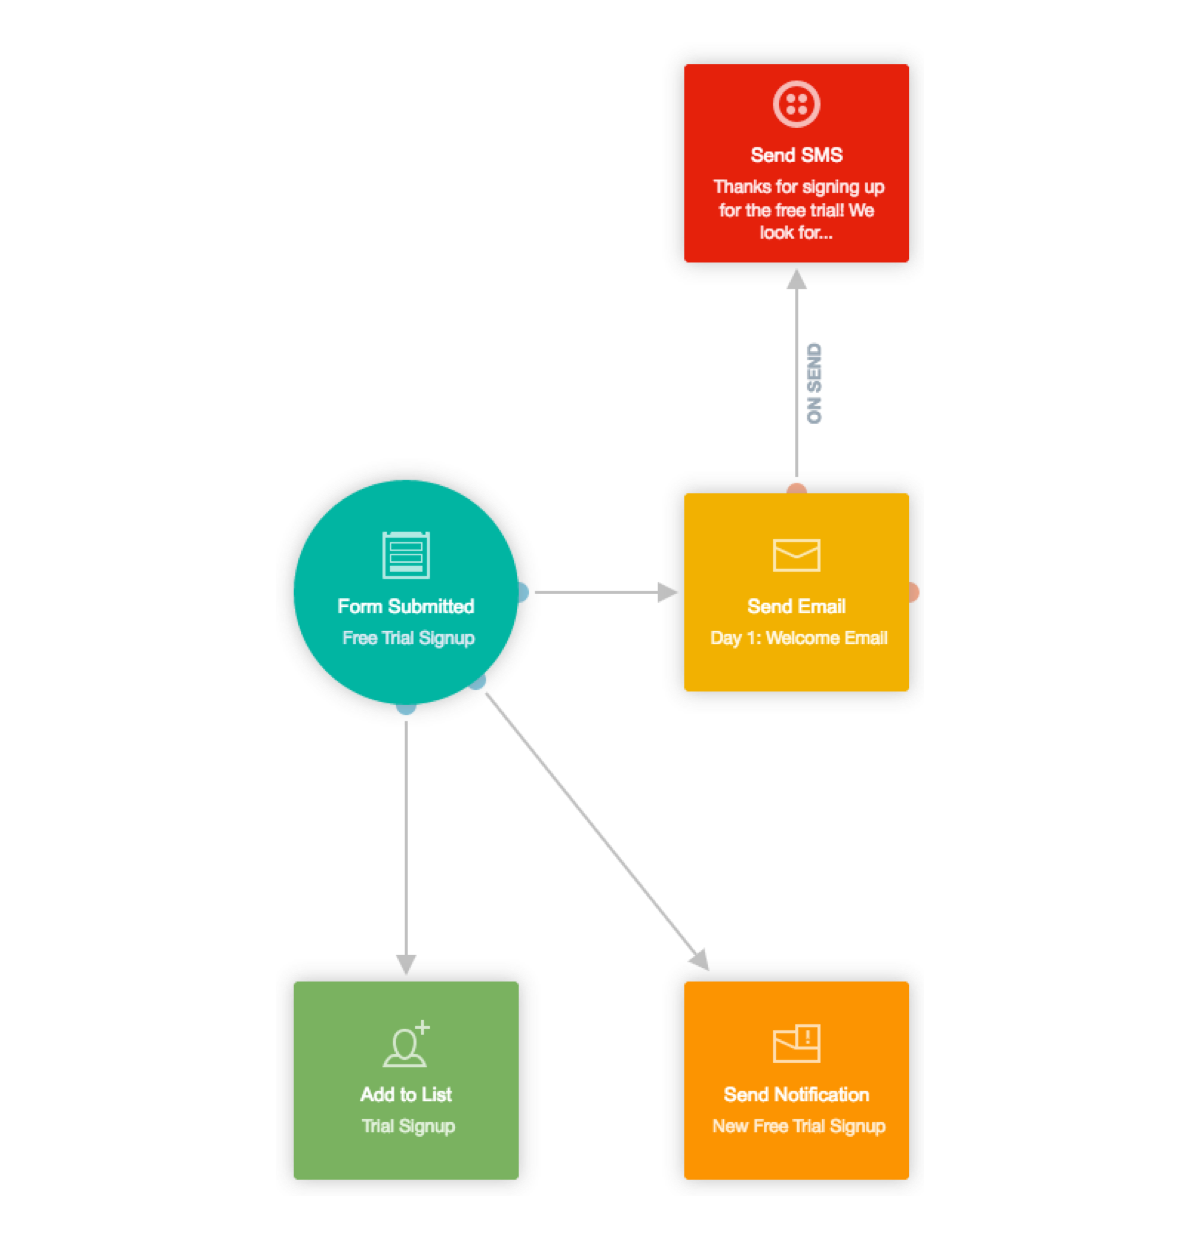
1. The user is added to the “Trial Signup” list
The “Trial Signup” list is your master record for all free trial signups. Later, you’ll use this list as a final condition check before ejecting contacts from this journey. (More on that later.)
2. The user receives a welcome email
Send an email immediately after a new user signs up that makes them feel welcomed and encourages them to log in.
Squarespace takes a direct approach in its welcome email to ensure users can immediately find their website URL, login details, and account settings. The email also exemplifies their people-centric, trusted advisor approach by using a photo of their actual employees.
Squarespace sends this welcome email to trialists
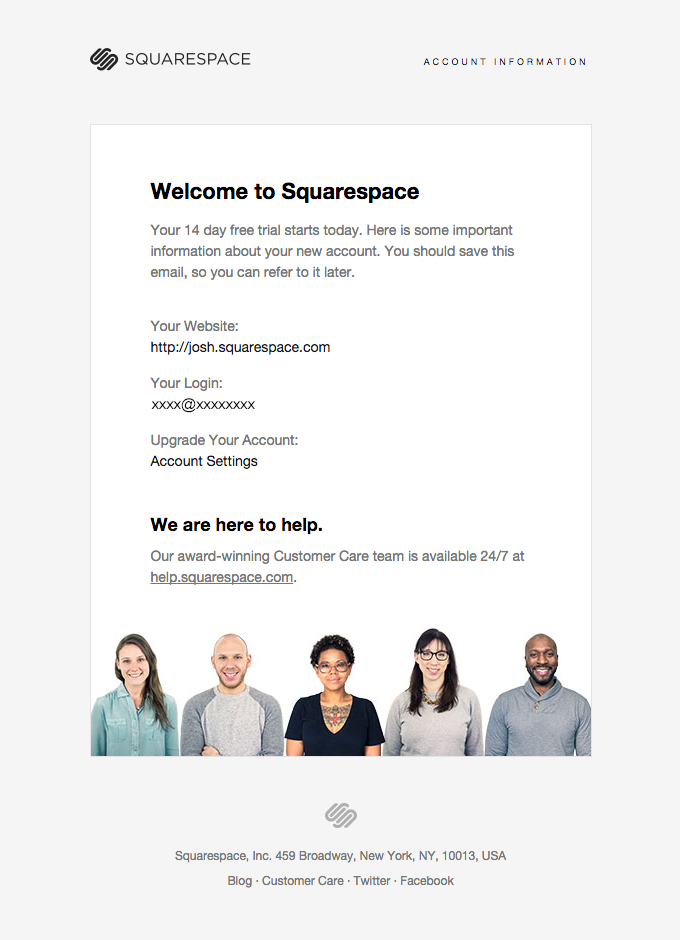
The takeaway? Inject humor, a friendly face, or simply give direct access to key account information in your welcome email.
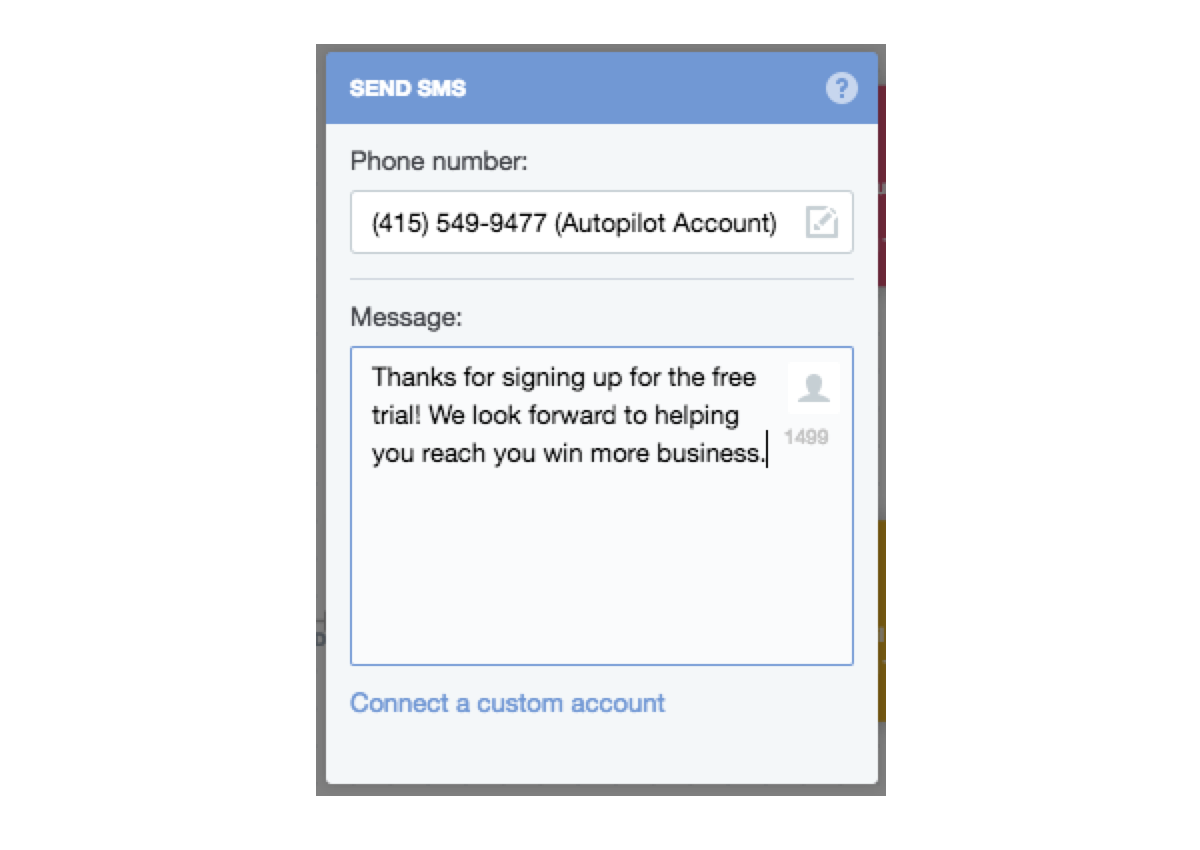
3. The user receives an SMS message
Add a welcome SMS message to your time-based free trial to establish a more personal connection. When writing the message, stick to a welcoming, friendly tone.
Send free trialists an SMS welcome message to establish a more personal connection
4. Your team receives an email notification to celebrate the new signup
New signups call for celebration. Set up an email notification to alert your team every time a free trial comes through.
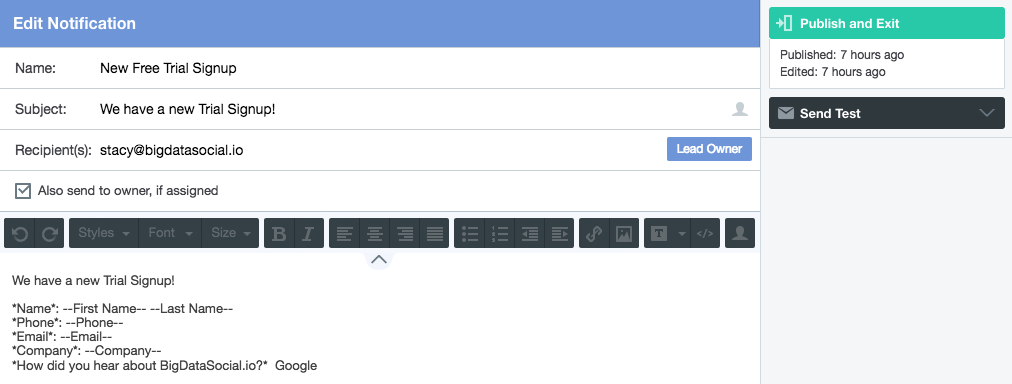
Send an internal notification to alert your team every time a free trial comes through
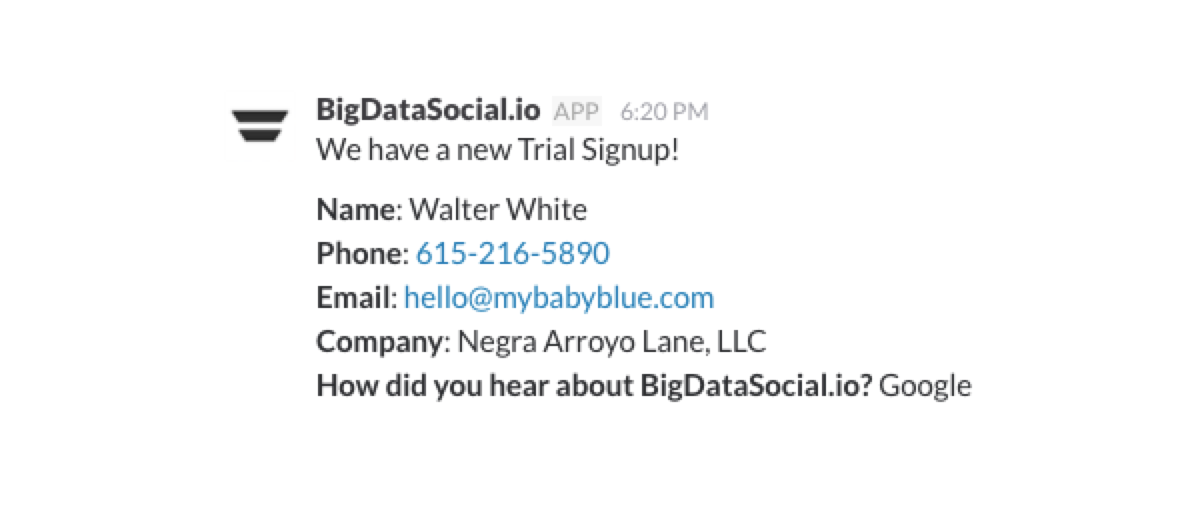
If you want to keep your inbox zero streak going, roll with a Slack notification instead.
You can send internal notifications via email or Slack
Day 2: Tips for getting started email and Headsup in-app message
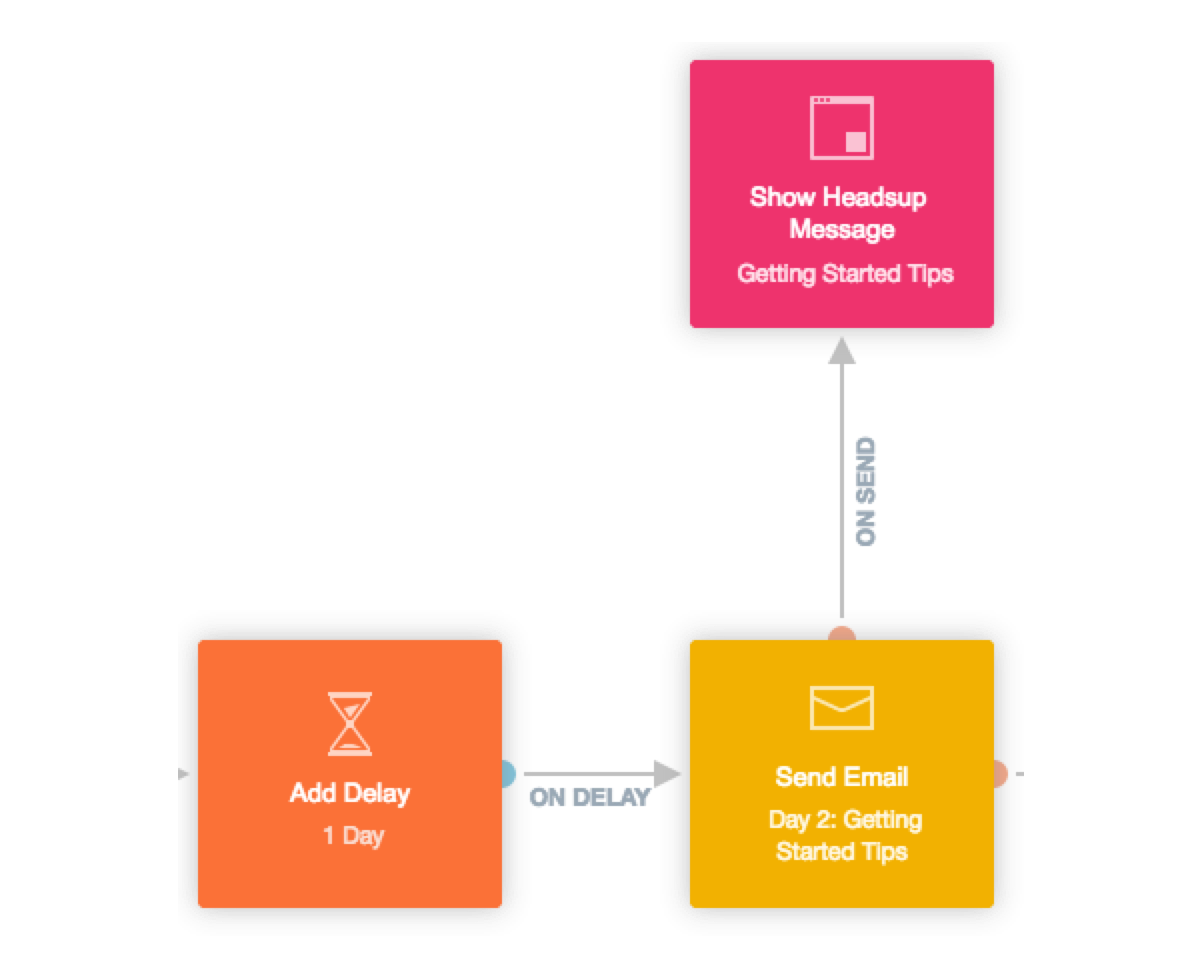
After a one-day delay, send a “Getting Started Tips” email and display a Headsup message.
Following the delay action, automate your Day 2 email and Headsup message
Show users the exact steps needed to gain value from your product. For example, GoodReads takes a prescriptive 1-2-3 approach to help users recognize value quickly: follow your favorite author, join a group, win a free book.
Taking a prescriptive approach, GoodReads helps users recognize value quickly
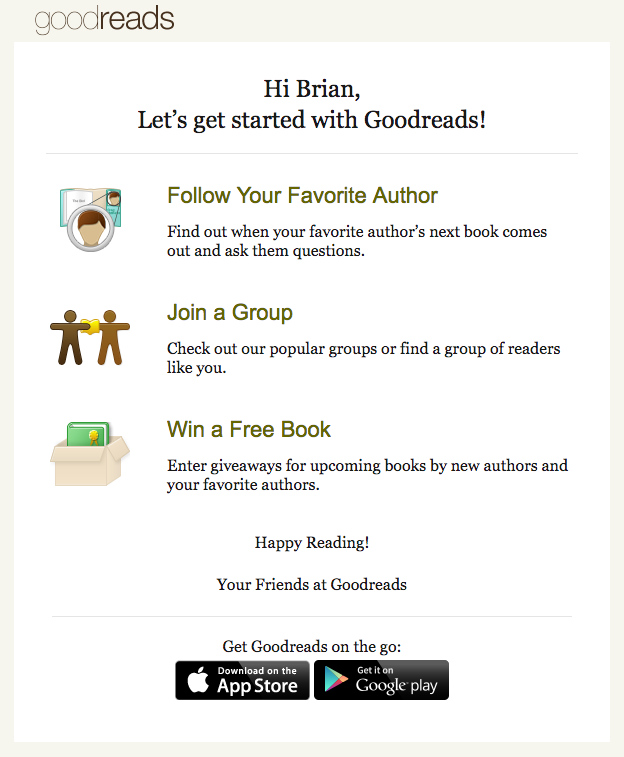
The takeaway? Ensure new users get off to a strong start by directing them to complete key actions, and linking to helpful content. This is an easy way to increase your activation rates.
Next, use a Call to Action Headsup to direct users to the same getting started tips you sent via email.
Day 7: Tips for getting started escalation email
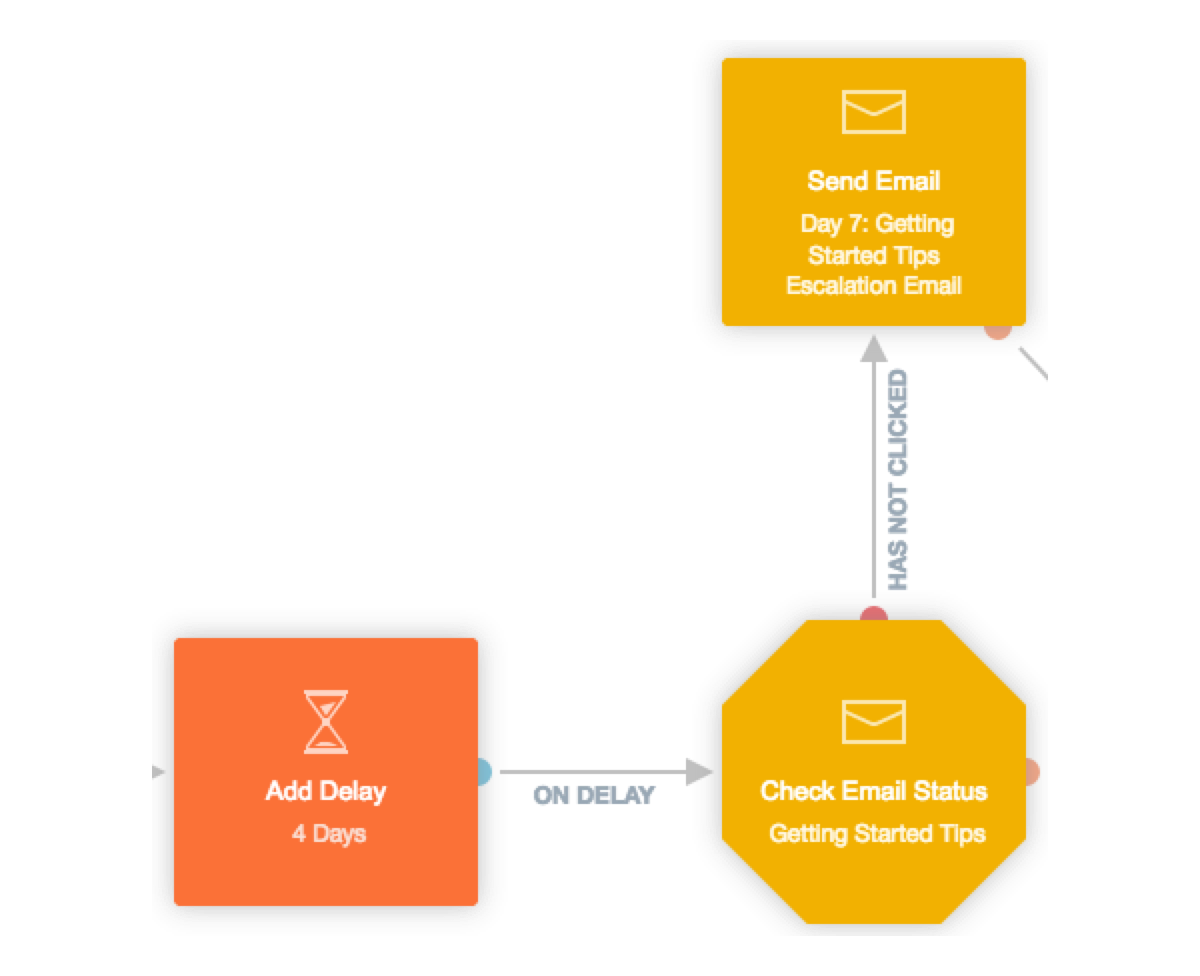
After a four-day delay, send a “Getting Started Tips” escalation email if the user has not already clicked on the original “Getting Started Tips” email.
Following a four day delay, check if the previous email has been clicked, then automate another email touch
The goal hasn’t changed. You still want to help users become successful with your product.
Common getting started tips approaches include:
- Give actionable best practices (e.g., here’s the 1-2-3 of how to get the most out of your account)
- Direct users to a specific in-app pages (e.g., your “Manage Users” page)
- Invite users to an orientation demo (e.g., a 30-minute crash course on how to share documents and collaborate between teams)
- Link to specific help center articles or blog posts (e.g. how to invite a user from outside your company)
The key here is to emphasize the events that increase the likelihood of trialists becoming customers. For example: At Autopilot, free trialists who install our tracking code are 70% more likely to buy than those who don’t. This step is mission-critical for users to see value in the product, leading to higher adoption rates.
Day 14: Mid-trial check-in email
After a seven-day delay, send a mid-trial check-in email. The delay begins after a condition check reveals either the “Getting Started Tips” escalation email has sent or the original “Getting Started Tips” email has been clicked.
Following a seven day delay, send a mid-trial check-in email
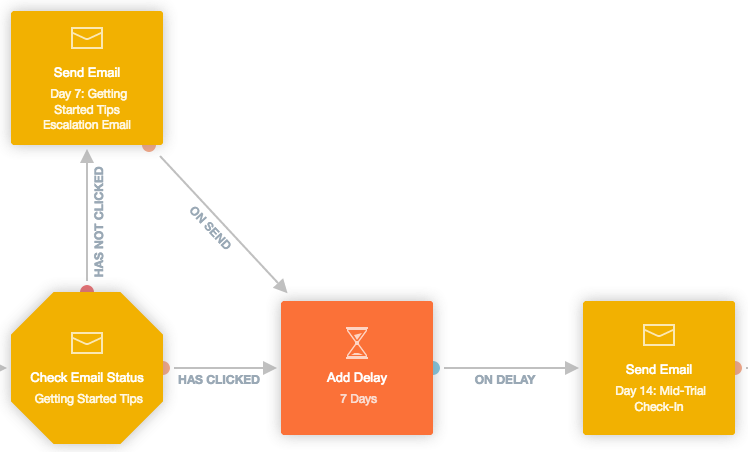
The mid-trial check-in email gives trialists a bird’s-eye view of their usage.
Salesforce, the CRM giant, pioneered this tactic in the mid-2000s with their personalized account review emails. The company injected feature usage into roll-up fields and linked to online resources for users to explore.
Modern day SaaS vendors mimic this model with highly clickable and much appreciated usage summary emails, which are easy to pull off with tools (like Segment) that sync events into automation systems.
Zendesk takes this email to another level by including aggregated data to benchmark performance against relevant peer groups:
A Zendesk email that includes aggregated data to help users benchmark their performance
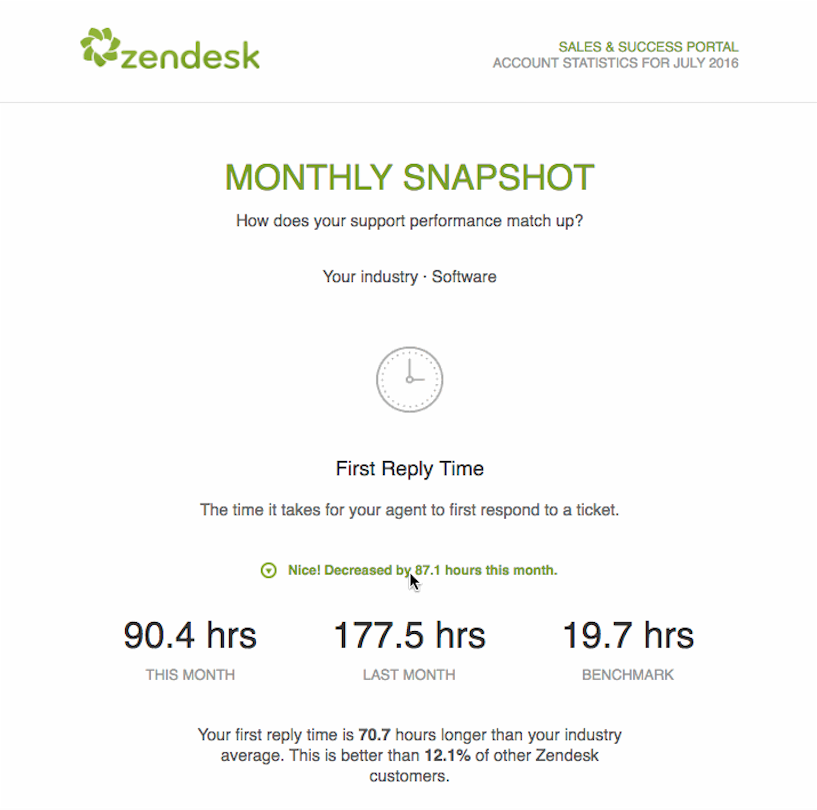
Notice the three highlighted metrics, which are followed by a short human-readable statement that summarizes how the user fares against other Zendesk customers. These data points encourage slow starters to ramp up their customer service efforts, while giving top performers a pat on the back.
Day 23: Buying considerations email
After a nine-day delay, send a buying considerations email.
Following a nine day delay, automate an email that helps trialists make a purchasing decision
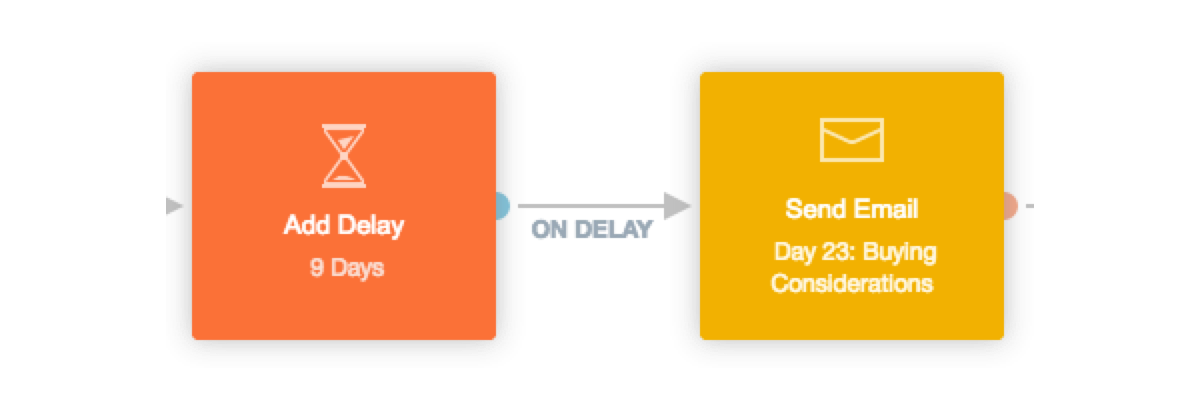
The buying considerations email helps trialists decide whether to upgrade. Remember, the trial is almost over—so you need to address lingering obstacles. Here are a few options to consider:
- Make the business case for your software. If you can prove your product leads to a positive ROI, moving forward with the purchase should be a no-brainer.
- Help them help you. Is your free trialist the decision maker? If not, empower them to communicate your product’s value to their boss.
- Share a customer success story. You want trialists to hear your existing customers’ stories and say, “That could be me! I want to use this product.”
- Link to your online reviews. Let your G2 Crowd and GetApp reviews do the work for you. Potential buyers will see the good, the bad, and the ugly from verified users.
The end of your time-based free trial is near. Put yourself in your user’s shoes, and provide them with what they need to seal the deal.
Day 30: Expiry warning email
After a seven-day delay, send an expiry warning email.
Following a seven day delay, automate an email that informs the user about their trial expiration
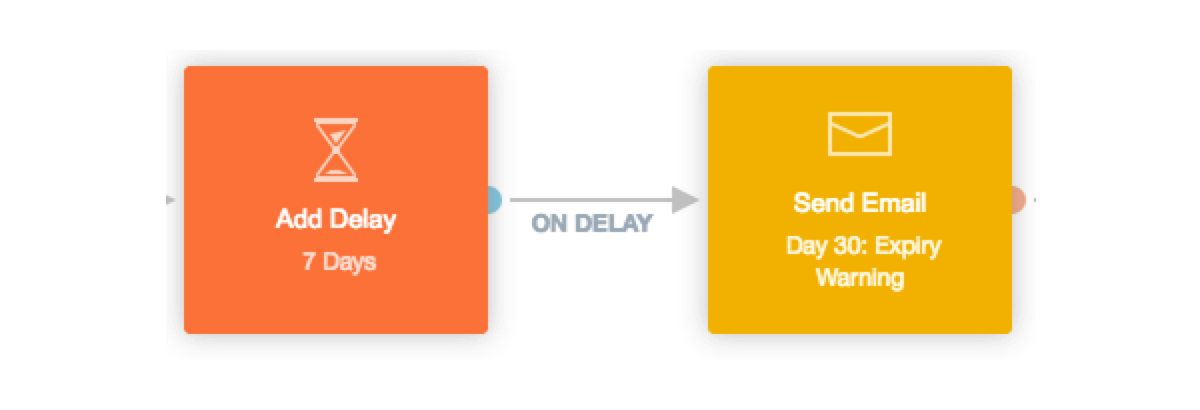
The expiry warning email informs users their trial is ending, but also acts as a reminder to buy. This email could be the clincher between a lost trialist and a paying customer.
Basecamp, the popular project management tool, pings users five days before their 45-day free trial expires:
Follow Basecamp's example when crafting an expiry warning email for your trial journey
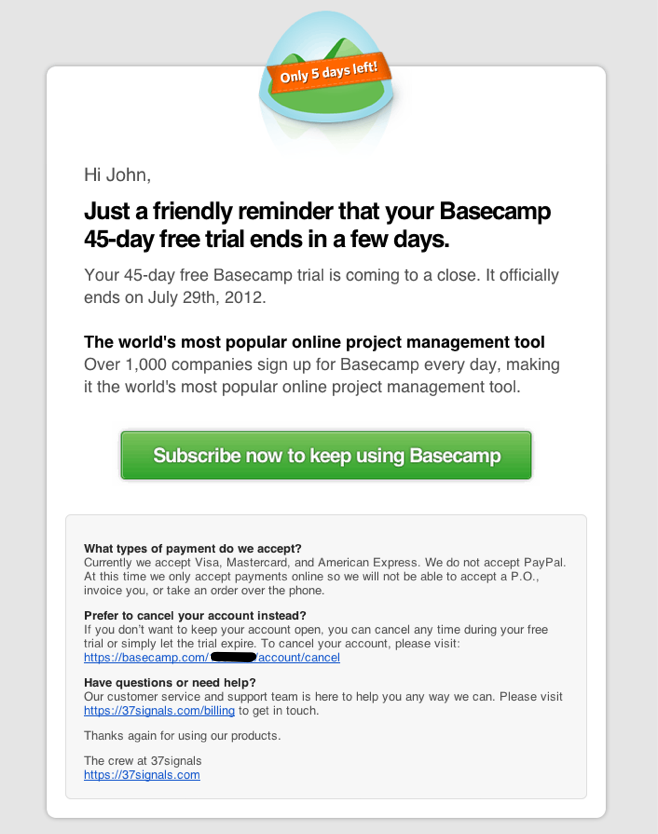
The company reminds the recipient of the length of their trial and the expiry date, giving active trialists a deadline for subscribing and inactive trialists an opportunity to request an extension. The green (non-urgent) call-to-action button is center-aligned below the reinforced value prop and is impossible to miss. Finally, the inclusion of FAQs helps proactively address common concerns.
Day 33: Post-trial survey email
After a three-day delay, if the trialist still has not converted into a paid user, send a post-trial survey email.
Following a three day delay, automate a post-trial survey if the contact did not convert
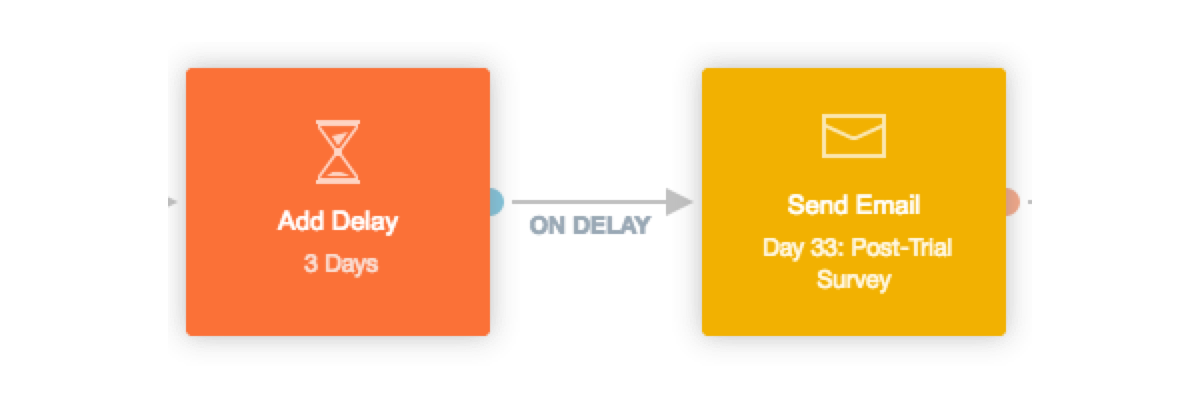
This email links to a survey, which collects information about why the trialist didn’t buy, helps you understand how you can make your product or trial experience better in the future. Be sure to use a thankful tone in the copy.
Here’s the feedback survey we send at the end of our trial:
Autopilot's post-trial survey email
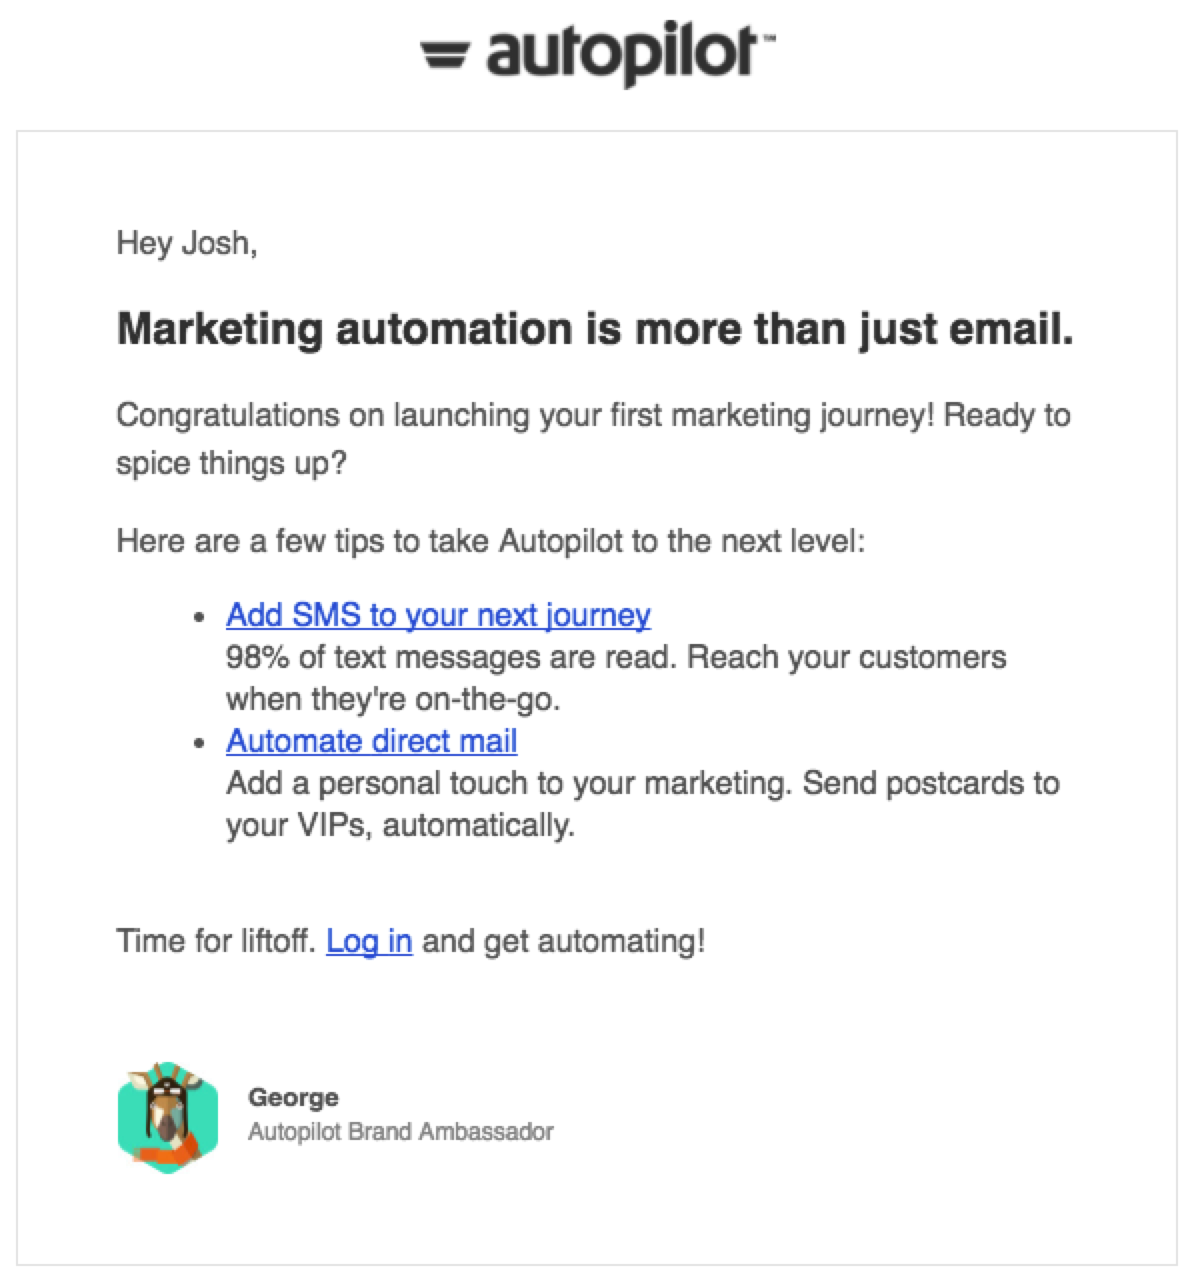
This succinct, text-based email is sent from our product marketing manager and links to this feedback survey:
Autopilot's post-trial survey
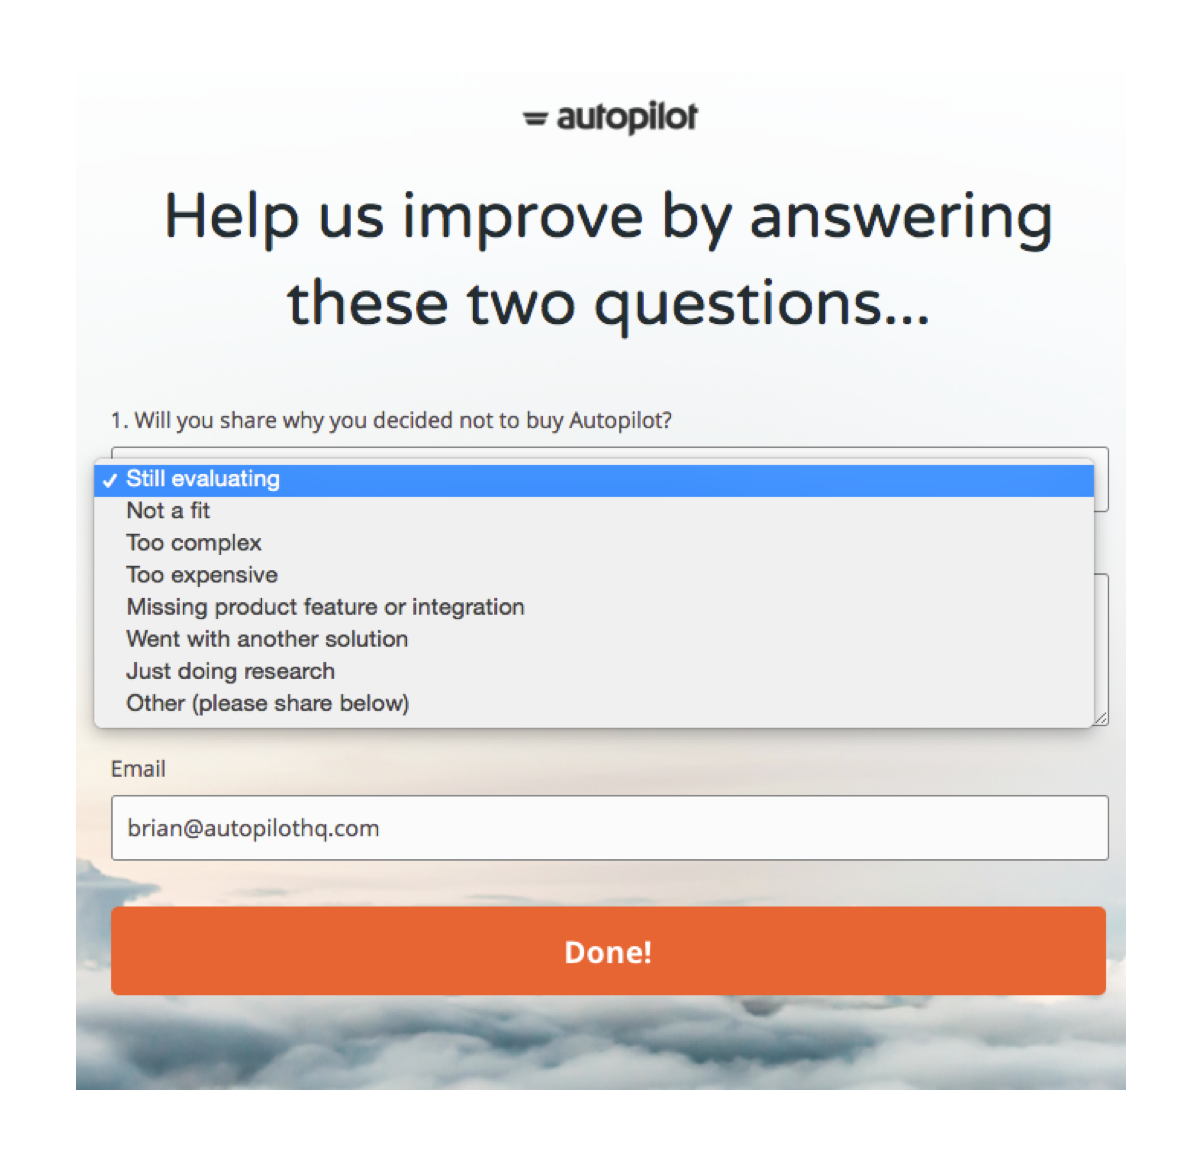
We found that 27% of our expired trialists don’t buy because they’re still evaluating their options. Based on their feedback, we send an automated response to either set up a call with sales or nudge them back into the product.
Once you know why your trialists don’t purchase, the next step is to address the reasons with strategic, automated messages.
Start with this list:
- Still evaluating → Offer a trial extension
- Not a fit → Drop into nurture
- Too complex → Schedule a customer success call
- Too expensive → Provide a one-time discount
- Went with another solution → Send top of funnel lead nurturing emails to stay top of mind when the other service doesn’t work out
- Just doing research → Add to nurture (notice the nurturing trend?)
- Missing product feature or integration → Update your product roadmap, let the expired trialist know when it’s live
Day 90: Add to “Lost Trial Nurture” list
After 57 days, add the person to a “Lost Trial Nurture” list.
Following a 57 day delay, add the contact to a list of lost trialists to nurture
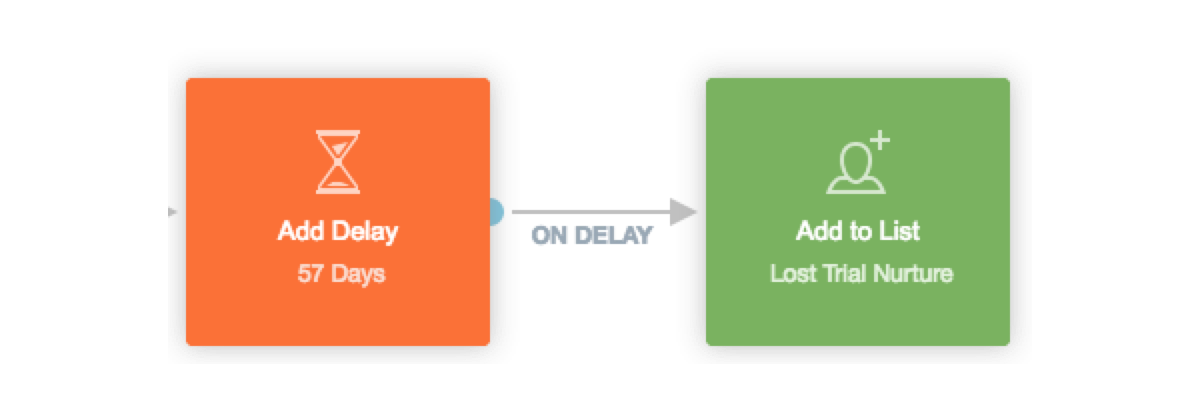
This delay provides enough time for expired trialists to come back and buy before you place them into a lead nurture journey. Users will feel bombarded if you start sending nurture emails immediately after their trial ends (or even at the 60-day mark).
A good rule of thumb is to multiply your trial length by three, then wait that many days before you begin nurturing lost trialists:
- 30-day trial → start nurturing at 90 days
- 14-day trial → start nurturing at 52 days
- 7-day trial → start nurturing at 21 days
Once users are added to the list, your time-based free trial is done. There’s only question left to answer…
How do I eject a paying customer from the free trial?
If a free trialist converts into a paying customer at any point during the 30-day free trial, do you want them to keep receiving your time-based emails? Definitely not. Imagine the awkward conversation if a user receives a buying considerations email after already buying.
The dreaded oops email
To eliminate this dreaded “oops” email, eject paying customers from the journey.
To eliminate the dreaded oops email, eject paying customers from your trial journey
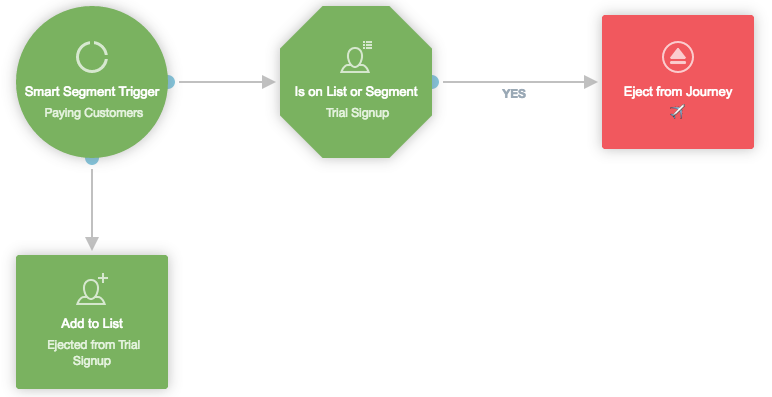
Trigger the ejection with a smart segment that tracks your paying customers, then add them to the “Ejected from Trial Signup” list. From there, double check if the paying customers are on the “Trial Signup” list to limit the ejection to this specific journey. If they are on the list, paying customers will advance to the eject from journey shape… and voilà—no more “oops” emails.
Time-based free trial recap
Let’s zoom back out. The time-based free trial is made up of a series of messages to introduce users to your product, walk them through the buying process, and get their feedback if they don’t buy.
Now it’s time to cover a more advanced approach—creating a time- and usage-based free trial that’s tailored to your product experience.
Time- and usage-based free trials
This type of trial combines time and usage to create a personalized free trial journey for every user. It’s a natural next step once you’ve mastered the time-based approach. Plus, it opens the door to targeted messaging based on how trialists are using (or not using) your product.
Here’s how to create a time and usage-based free trial in Autopilot:
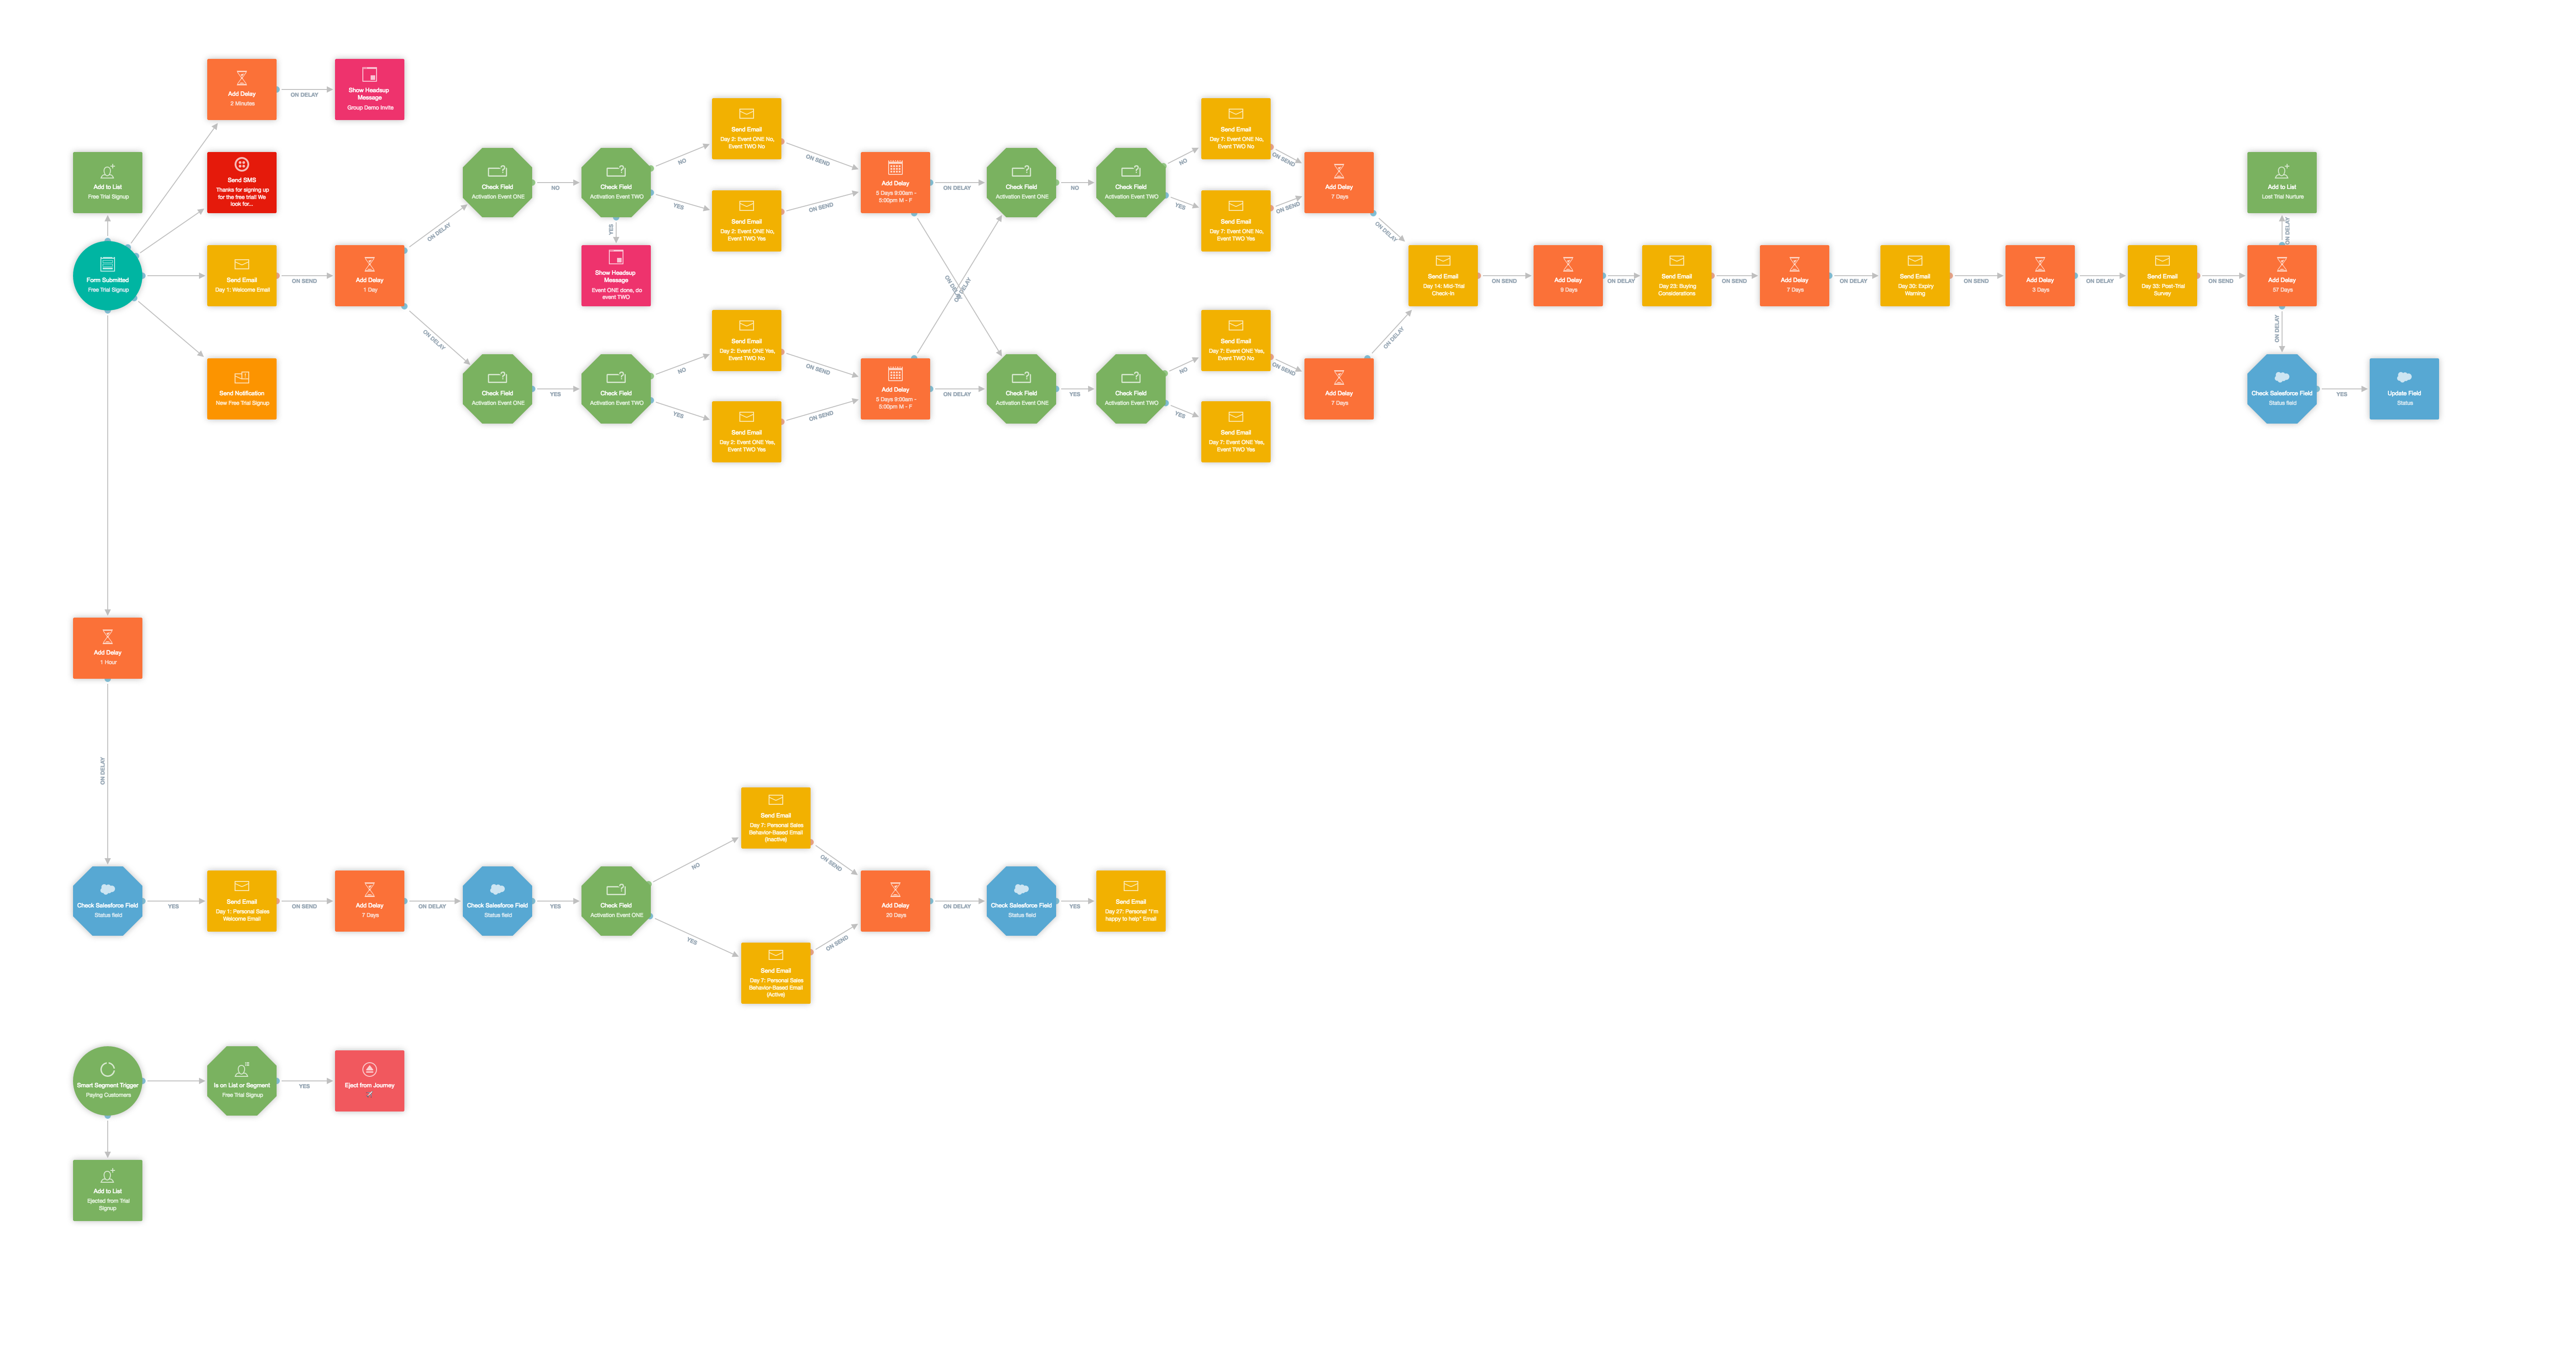
Time- and usage-based free trial journey, click to view high-res image
In this example, we’ll work with the existing time-based free trial structure, and simply add usage to the equation.
You’re in for a treat! This journey includes a sales outreach track to add a human touch to your trial experience. If you’re running a bottoms-up SaaS startup with a self-service business model, you can throw out the sales track and just add behavior-based emails for your key activation events.
Here’s a breakdown of the steps (without sales outreach):
Day 1: Welcome email, SMS message, internal email notification, Headsup message
Day 2: Condition check, behavior-based emails (round one), Headsup message
Day 7: Condition check, behavior-based emails (round two)
Day 14: Mid-trial check-in email
Day 23: Buying considerations email
Day 30: Expiry warning email
Day 33: Post-trial survey email
Day 90: Add to “Lost Trial Nurture” list, check Salesforce field, update field
With the time-based free trial in mind, you’ll notice three differences:
- Day 1 has an added Headsup message
- Days 2 and 7 “Getting Started Tips” emails were replaced with behavior-based emails
- Day 90 now checks and updates the lead status in Salesforce
Everything else is the same. Easy peasy.
The usage-based emails come into play on days 2 and 7. While it may seem like a minor change, personalized content is known to yield 4x the results.
Now, let’s add the sales outreach track into the mix.
Here’s a breakdown of the steps (with sales outreach):
Day 1: Welcome email, SMS message, internal email notification, Headsup message, personal sales welcome email
Day 2: Condition check, behavior-based emails (round one)
Day 7: Condition check, behavior-based emails (round two), behavior-based personal sales email
Day 14: Mid-trial check-in email
Day 23: Buying considerations email
Day 27: Personal “I’m happy to help” email
Day 30: Expiry warning email
Day 33: Post-trial survey email
Day 90: Add to “Lost Trial Nurture” list, check Salesforce field, and update field
Day 1: Welcome email, SMS message, internal email notification, Headsup message, personal sales welcome email
Refer to day one of the time-based free trial for the primary messaging, then add these two elements as cherries on top:
1. Headsup message
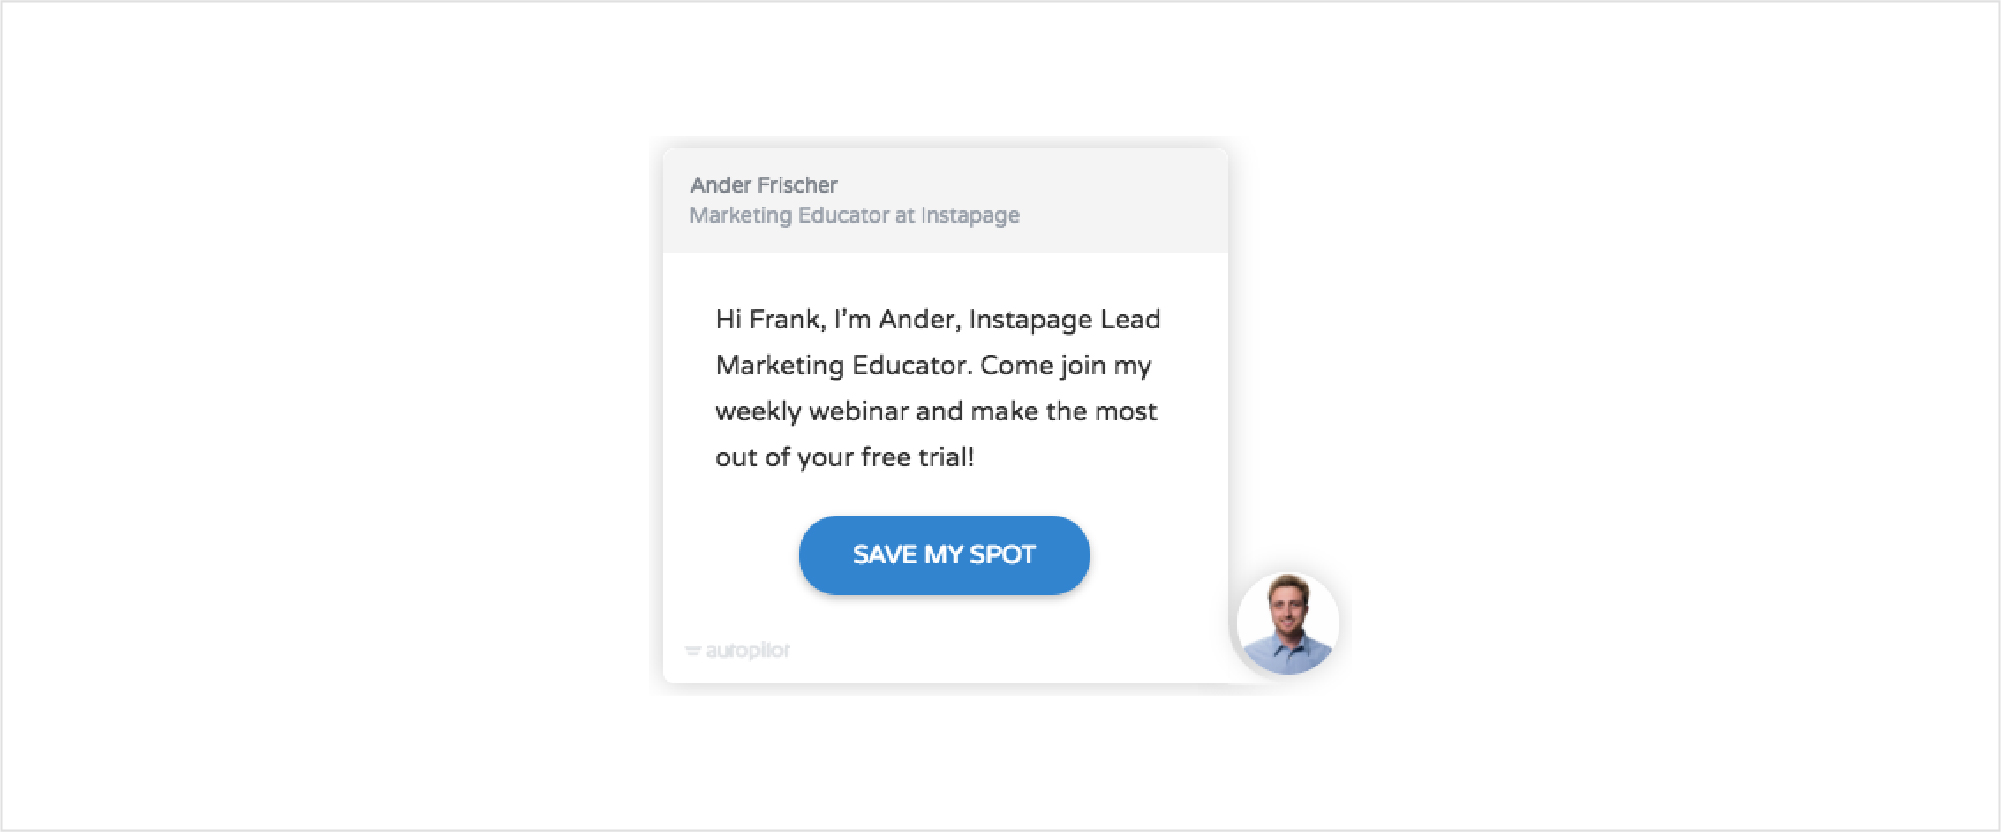
Throw an in-app message into the mix to connect with free trialists outside of their inboxes. For example, Instapage uses Headsup to invite trialists to a group demo. Since launching this in-app message, the company has seen a 30% increase in attendance rate for its weekly getting started webinar. And it only took a few minutes to set up!
Use in-app messages to connect with free trialists in a contextual way
2. Personal sales welcome email
A personal, text-based welcome email gets the conversation between your free trialist and sales team started early. Depending on the complexity of your software and the size of your the user’s organization, they may more guidance throughout their journey from lead to customer.
For Autopilot, this outreach email opens the door:
Personal, text-based welcome emails spark early conversations between sales and the trialist
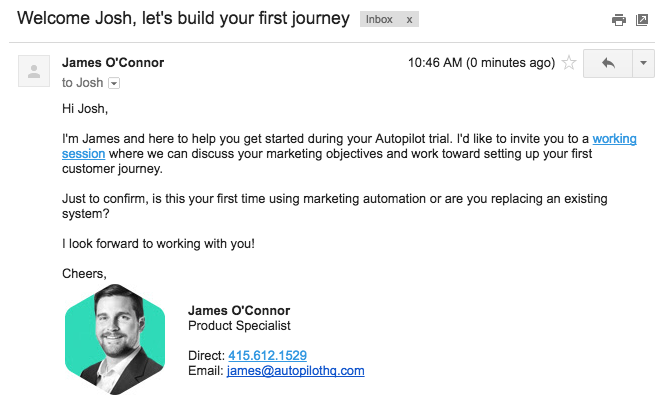
The email introduces the salesperson, invites the trialist to a working session, and asks a simple question that helps qualify the lead.
Notice the use of “working session” as opposed to “sales call”. Since modern SaaS sales is about empowerment and helping users see value by experiencing the product, “working session” makes more sense than “sales call”. The link goes right to James O’Connor’s Calendly so the trialist can autonomously schedule a time that works for them—no back and forth required.
Trialists can autonomously schedule a time with your sales rep using Calendly
Assuming the trialist responds to the question, their response helps inform the working session agenda. Try including a similar question in your sales welcome email to get the conversation going.
Finally, the photo of James adds a human touch that can’t be replicated by an HTML template. This email comes from and replies to a person—and the headshot communicates that.
Day 2: Condition check, behavior-based emails (round one)
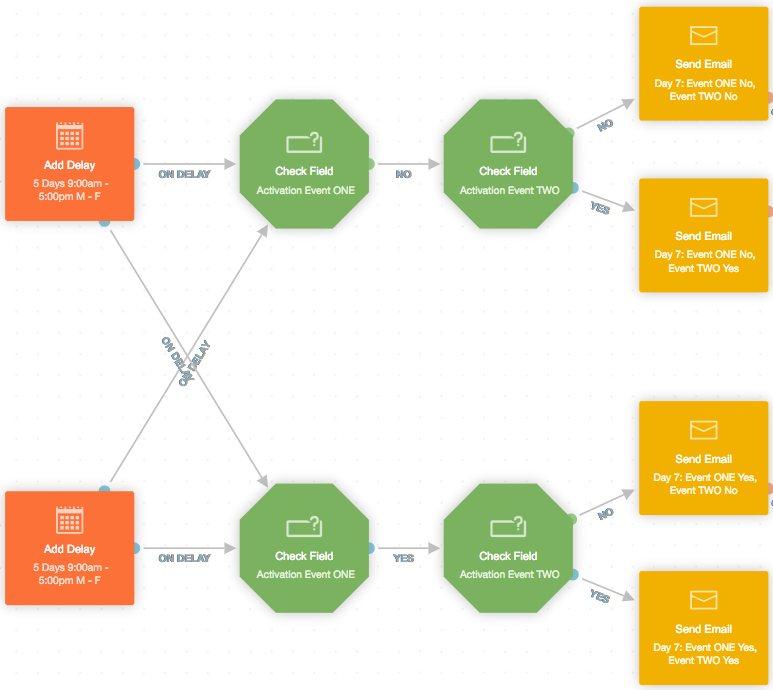
Day two is when the first usage-based element kicks in. It’s a set of behavior-triggered emails based on whether a user has completed one or both of the first two activation events.
Check whether the trialist has completed one or both activation milestones
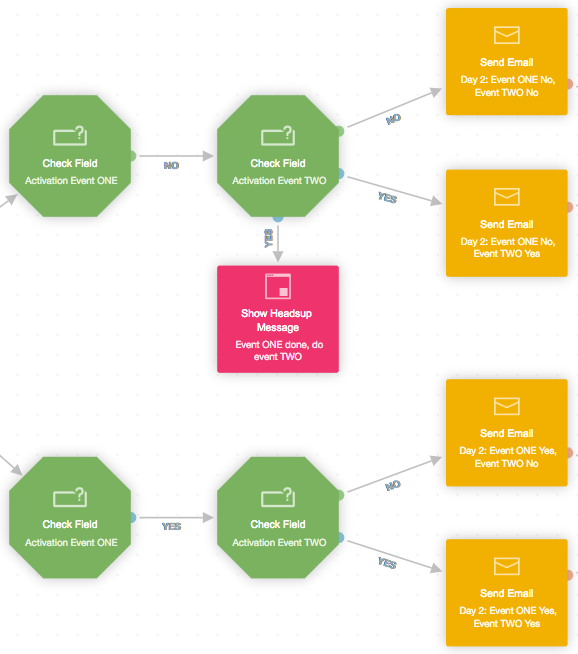
In this journey example, there are four potential activation event combinations:
- Event ONE no, Event TWO no
- Event ONE no, Event TWO yes
- Event ONE yes, Event TWO no
- Event ONE yes, Event TWO yes
After their activity has been verified, users receive a personalized email highlighting which action to take next.
So how do you choose which activation events to emphasize? Focus on the behaviors that are most likely to turn trialists into customers.
For example, if a trial user hasn’t installed your code snippet on their website, then odds are they haven’t experienced your product’s value. Remind the user to complete this key action with an email like this one:
After their activity has been verified, send users a personalized email highlighting which action to take next
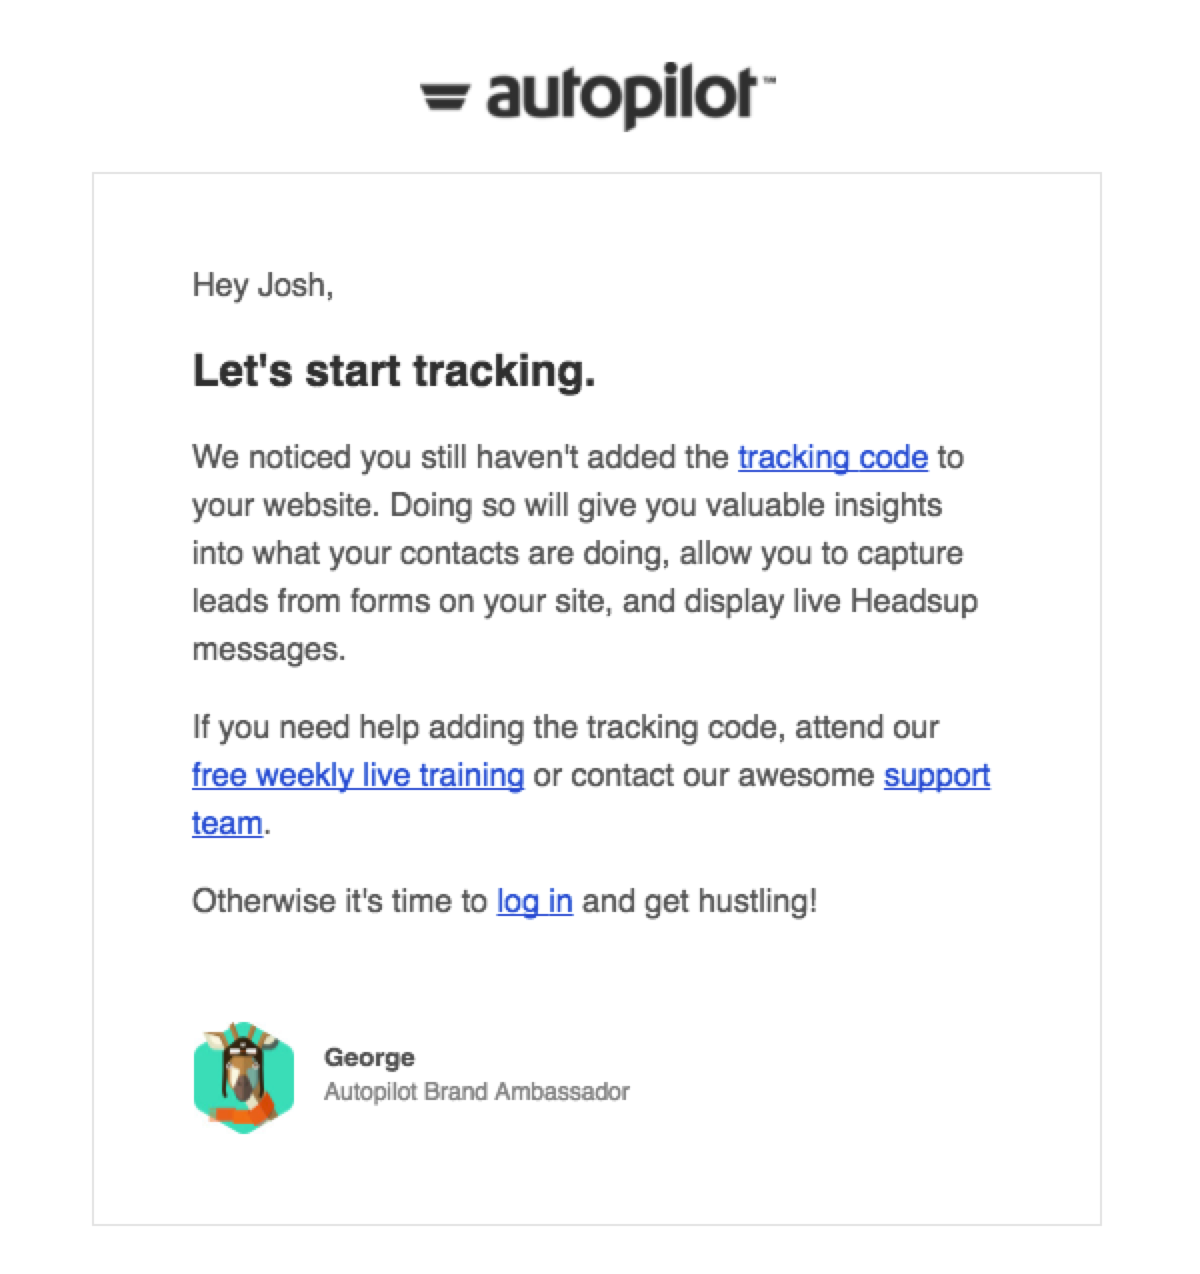
Next, choose your second key activation event. Remember: Prioritize actions that help transform trialists into customers.
Every time you add an activation event to your SaaS trial, your number of potential “completed/not completed” combinations increases. Sticking with the current two key events example, here’s the HTML-version of an email Autopilot trialists receive who have installed the tracking code but not published a journey:
Once the first activation event has been completed by the trialist, nudge them toward the next step
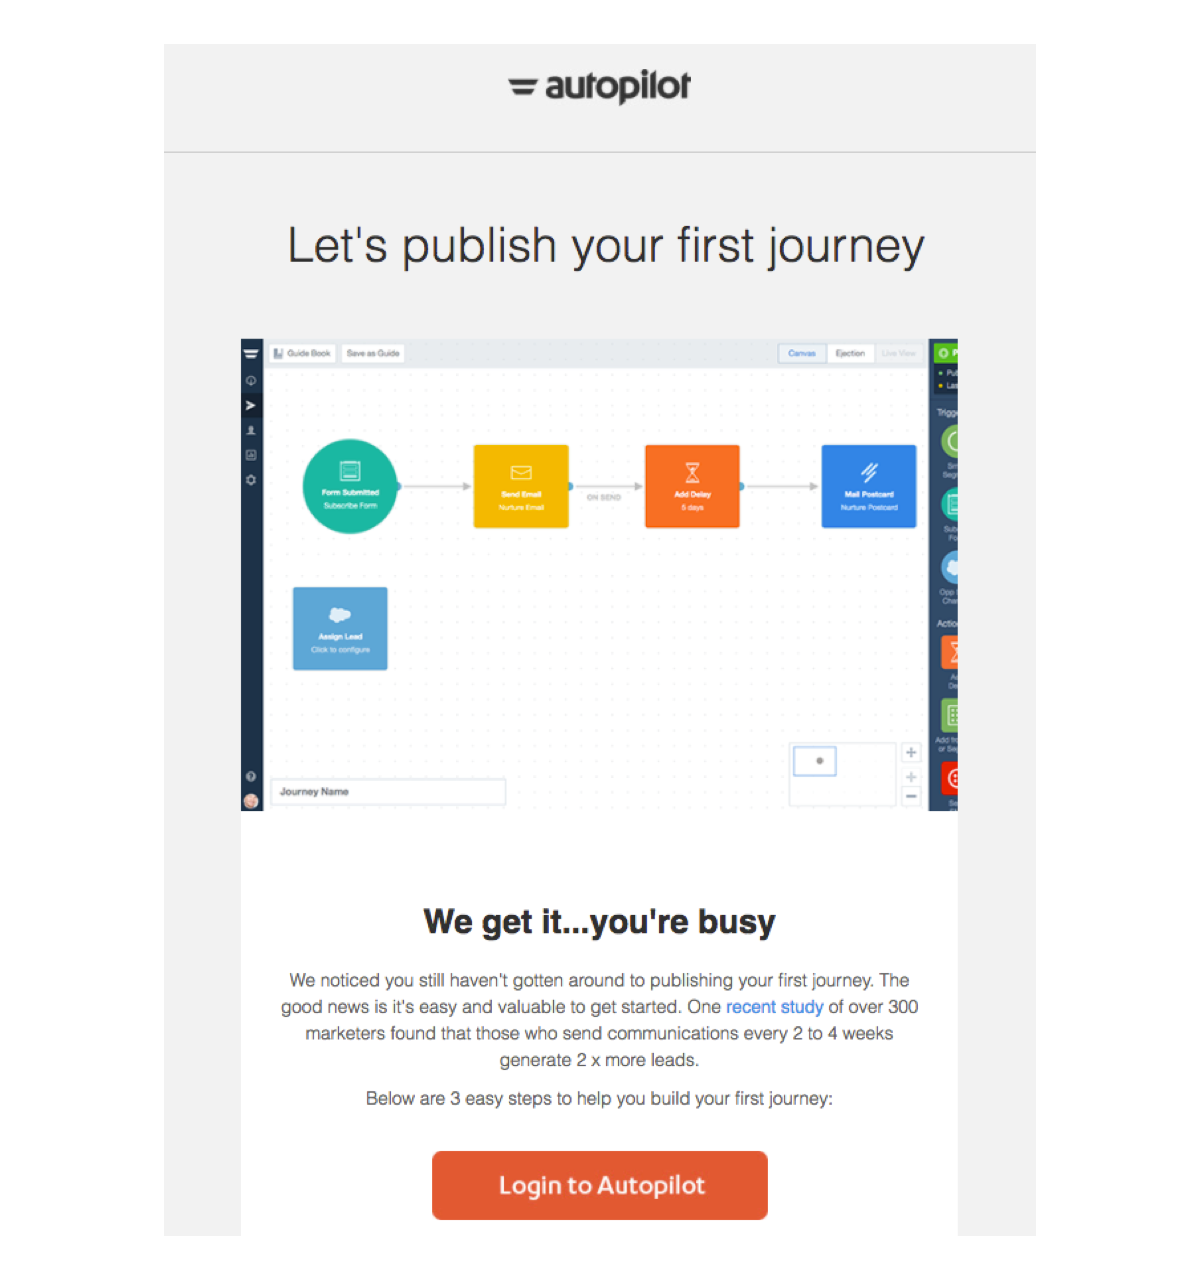
Since the trialist has already installed the tracking code, the email focuses on publishing their first journey—the second key activation event.
Include one, two, three… or however many key activation events make sense for your company in your SaaS trial. The number isn’t the silver bullet. What matters is choosing the events that show your product’s value and increase the likelihood of trialists converting into paying customers. If you create behavior-based emails that emphasize value-add activities then you’ll be golden.
Day 7: Condition check, behavior-based emails (round two), behavior-based personal sales email
After a five-day delay, it’s time for round two of the behavior-based emails.
Following a five day delay, check whether the trialist has completed one or both activation milestones again

This next batch isn’t rocket science. It’s the same emails you sent the first time around using the same behavior-based criteria, but with the word “reminder” added to the subject line.
Ideally, trialists will have completed the activation event you nudged them to complete in the previous send. If they haven’t, they’ll receive the same email, which isn’t a big deal as most people appreciate friendly reminders.
Let’s say that the condition checks reveal that both key activation events have been completed. Here’s what that behavior-based email could look like:
Even if the trialist completes all of your key activation events, you can still help them take their product use to the next level
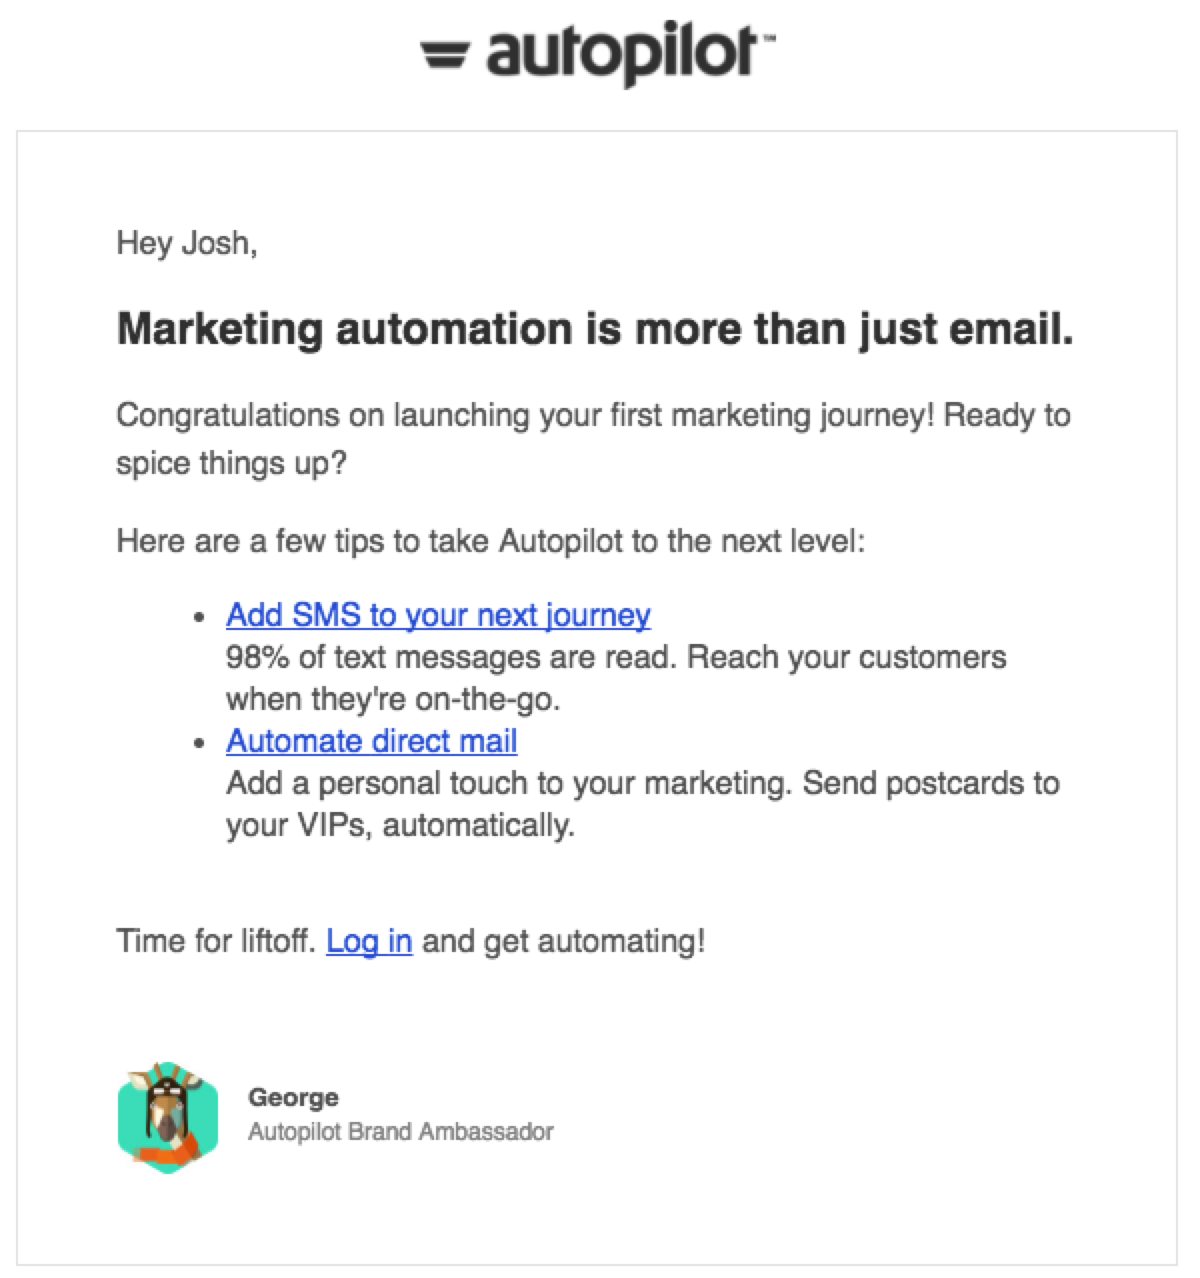
The email congratulates the trialist, which most people love. Even though both key activation events have been checked off their to-do list, the messaging continues to nudge trialists to take their product use to the next level—a natural next step in the customer journey.
Day 14: Mid-trial check-in email
Same as in the time-based trial. Wooo!
Day 23: Buying considerations email
Same as in the time-based trial. Again.
Day 27: Personal email: “I’m happy to help”
Think of this as the sales rep version of the expiry warning email. The goal is to bring the product top of mind again before the trial ends, while offering help.
Autopilot's personalized expiry warning email from a sales rep
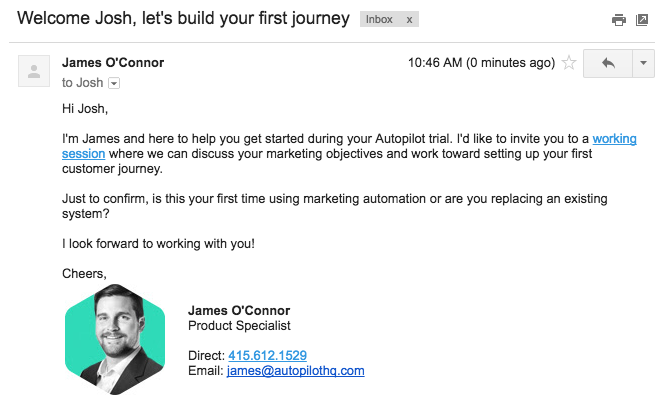
Each phrase is intentional:
- “I’m reaching out regarding your 30 day trial of Autopilot. You obviously signed up to learn about automating your marketing.” These two sentences immediately set the context.
- “If you are interested in accomplishing something soon…” This sentence taps into the goals the trialist originally had when they signed up.
- “…simply reply back and I would be happy to help with your marketing. Hope to connect soon.” These two sentences invite the reader to be open and honest about their marketing struggles, while providing an invitation to chat.
The email is straightforward, personal, and helpful—a perfect cocktail for someone who’s on the fence about becoming a paid subscriber.
Day 30: Expiry warning email
You guessed it… same as in the time-based trial.
Day 33: Post-trial survey email
Same as in the time-based trial. (Noticing a trend?)
Day 90: Add to “Lost Trial Nurture” list, check Salesforce field, and update field
This step is the same as in the time-based trial. The only differences are the check Salesforce field and update field shapes. For the former, if the lead status field is still “Open”, then you’d want to update the field in the latter to “Nurture”.
How to set up the shape (left) and how the field is updated to nurture (right)
Once their status is updated to “Nurture”, the trialist will enter a journey that nurtures them back to another trial and, hopefully, a paid subscription.
How do I eject a paying customer from the free trial?
This step is exactly the same as in the time-based trial journey—and that’s the end of the time- and usage-based trial with a sales outreach track. Nice work!
Finally, let’s explore how best to measure your trial performance so you can maximize your results.
How to measure performance and iterate
Metrics reveal if your trial is actually working or not. With a solid grasp of the numbers, you can make tweaks to continually improve. Beyond the metrics outlined in the first section, here are the key performance indicators you’ll want to track (and the accompanying tools you need):
Leads, customers, and revenue
Measure your performance and share the impact of your SaaS trial with your team by creating a dashboard that automatically tracks leads, acquisitions, and revenue. Connecting Autopilot with Salesforce is a good solution here (and surprisingly straightforward).
A Salesforce dashboard that automatically tracks leads, acquisitions, and revenue
Your conversion funnel
Use Kissmetrics or Heap to track your trial signups, activations, and conversions. Develop an activation-to-conversion funnel comprised of one to three key activation events to see where users drop out and where your event-based opportunities lie.
Open rates and click-through rates
Autopilot offers insight into your individual emails and in-app messages. Open, click, and unsubscribe rates vary dramatically based on the level of personalization and usage-based segmentation you’re doing. Low open rates range from 1% to 5%, while high open rates range from 30% to 50%.
MRR trends and insights
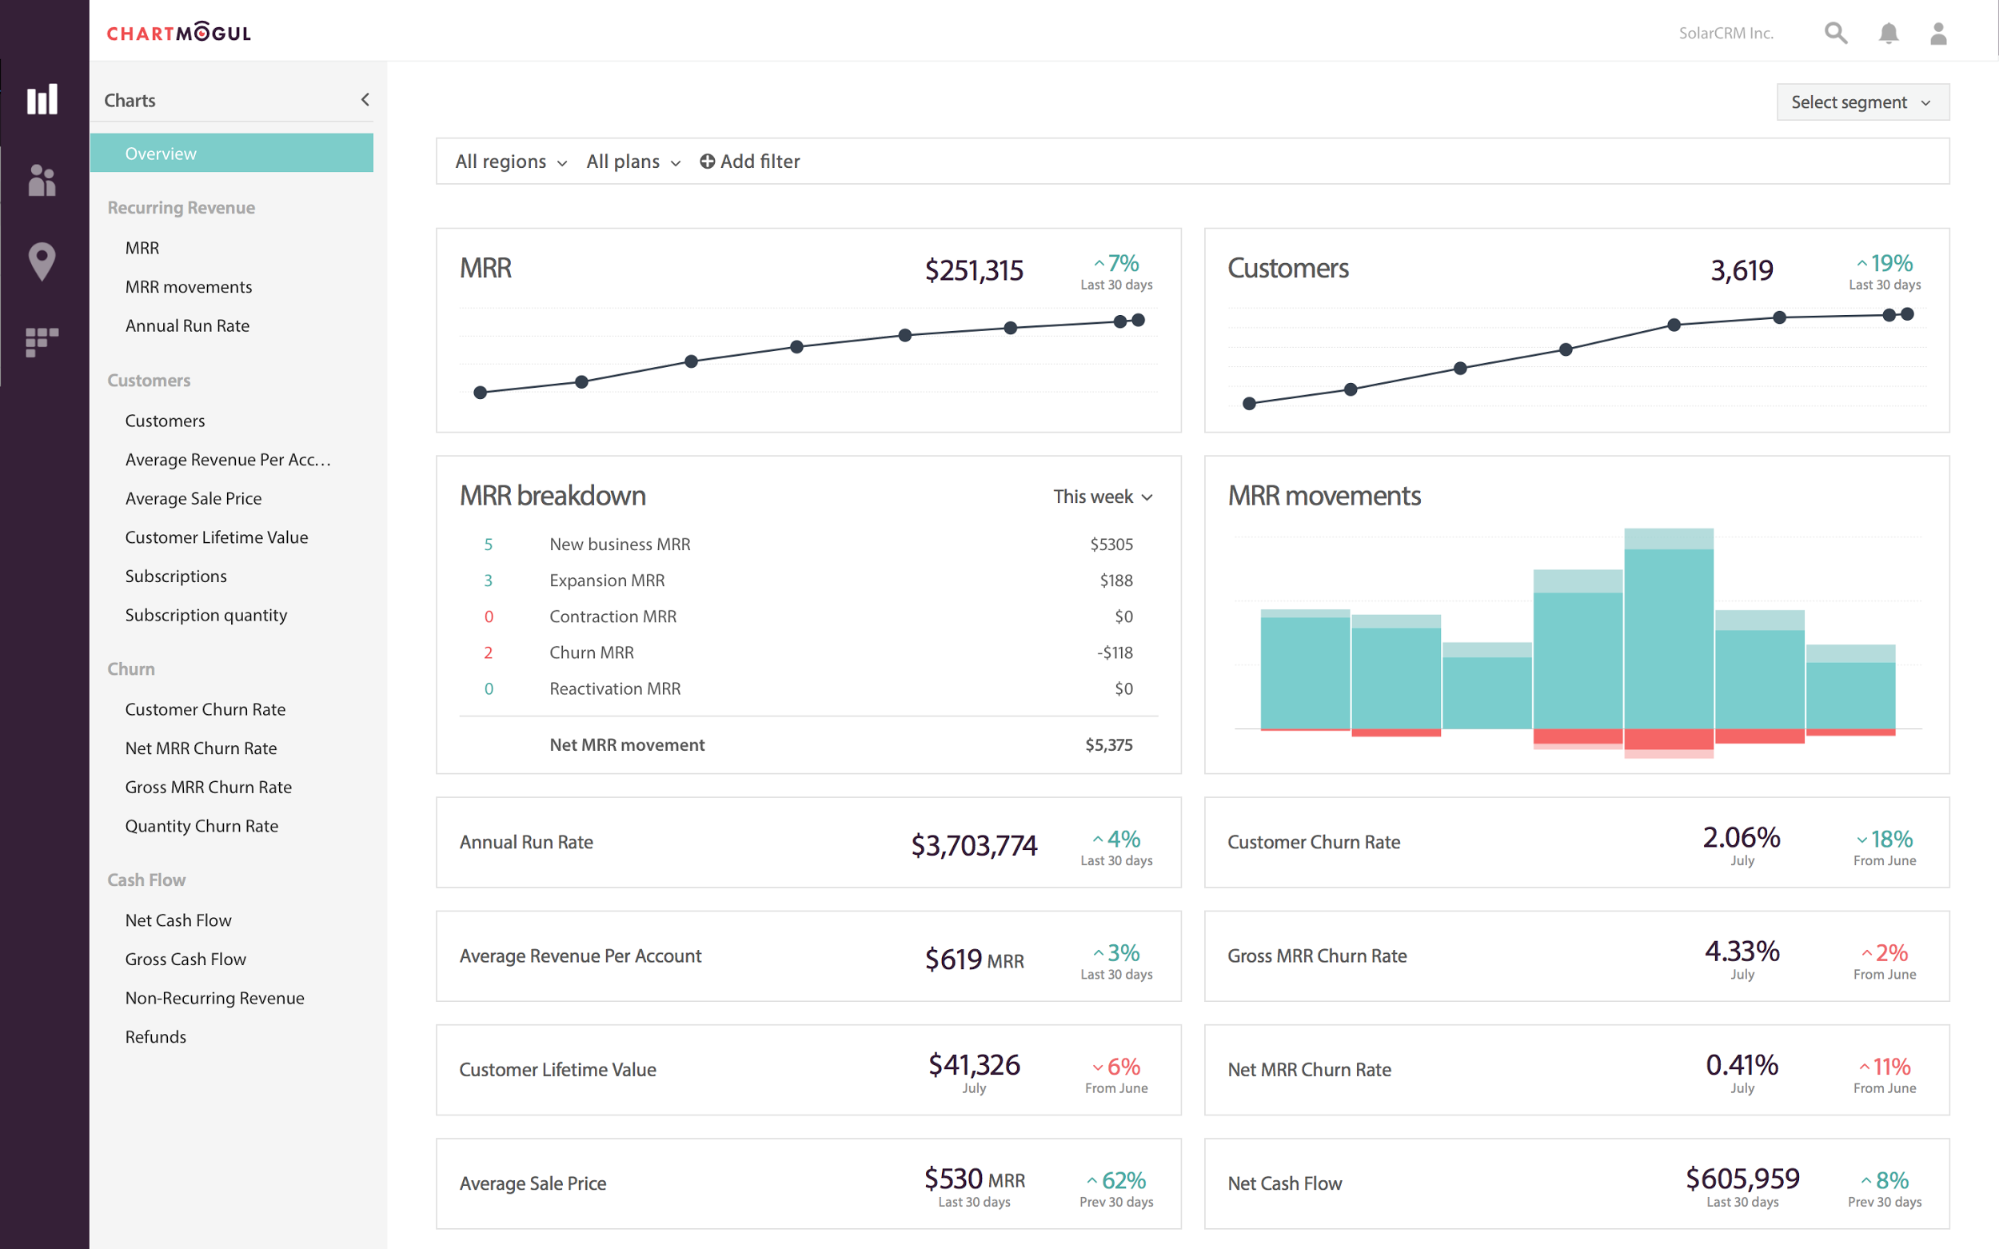
Did your new SaaS trial increase your monthly recurring revenue? How did subscription growth change three months before and after you implemented your new SaaS trial? ChartMogul makes it easy to become well-versed in SaaS economics, which is important both for understanding your business at a granular level and for being able to communicate your operational strengths in a concise, yet informed manner.
ChartMogul's overview, which shows several essential SaaS metrics, from MRR to churn to CLV
