October 6, 2016
Effective Facebook Ads
You’ve probably heard something like this before: “Just test everything. That’s how you succeed with Facebook ads.” It’s true. As long as you test plenty of ad images, copy, and target audiences, you’ll eventually find success with Facebook ads. But, and this is a big but, you need to have a well thought out, structured approach to split testing your ad elements. If you do that, you’ll understand what’s working and what’s not, and you’ll continually improve the performance of your campaigns over time. In this post, I’m going to outline a simple but effective method you can use to test your way to profitable Facebook ads.
Which Facebook ads factors should you test?
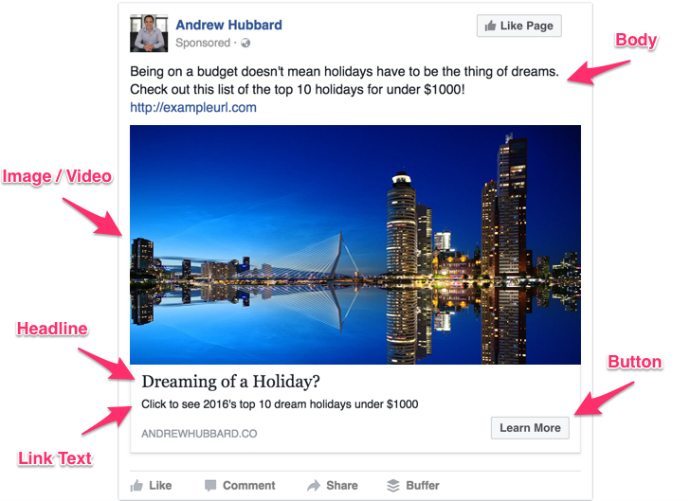
Let’s start by getting clear on what you need to test. Facebook ad creative has two main elements:
- The image or video
- The ad copy (text)
There are multiple parts to the ad copy as well:
- The headline
- The body
- The link text description
- Previously you could enter some custom text in the URL description as well, but Facebook has since removed this ability and now you can only enter a URL there.
 To keep things simple, I’ll just refer to the copy as one element for now. The other main element you’ll need to test is your target audience. This is who you show your ads to. So to sum it up, at a minimum you’re going to want to test:
- Different images or videos
- Different sets of ad copy
- Different target audiences
This can lead to an expensive number of combinations to test. Let’s say you have 3 images, 3 sets of ad copy, and 3 different target audiences. That’s 3 x 3 x 3 = 27 different combinations. If you’re spending $5/day per combination, that quickly jumps up to a $135/day in ad spend (27 x $5). How do you manage it all so you can still test your ads without requiring a large budget to do so? It’s all about prioritizing. Focus on testing the elements that make the biggest impact on your results first, and worry about things that make less of a difference later on. According to a study by Adespresso, your ad image has the biggest impact on performance, followed by the ad copy used in the body. This means you should focus on A/B testing images first. With that in mind, your initial ad testing might look something like this:
- 3 different images
- 1 set of copy
- 2 different target audiences
That brings it down to 6 different combinations to test. And it brings the cost down to a much more reasonable $30/day if you’re spending $5/day on each test. Got an even smaller budget? No worries. You could cut it back to 2-3 images, 1 set of copy, and 1 audience. The point here is to just make sure you’re testing the most important elements first. Then once you find which image is working best, you can take that 1 image and test it with 2-3 different sets of copy. This keeps the number of tests you’re running at any one time down to a minimum.
How to structure your campaigns, ad sets & ads
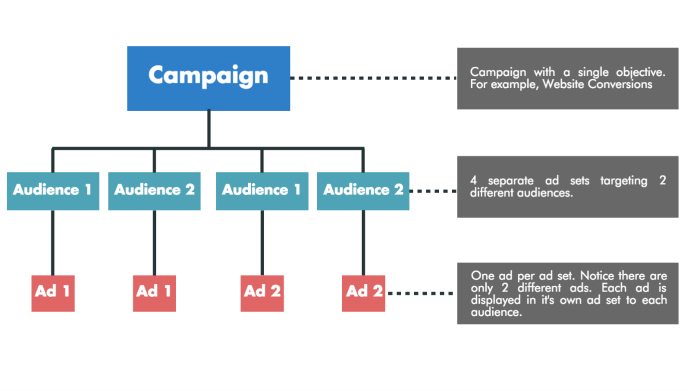
Now let’s look at how to set up your tests in the Facebook Power Editor. First, the campaign. Use one campaign per objective. If you’re running ads with a website conversions objective, they will all sit under a single campaign with that objective.  Under that, I recommend having one ad set per ad that you’re running. This means if you have 6 ads to test, you will have 6 separate ad sets. If you group multiple ads under a single ad set, Facebook will pick a “winner” for you very early on. It will then stop showing the other ads to people. By creating separate ad sets, you ensure that you collect enough data to make an informed decision about which ads to keep on and which ads to turn off. So if you’re testing 6 different ad/audience combinations, the structure will look like this:
- 1 campaign
- 6 ad sets
- 6 ads (1 under each ad set)
Generally when I’m starting out I’ll allocate my total budget evenly across all ad sets. If the budget is $30 in this example, each ad set is allocated $5.
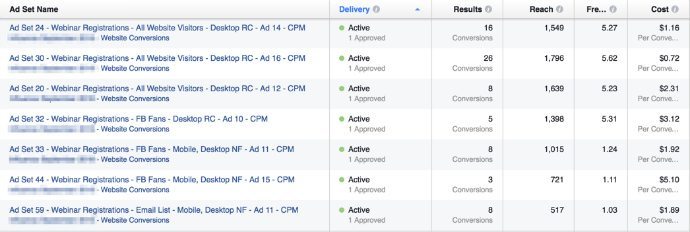
 Example of a series of ad sets testing different audiences and different ads. Notice the ad name included at the end of each ad set name to make things easier to keep track of.
Advanced ad set structure
If you want to get even more granular, separate your ad sets based on placement and even demographic details in some cases.
Placement
For example, if you’re running ads in the news feed and in the right column, create one ad set targeting the news feed only, and another for the right column only. There are 2 reasons for this: 1. Performance can differ across placements. By separating them you can see which placement performs better and turn the other ones off. 2. The ad creative looks different for each placement. There’s far less text on a right column ad compared to a news feed ad. For that reason, use separate text (copy) for each placement to make sure you’re communicating your message effectively.


Interest targeting
Interest targeting is also another element to test. If you go this route, I recommend including only 1 interest per ad set. You can group very closely related interests in an ad set, but I suggest sticking to 1 if possible. Let’s say you’re interested in targeting people interested in growing an email list. You might pick interests like ‘Online Business’, ‘Gary Vaynerchuck’, or ‘Smart Passive Income’. You should put each of those interests in a separate ad set, rather than bunching them together. The only exception is if they are very closely related. For example, if you were targeting ‘Online business’ and ‘Internet Business’, you could put those together as they are the same thing just worded differently. This allows you to see how well each target interest is performing. If you bunch them all together, you have no idea which interests are delivering good results and which ones aren’t.
Run your campaigns and make data-driven decisions
After your ads are all set up, it’s time to kick things off and… Wait. This is the most difficult thing for a new Facebook advertiser to do. Instinct tells you to watch your new ads like a hawk. You’re tempted to look at your campaigns every hour to see how they’re doing. And worst of all, there’s a temptation to turn ads off or scale some up after just a couple of hours. This is not what you want to do, despite your urge to do it anyway. Here’s the process I like to follow instead. Remember, I’m just giving you some numbers to use as a guide here, don’t take them as absolute benchmarks you have to stick to.
Let each ad run for at least 2-3 full days
First, run the ads for at least 3 days. Longer if possible. Why three days? Because that allows Facebook’s algorithm to settle in and optimize itself. It also gives you time to collect a meaningful amount of data. The other reason is because your ads perform differently on different days of the week. For example, Monday & Tuesday might be bad, but Friday & Saturday could deliver leads at half the cost of Monday & Tuesday. If you run your ads for one day, and it happens to be a Monday, you’ll see poor results that aren’t a true reflection of your overall performance. Ideally you want to run the ads for as long as possible, but three days is the absolute minimum I recommend if you’re strapped for time and/or budget.
Wait until your ads also have at least 1000 impressions
I also like to make sure the ads receive a significant number of impressions. As a guide, aim for at least 1000 impressions. This is to ensure that you’ve got enough data to reach statistical significance. I’ve seen so many cases where people will run an ad for a day, see really cheap conversions (for example, $0.50 each) and decide to bump up the budget from $5/day to $100/day. All of a sudden those $0.50 conversions become $7 conversions. Here’s why: If you’re lucky and get 2 conversions after spending just $1 on ads, it looks like you’re getting $0.50 conversions. But after spending just $1, you just don’t have enough data to really know. If those first 2 conversions were just luck, you might find that you only get 1 conversion from the next $10 you spend. Now you’ve spent $11 and got 3 conversions—an average of $3.66 per conversion. So, only move on to the next step after you’re comfortable you have enough data to make informed decisions.
Find winners & scale up
After a few days it’s time to look at the reports to see which ads are performing well and which ones aren’t.
The performance metrics that matter
Facebook ad reports are a bit daunting when you first look at them, so let’s talk about what you should focus on to determine whether or not an ad is performing well. First, you need to figure out what your primary metric is. If you’re goal is email signups, webinar registrations, or any other event that requires someone to convert, your primary metric will be Cost Per Conversion (CPC).
 Tracking conversions in the Ad Manager
That’s the number that matters most when you’re deciding if an ad is performing well or not. At the end of the day that’s all that matters. Sure, clickthrough rates and other metrics are important, but they all feed into the one number that matters most—your cost per conversion. And if your goal is just website clicks? Then the most important metric when judging an ad performance is going to be your cost per link click (not just cost per click. It’s about link clicks).
 Tracking link clicks in the Ad Manager
The key here is to focus on the metric that is most closely aligned with your end goal.
Optimizing your ads
Turn off all ads that aren’t the top 1 or 2 performers based on your primary metric. Next, you’ll want to: a) allocate extra budget to the top performers; or b) set up a new round of ads to test. You might even want to do both, depending on your budget & how many ads you’ve tested already. If you’re ready to scale up: Only increase the budget of your winning ad sets by a maximum of 50% every 24-48 hours. The more gradual you can be, the better. This gives Facebook’s algorithm time to adjust to the new budget and helps prevent blow-outs in your costs. Takeaways:
- Turn off your underperforming campaigns
- Increase the budget on the best performing campaigns by a maximum of 50% per day
- Start a new series of tests if you still have images or copy to test
Rinse & repeat
Now it’s simple a case of repeating the testing cycle until you’re confident that you’re getting great results. You can adjust this process to suit your budget, test fewer combinations at a time, or test hundreds at once if your budget allows. It’s completely up to you. By sticking to a structure like this and making decisions based on data rather than your gut feelings, you’ll greatly increase your chances of creating profitable Facebook ad campaigns. When you get more advanced you will also want to start testing and improving external elements like your opt-in offers, landing pages, and webinars as well. But the less you test at once, the easier the process will be. How do you approach your Facebook ads testing? Is your process similar or different than what I’ve outlined above? Let us know in the comments.


