June 3, 2016
Setting Up a Webinar With GoToWebinar, Instapage, and Autopilot
In this post, you’ll learn the exact steps for setting up a webinar registration page and nailing your post-webinar follow up. This isn’t based on theory or googling around. It’s the actual process we use for automating webinar journeys here at Autopilot. To get started, you’ll need a working account for:
Zapier (optional, if you’re feeling extra daring)
Setting up a webinar registration page
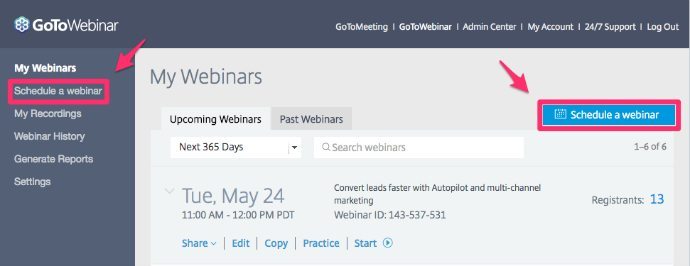
Step 1. Log in to GoToWebinar and schedule your webinar
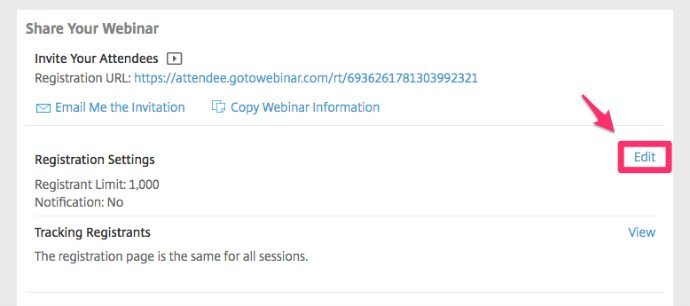
 As a default, GoToWebinar requires First Name, Last Name and Email fields in their registration forms. If you’d like to capture more details about your registrants like Job Title, Company or Phone Number, you can add additional required or optional registration fields for your attendees to fill out. To do so, click into your scheduled webinar, scroll to Registration Settings and select “Edit.”
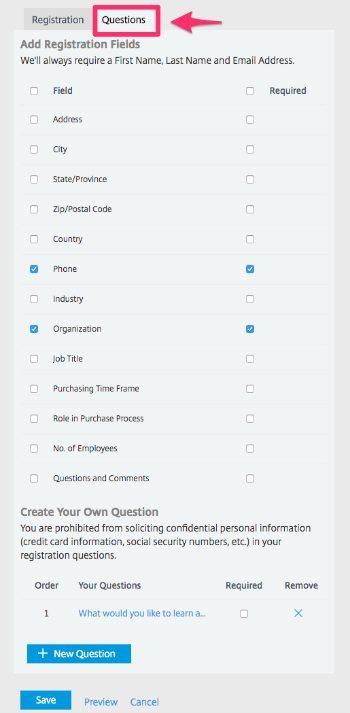
  Toggle to the “Questions” tab and use the tick boxes to add fields to your webinar registration form. Click “+New Question” to add custom fields.
  Pro Tip: For every webinar, prepare a document to centralize information about your webinar such as title, date, time, speakers, and a short abstract with key takeaways. This will serve as a guide throughout your planning and content creation. Trust me, you’ll thank yourself later.
Step 2. Build your custom landing page in Instapage
While you could certainly use GoToWebinar’s out-of-the-box registration page, there are a few downsides:
You can’t track traffic because the page doesn’t live under your domain
There’s not much flexibility in terms of customization besides swapping colors and uploading a logo and an image, leaving you with a lackluster page that doesn’t fully represent your brand
It doesn’t allow for A/B testing, making it impossible to learn what page elements encourage signups or whether you’re losing out on registrants due to bad design
With 100% confidence, I suggest building an on-brand, trackable and testable landing page to improve your webinar landing page conversion rates over time. See the difference? 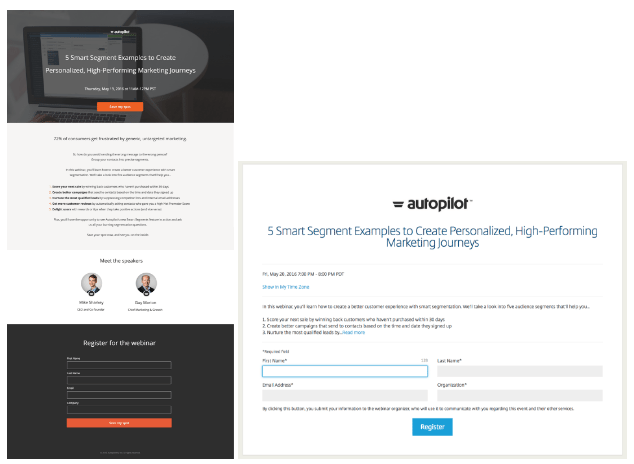 The best part is Instapage makes this super easy. With a wide selection of webinar specific landing page templates to choose from, you don’t have to design anything from scratch. Simply swap out images and dummy text for your own.
Step 3. Integrate Instapage with GoToWebinar
When you are finished creating your landing page, integrate Instapage with GoToWebinar by clicking your call-to-action, then “Edit.” 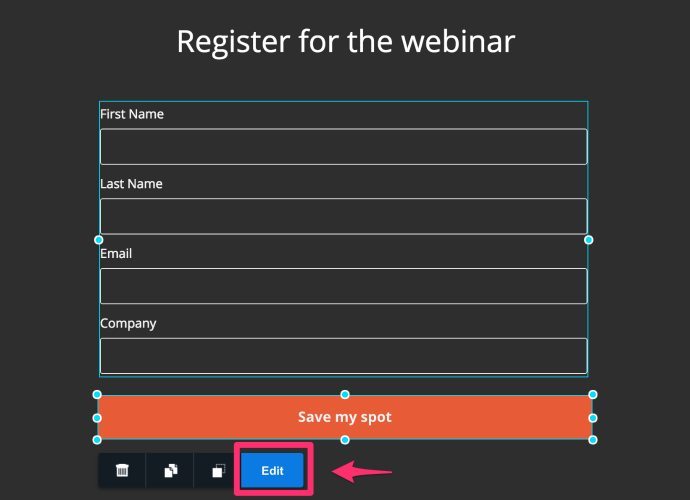 Click “Integrations,” then find “GoToWebinar.”
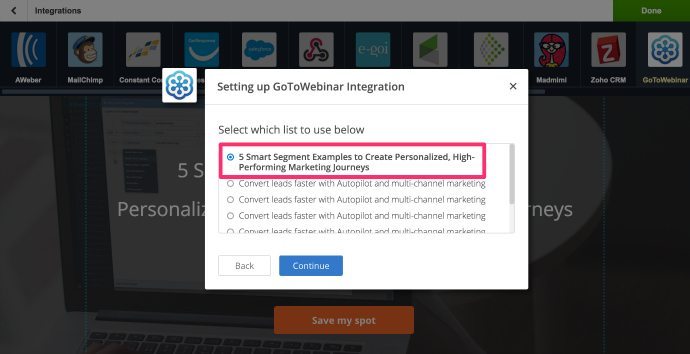
 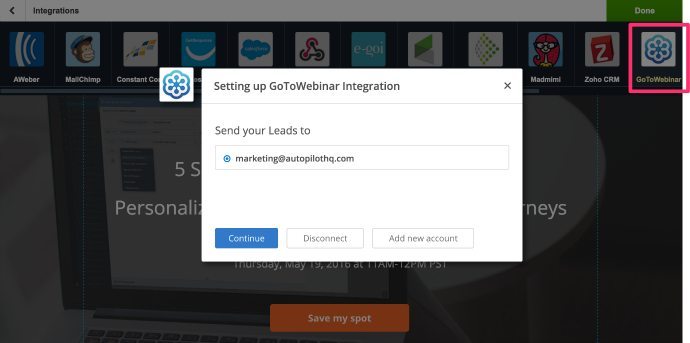 Select your GoToWebinar account and click “Continue.” Instapage will check your integration and pull a list of your scheduled webinars to choose from. Select your webinar and click “Continue.”
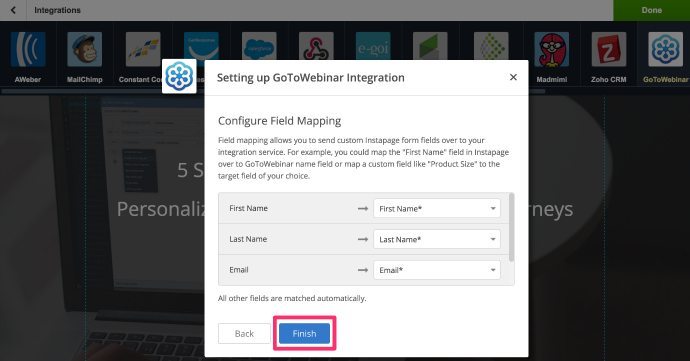
  Finally, map the fields on your Instapage form to GoToWebinar form fields and click “Finish.”
Step 4. Connect Instapage to Autopilot
There are two ways to do this: 1) Use the Instapage-Autopilot integration (instructions here) 2) Add the Autopilot tracking code to the header of your Instapage landing page In this post, we’ll cover the latter option. While this example is specific to Instapage users, Autopilot’s universal form capture feature allows you to capture form submissions from any form on your website with a tracking code, making it easy to automatically add registrants’ contact information into a list for following up with later. Select “Settings” in Instapage’s top navigation.  Click “HTML/CSS.”
  Log in to Autopilot and grab your tracking code by going to “Settings” > “Tracking Code.”
 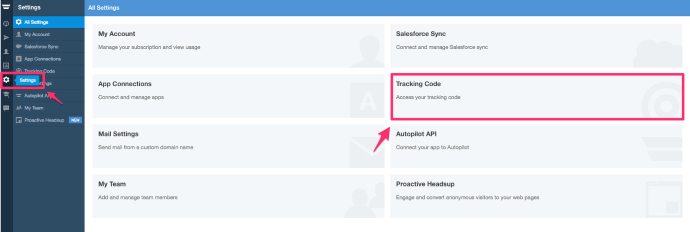 Copy your tracking code, place it in the header of your Instapage landing page and click “Done.”
 ![]() Before publishing your landing page, edit the mobile version and create a variation to test against. If you need landing page A/B test ideas, try one of these. Pro Tip: Rather than simply showing a “Thank you” pop-up message, redirect registrants to a dedicated confirmation page that points them to relevant content they may be interested in (example) or drives them to take another action, like sign up for a free trial (example). This not only keeps them on your site longer, but gives you an opportunity stir up excitement for the upcoming webinar or even have them take the next step in your customer journey.
Before publishing your landing page, edit the mobile version and create a variation to test against. If you need landing page A/B test ideas, try one of these. Pro Tip: Rather than simply showing a “Thank you” pop-up message, redirect registrants to a dedicated confirmation page that points them to relevant content they may be interested in (example) or drives them to take another action, like sign up for a free trial (example). This not only keeps them on your site longer, but gives you an opportunity stir up excitement for the upcoming webinar or even have them take the next step in your customer journey.
Step 5. Capture your webinar registration form in Autopilot
Log in to Autopilot, navigate to “Journeys” and start a new journey from scratch. 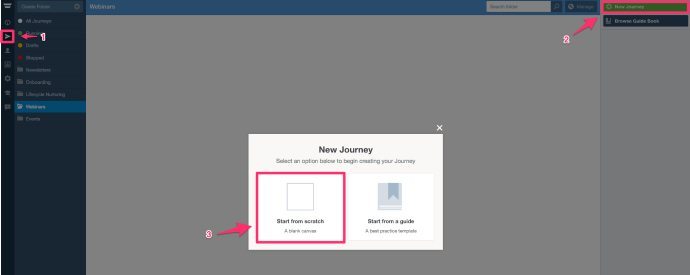 Name your journey using a naming convention like “Webinar - [Name of Webinar] Registrants - [Month Year]” to keep things organized. Drag and drop the “Form Submitted” trigger onto the canvas and configure your form using the URL of the Instapage landing page you’ve just published. Instructions on how to set this up can be found here. Once you’ve captured your form, add all contacts who submit the form to a webinar registrant list. Doing so will allow you to follow up with this list or suppress them from reminders and invitations later. Publish the journey with these two shapes or add any other automated actions you’d like, e.g. send internal Slack notification, add registrant to another relevant list, send a text confirmation, etc. Here’s an example:
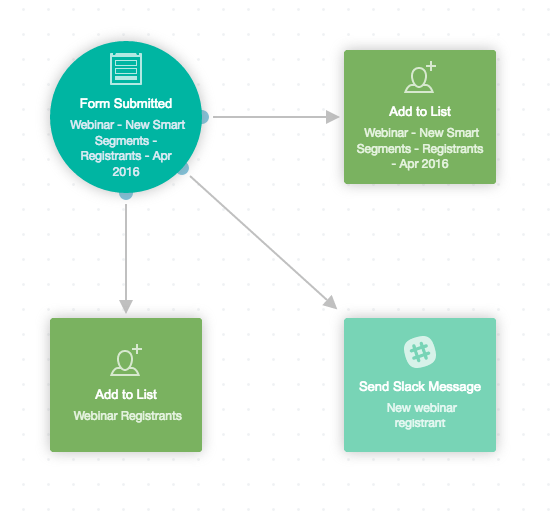
Step 6. Test your registration page
Once your Autopilot journey is published, refresh your Instapage landing page and submit a test registration. Check to see if: 1. You’ve been added as a webinar registrant in GoToWebinar. 2. You’ve received a webinar confirmation email from GoToWebinar. 3. Proper actions have taken place in Autopilot, i.e. you’ve been added to the webinar registrant list. **Pro Tip: **Toggle to the “Live View” tab to see how many people have entered each shape in your journey and where people are getting stuck. If everything works properly, you are ready to begin promoting your webinar. I won’t go into the weeds with strategies on how to drive webinar registrants in this post (you can read all about running a kick-ass webinar from beginning to end here), but this is what a typical webinar invitation journey could look like using Autopilot: 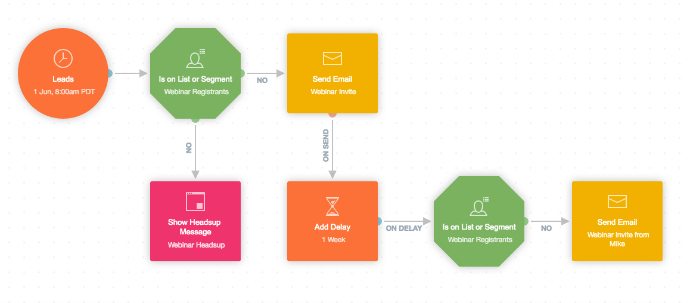 This journey starts with a time trigger to a “Leads” list, checks to see if they are already a registrant and if not, they are sent an email invitation and shown a Headsup message next time they visit your website. After a one week delay, we check again to see if the contact has registered. If not, they are sent another webinar invitation, this time from an individual on your team - ideally one of your webinar speakers.
Nailing the post-webinar follow up
Step 1. Add webinar attendees to a list in Autopilot
I’ll give you two ways to go about this. Option A: Import contacts from a spreadsheet to Autopilot Following your webinar, generate an attendee report in GoToWebinar by clicking “Generate Reports” in the left navigation and selecting “Attendee Report” as the report type. Once you’ve identified the correct webinar you’d like to download a report for, click “Generate Report.” 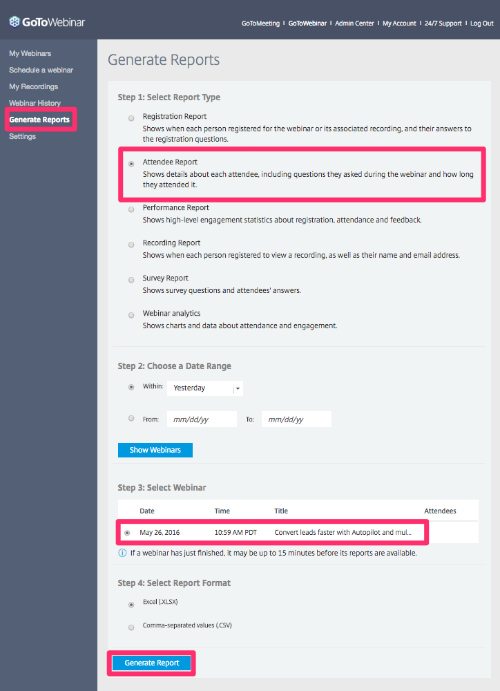 Clean up the Excel spreadsheet to include only webinar attendees (delete non-attendees) and the columns you’d like to import into Autopilot such as Last Name, First Name, Email Address, and Company. Next, navigate to the “Contacts” tab in Autopilot and follow these instructions to import your list. At step 5, be sure your list name is easily distinguishable as an attendee list using a naming convention like “Webinar - [Name of Webinar] Attendees - [Month Year]. **Option B: **Set up a Zap to add GoToWebinar attendees to a list in Autopilot This method is for all you automation overachievers using Zapier. It takes a bit of foresight as you’ll need to set up the Zap prior to your webinar taking place. First, create a new list in Autopilot for webinar attendees to populate into. Next, log in to Zapier and click “Make a Zap.” Select GoToWebinar as your Zap trigger.
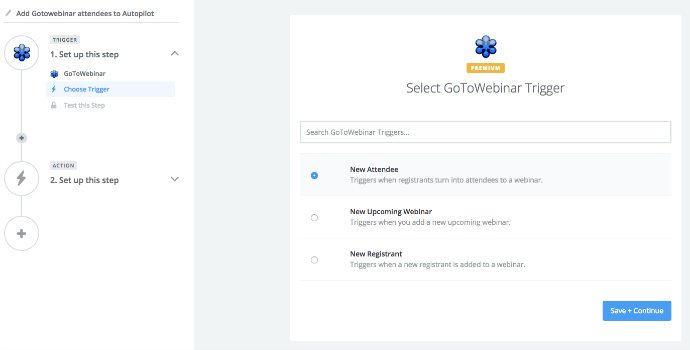
 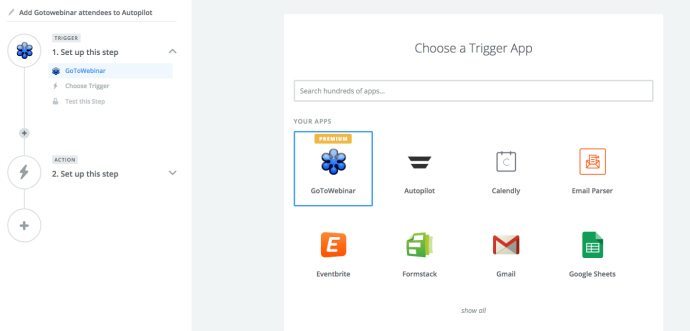 Choose “New Attendee” as the trigger.
  Select your account and your webinar, then test that step. Next, choose Autopilot as your Zap action.
 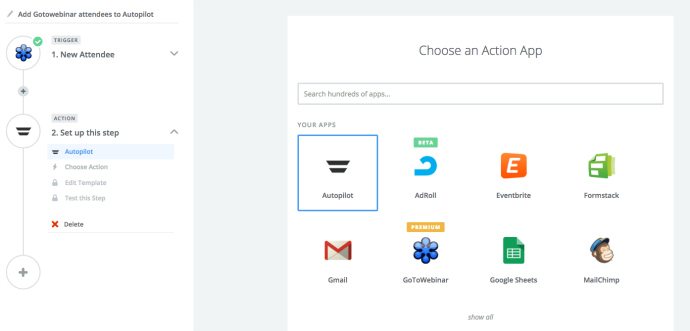 Select “Add Contact to List” as your action.
 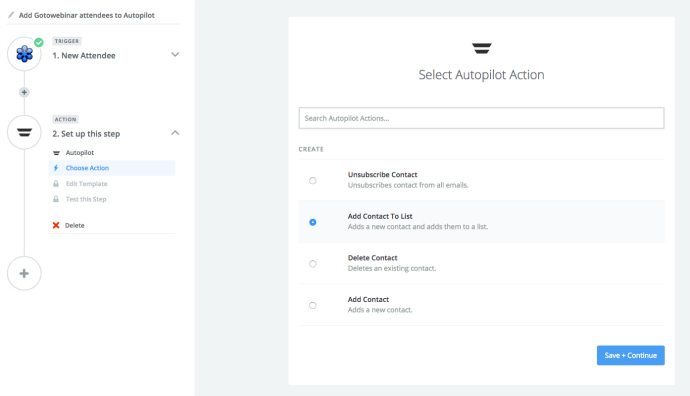 Find the list you’ve created in Autopilot and set up your field mapping template from GoToWebinar to Autopilot. We typically use Last Name, First Name, Email Address, and Company. Test your Zap, give it a name and turn it on! Now when your webinar registrants turn into attendees, Zapier will automatically add them to your attendee list in Autopilot, meaning no manual download/upload process. Cool, right?
Step 2. Create and publish your follow up journey using Autopilot
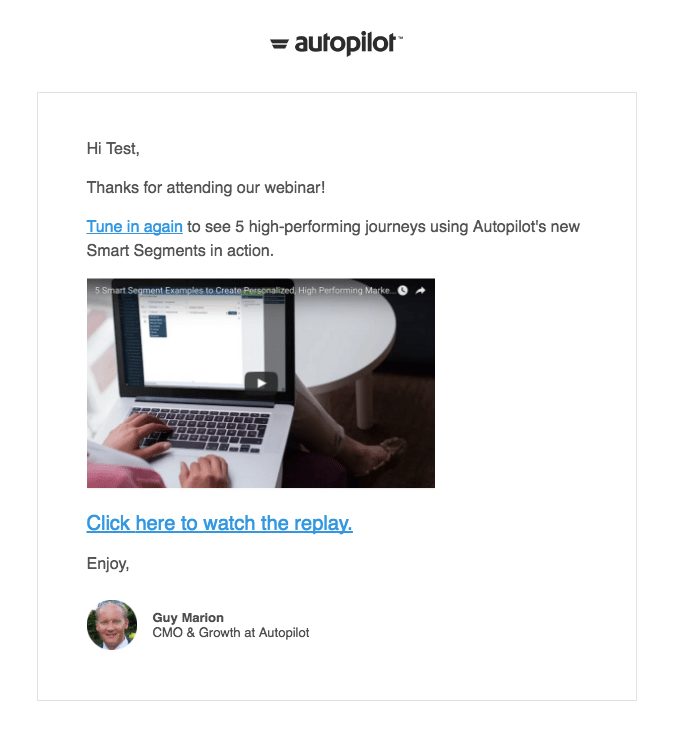
A typical webinar follow up journey sends one email to attendees and a different message to non-attendees. 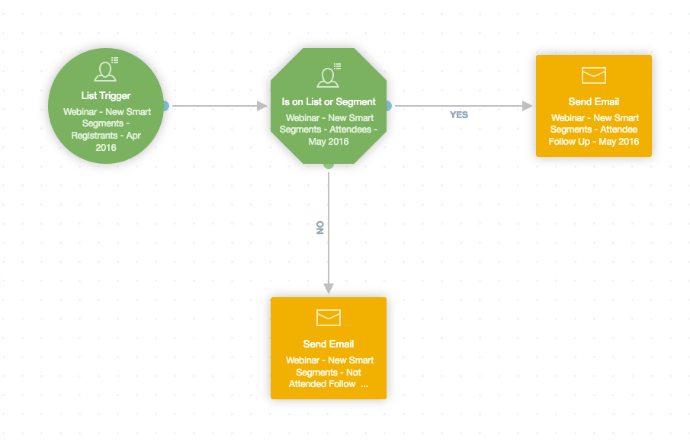 In the journey above, we use the Registrant list as our trigger, then use the Attendee list as a condition check. If the contact is on the Attendee list, they receive a “thank you for attending” email with a link to the webinar recording:
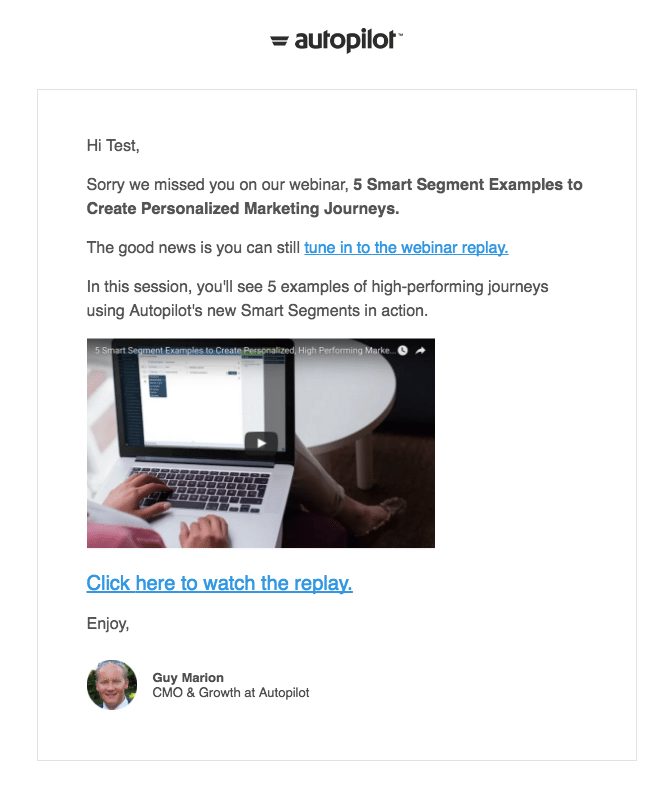
  If the contact is on not on the Attendee list, they receive a “sorry we missed you” email (also with a link to the webinar recording):
  (Side note: If you’re interested in our webinar on smart segmentation, you can find the replay here.) One email to attendees and another to non-attendees is a good start, but the follow up journey doesn’t need to stop there! You could continue nurturing webinar registrants and attendees with other relevant content, special offers or sales touches. The world is your oyster.
Happy automating!
The process outlined in this post is one of many ways you can rig up your tools to automate webinar journeys. I’m curious, how do you do it at your company? Please share your favorite tips for setting up a webinar in the comments.


