


November 19, 2018
Start Tracking Your Visitors
The Autopilot tracking code is fundamental to monitoring, capturing, and messaging visitors. Add it in minutes.
Successful customer journey marketing starts with unlocking your Autopilot account and building knowledge: Who is my audience? Are they known or anonymous visitors? How are they engaging with my website(s)? Without the tracking code, you’re shooting in the dark.
In this lesson, you’ll learn:
- What the Autopilot tracking code unlocks
- How to add the tracking code to your web pages
- Steps to ensure the tracking code is working
Autopilot's tracking code enables you to track known and anonymous visitor activity, capture lead and contact data, and display targeted onsite and in-app messages
What the Autopilot tracking code unlocks
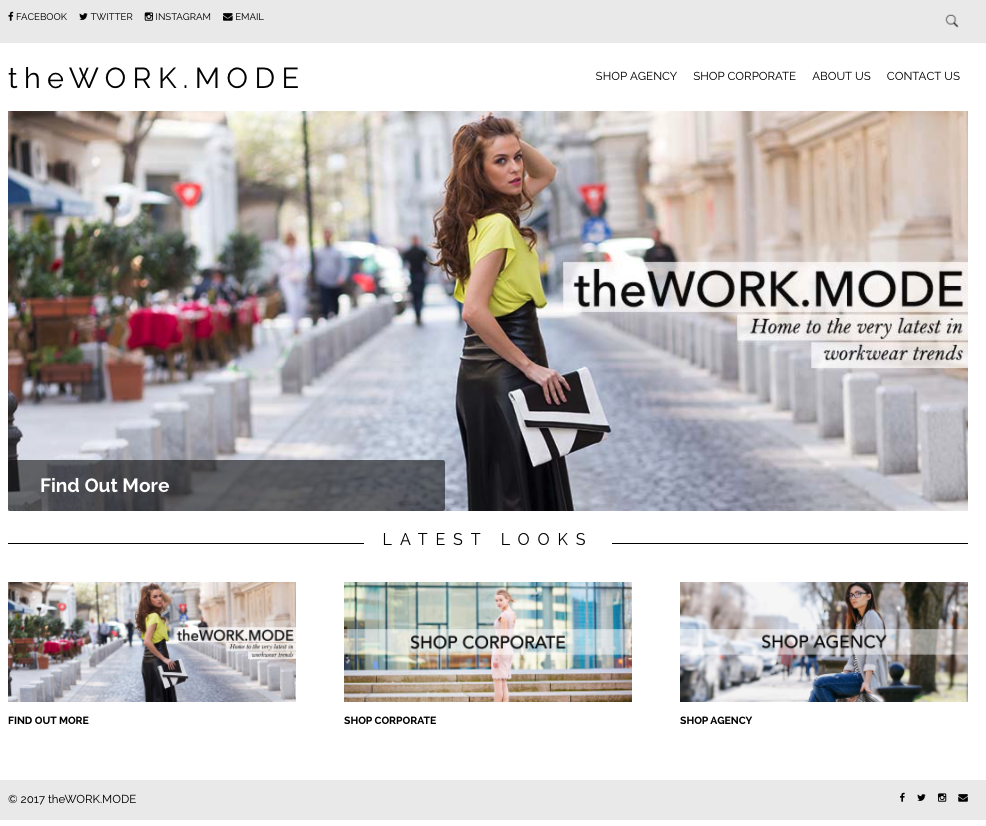
Let’s say you run an e-commerce platform called TheWorkMode, which sells workwear fashion to professional men and women. You’ve been featured in GQ, Vanity Fair, and most recently, Vogue. You’re using Autopilot to entice visitors who abandon their shopping cart to return and buy, and to nurture and reactivate lapsed customers.
TheWorkMode website - 100% fictional
Your first configuration step is to install the Autopilot tracking code on any pages or sites where your visitors land, such as your website, blog, help center, or product.
Through the tracking code, you’ll be able to:
- Track known and anonymous visitor activity on any site with the code
- Capture leads and contact data from nearly any web form
- Display onsite messages on specific or all tracked pages
- Enable automatic UTM parameter tracking
- Segment and/or score contacts based on website visits
- Display highly targeted in-product messages
1. Track anonymous and known visitor activity on your website
All visitors to your tracked pages are initially treated as anonymous and assigned a unique ID number.
Looks like Anonymous 328 visited the corporate dresses page again.

Once this visitor becomes known, all of their previous anonymous browsing history will be connected to their contact record in Autopilot. Plus, their future activity will appear alongside their known name in your activity feed.
It turns out that Anonymous 328 is a person. Her name is Eloise.

As the contact engages with your website, content, and messages, Autopilot tracks her interactions and aggregates them in her contact profile.
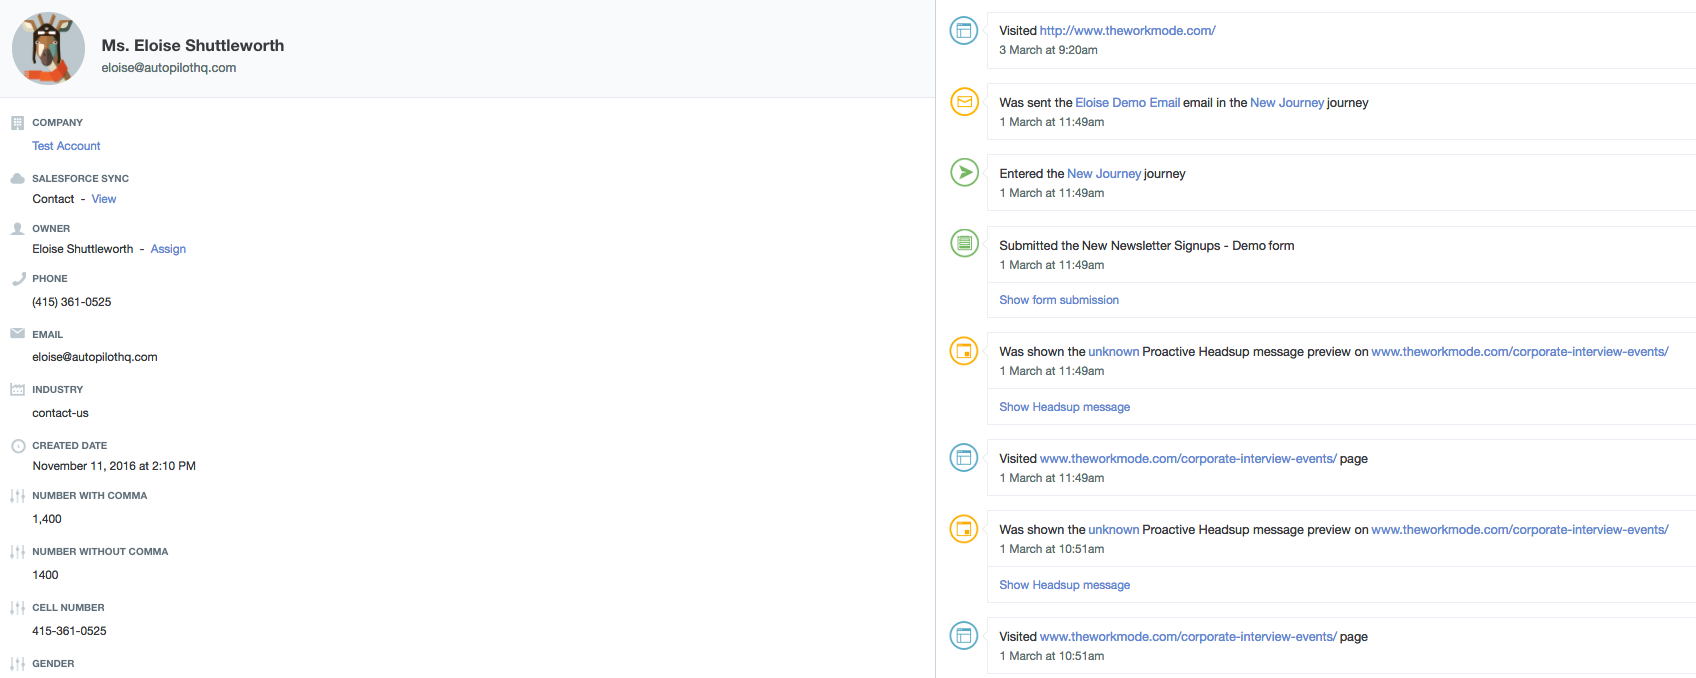
This is Eloise's contact profile in Autopilot. The Activity Feed is displayed on the right.
This contact record activity feed will help you understand Eloise’s entire customer journey with TheWorkMode.
2. Capture leads directly into Autopilot
So how did Eloise turn into a known contact in the example above? With the tracking code in place, you unlock a number of key features that will enable you to “session” or convert anonymous visitors into known contacts:
- Form capture
- Proactive Headsup
- Email engagement
Form capture
Like most companies, TheWorkMode sends an email newsletter. After being enticed by the 200+ hand-picked mix ‘n’ match pieces from leading Australian and international brands, visitors can subscribe to their newsletter from a number of web pages, including their about us page.
TheWorkMode's newsletter subscription form
Using Autopilot’s form capture feature, you can collect form field data (e.g. first name, email) from any form that resides on a page that’s running the Autopilot tracking code. You can then trigger automated journeys or update and segment your contacts upon form submission. Below is a quick video tutorial on how to capture forms in Autopilot.
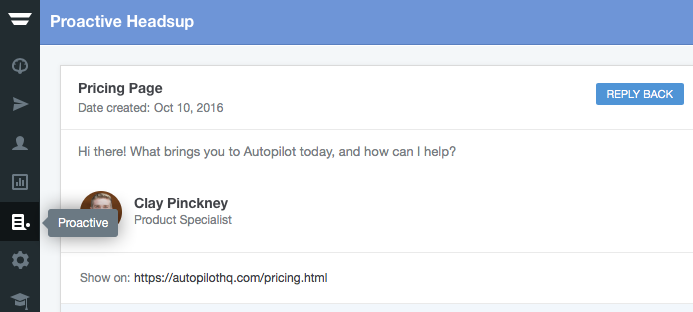
Proactive Headsup
Proactive Headsup is a lead generation channel designed to help marketers convert anonymous website visitors into leads. Out of 500 beta testers, 46% reported seeing leads increase by more than 10%—a big win for something that takes five minutes to set up.
Proactive Headsup is a lead generation channel designed to help marketers convert anonymous website visitors into leads
There are three types of messages you can send with Proactive Headsup:
- Call to Action: Encourage visitors to click through to another relevant web page.
- Subscribe: Add contacts to the list of your choosing with a single click.
- Reply Back: Provide an outlet for visitors or users to engage in conversation with a member of your team.
Out of the three, Proactive Subscribe and Reply Back are the two types that enable TheWorkMode to capture leads into Autopilot.
Proactive Subscribe in action (click to view high-res image)

Proactive Subscribe captures information into a list (like a typical opt-in form), whereas Proactive Reply Back captures the lead and starts a conversation.
Granular, a powerful farm management software and Autopilot customer, uses Reply Back to start conversations with leads early from its product page.
Proactive Reply Back in action (click to view high-res image)
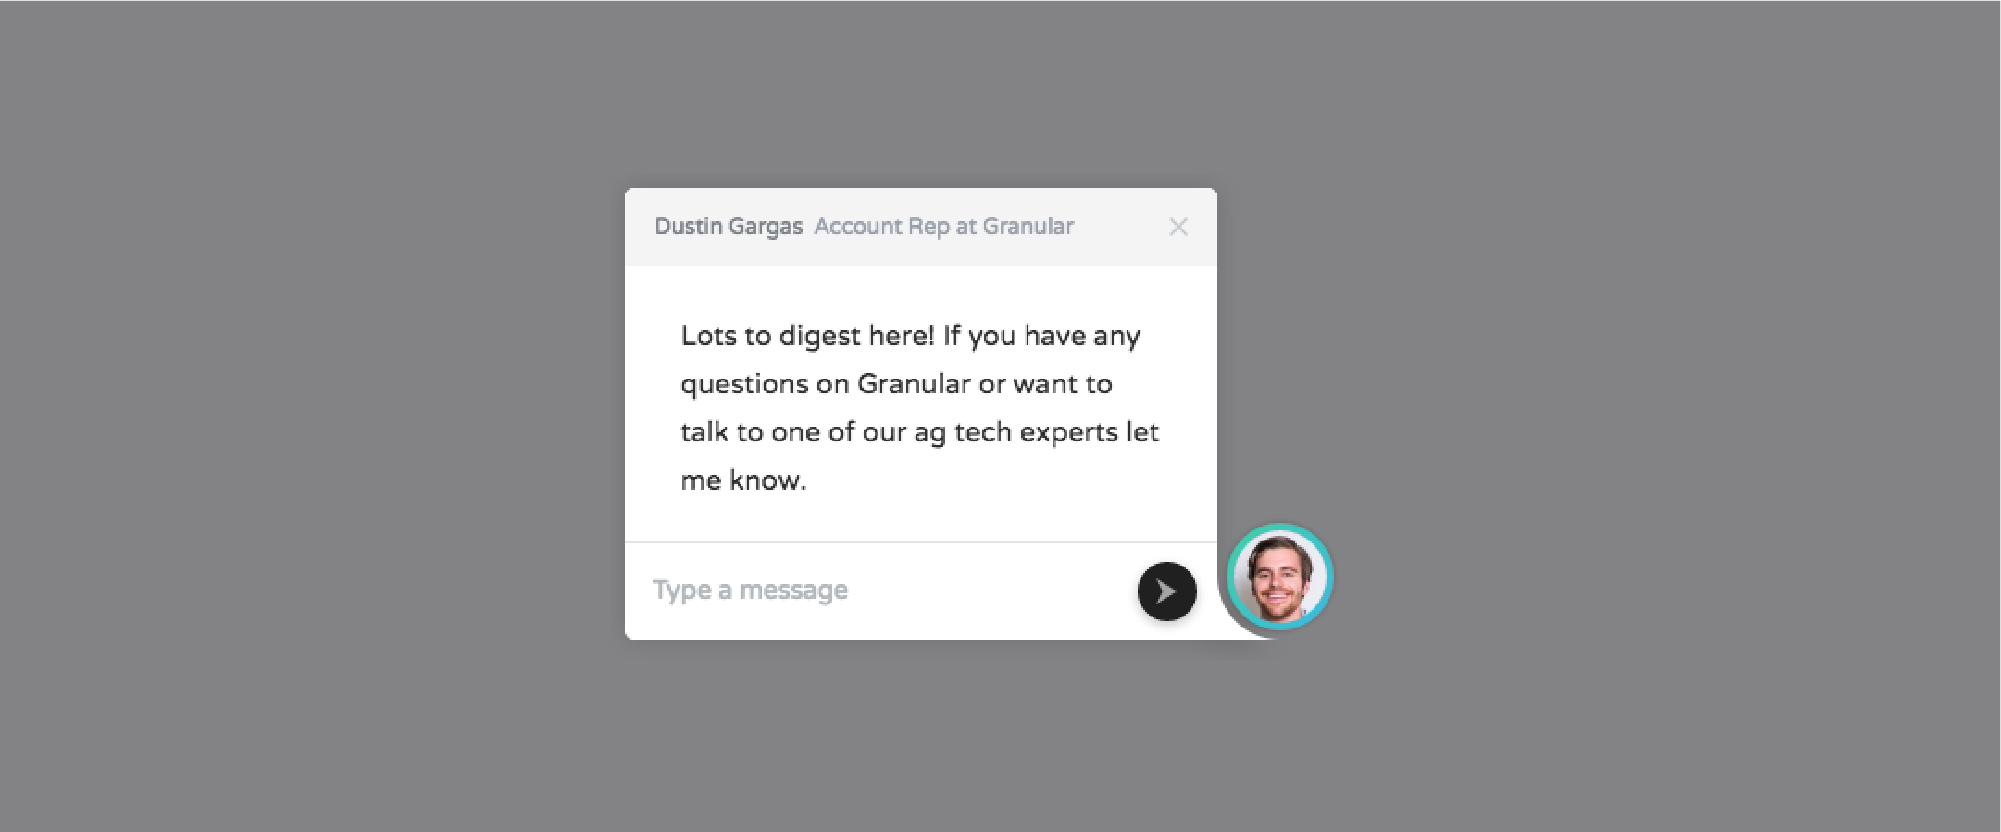
Notice the personal feel of Dustin’s message and the “ag tech experts” language that speaks directly to the company’s audience.
Proactive Headsup takes just a few minutes to setup and can be configured from the Proactive toolbar menu item.
Email engagement
There’s a third way to convert anonymous visitors into known users. When a contact who hasn’t already been sessioned clicks a link within an email sent using Autopilot, the tracking code is embedded and the user is sessioned via their email address. This allows you to track:
- Contacts from uploaded email lists (e.g., from a trade show): You already have permission to email them. Now you can track their online behavior by getting them to click a link in your follow-up email campaign, which automatically embeds the tracking code.
- Contacts who have cleared their browser cookies. Their email address may be in Autopilot, but since the tracking code relies on cookies, their web visits register as anonymous.
- Contacts who received the email in a different browser or device (i.e. Firefox instead of Chrome). Because each browser has its own cookies, Autopilot won’t immediately recognize contacts browsing your website from a new browser. But if that contact clicks on a link in an email sent by Autopilot from this new browser, the tracking code on the page clicked through to will associate the new cookies with your account, converting the contact from an anonymous visitor into a known visitor. Same goes for different devices.
Since TheWorkMode’s clothing lines are so stylish, you can expect email clicks galore.
3. Display Headsup messages on specific pages or all tracked pages
The tracking code enables you to display onsite and in-app messages with Headsup.
Proactive Headsup is shown to anonymous visitors, while Headsup is shown to known visitors. The latter is set up as a shape within automated journeys.
Example journey that triggers a Headsup message after a contact clicks on an email
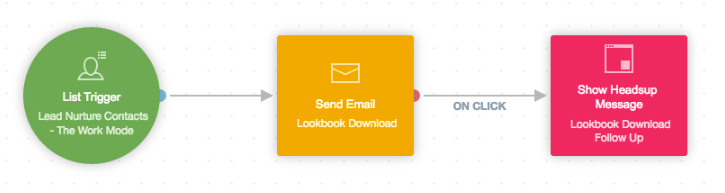
TheWorkMode could display a variety of Headsup messages:
- Link shoppers to a 24-hour sale with Call to Action
- Ask what clothing pieces browsers want next season with Reply Back
- Personally invite users to download your lookbook with Subscribe
Each time you set up a Headsup message, you’ll want to consider the journeys your contacts are in, the actions they’ve taken, and their attributes. Taking those elements into account leads to personalized, contextual messaging.
4. Enable automatic UTM parameter tracking
UTM parameters are snippets of text that, when added to a link, tell Autopilot (and other tools, like Google Analytics) more information about the visitor, such as where they came from, what medium they engaged with, and what they’re interested in. When visitors click on one of these custom links, the unique parameters are sent to your Autopilot account for easy access.
A URL with UTM parameters looks like this:
http://theworkmode.com/?utm_source=autopilot&utm_medium=email&utm_campaign=style&utm_term=corporate
In this case, the following information is sent via the parameters:
- Source: Autopilot
- Medium: Email
- Campaign: Style
- Term: Corporate
So, how’s that style campaign doing for TheWorkMode?
Since Autopilot’s tracking code captures UTM parameters from visits to web pages, you can find this out easily. Visits are displayed in the activity feed:

Looks like Eloise visited a URL with UTM parameters
You can also cross reference UTM parameters with paying customers to find out which campaigns led to sales.
Autopilot also captures UTM parameters included in links in emails sent via Autopilot. The benefit of this is that UTM parameters can be captured when contacts click through to web pages that don’t have your tracking code, like this:
Eloise also clicked on an email to a page with tracking parameters
Finally, with automated UTM parameter tracking, you can change a contact’s path in a journey using the has visited page condition and/or the is on list or segment condition.
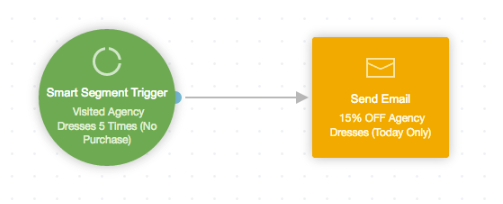
5. Unlock the ability to segment contacts based on page visits
The tracking code monitors page visits, but it also makes it easy to segment contacts based on those page visits.
For TheWorkMode, this opens up a world of possibilities when it comes to personalized marketing efforts:
- Visitors to the Corporate Casual Friday page could, after five visits, receive an email with the most popular clothing items in that category
- Visitors who viewed but didn’t buy the Karen Millen Sheer Back T-Shirt could receive an automated discount via email after a three-hour delay
- Visitors who haven’t come back to the website for more than two days could receive a 20% discount
- Visitors who view the events page could receive a personal Headsup invite from the CEO, but only if they’re based in Australia
Trigger promotional journeys by creating smart segments based on page visits
6. Display highly targeted in-product messages
The tracking code not only unlocks personalized messaging for typical websites, but also for in-product experiences.
With that in mind, imagine TheWorkMode decides to add a design-your-own-shirt product to its product lineup. The team creates an app that’s separate but complementary to their e-commerce website.
TheWorkMode's design-your-own-shirt app displaying an in-product Headsup message
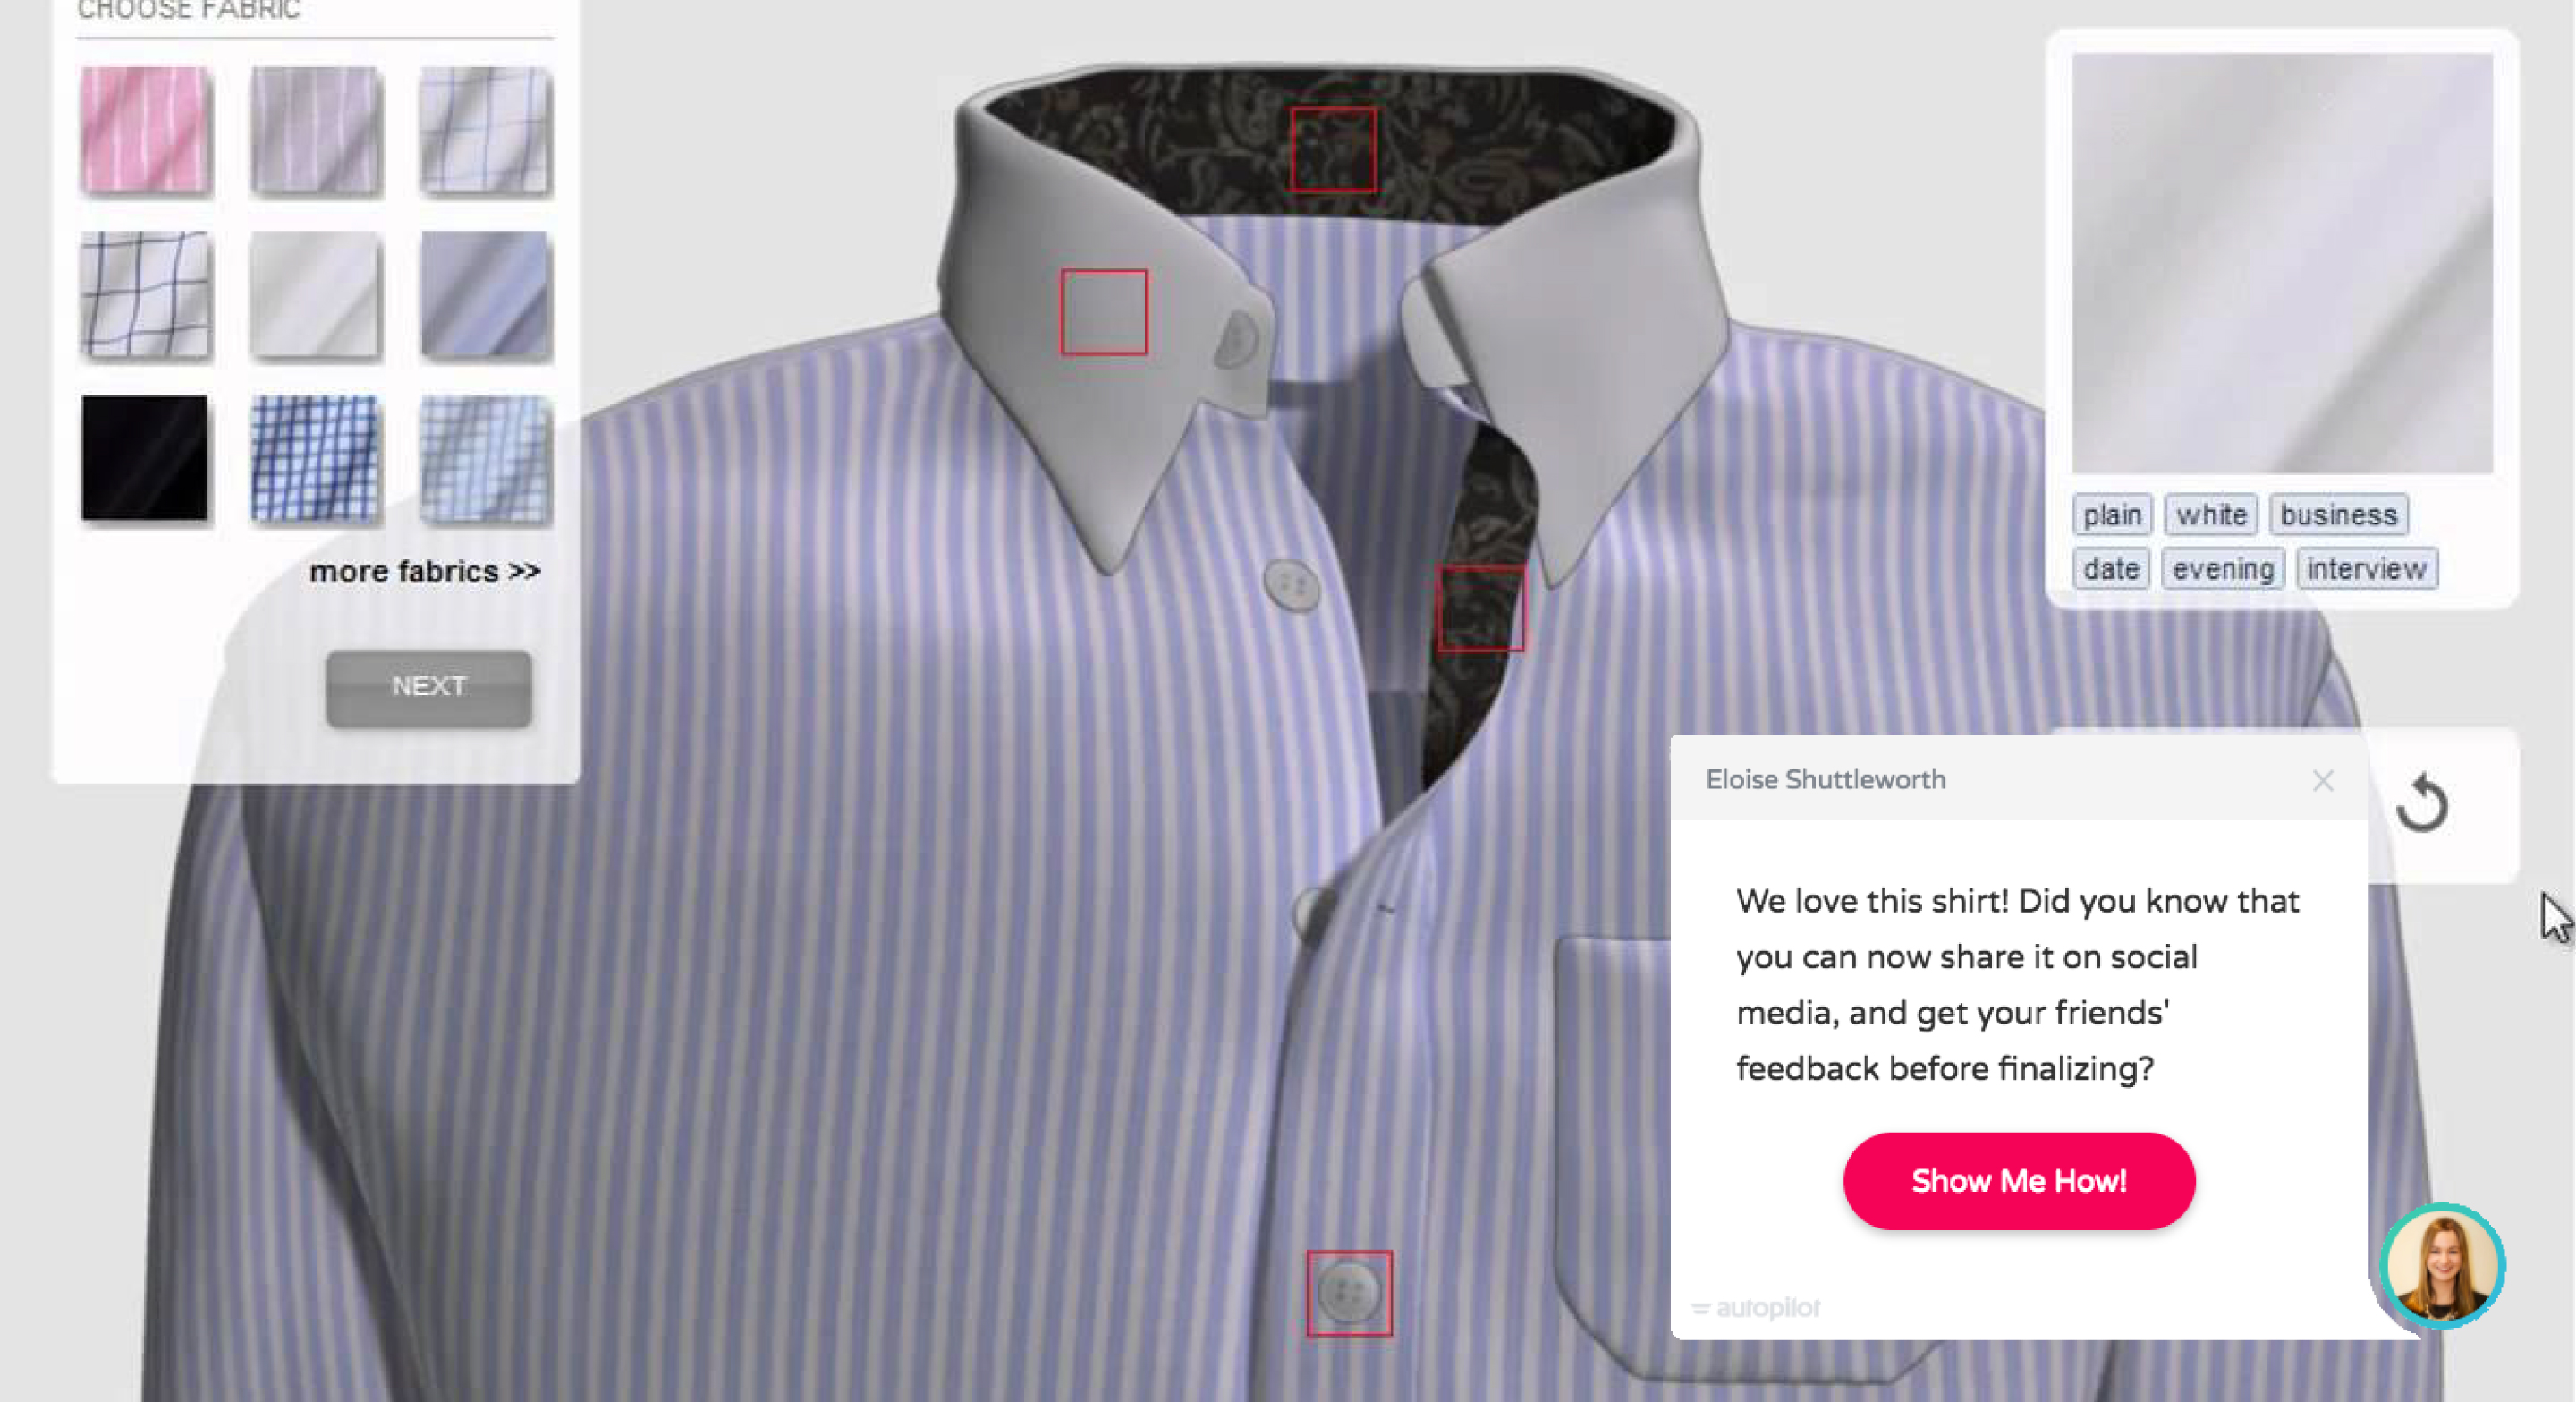
The name of the game has changed, making activation, onboarding, and retention top-of-mind concepts.
In-product messages TheWorkMode could send include:
- Personalized welcome email or Headsup message as soon as a person signs up for a free trial, which leads them to receive getting started tips
- Feature release notifications that communicate a new way to tweak shirt designs (more plaid please!)
- Proactive assistance from support after the tracking code picks up on a user visiting the help center
- Conversion nudges to buy the shirt that was designed last week but never purchased
- Targeted upsells that highlight a similar shirt in TheWorkMode’s original offering
Whether TheWorkMode is targeting e-commerce customers or product users, the tracking code’s got them covered.
How to add the tracking code to your web pages
To add the tracking code, follow the steps below or watch this quick video tutorial:
To start with, you’ll want to navigate to the Settings panel of your Autopilot dashboard, which can be accessed via the cog wheel on the left-hand panel. Next, select “Tracking Code”.
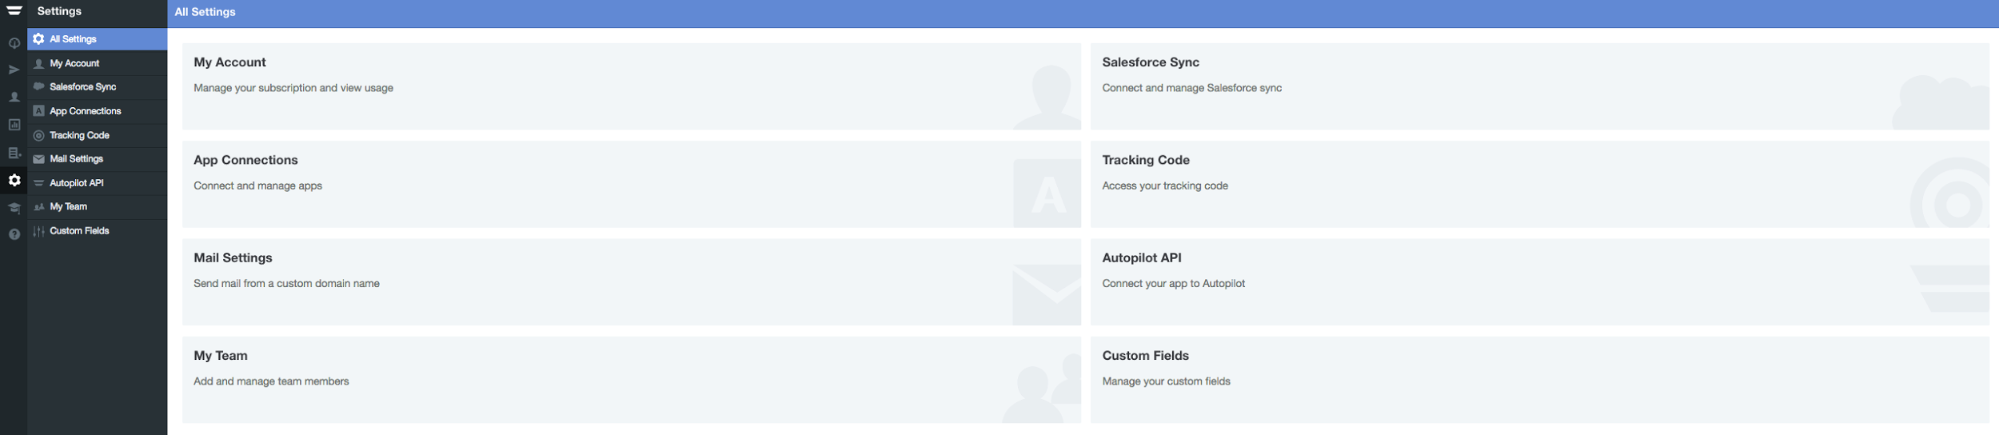
Settings > Tracking Code
Select the type of tracking code that is most relevant to your product. We offer two versions—one for your web pages, that can be used across all of your web assets, and one for your product.

Access the tracking code for Web Pages or Apps
Let’s roll with the web page tracking code setup since that’s most applicable to TheWorkMode. Keep in mind: If you’re looking to add the tracking code to your product, the steps are the same.
Within each of your accounts, you’ll see that we’ve generated a unique HTML tracking code for you to use across your web pages. It works very much like the Google Analytics tracking code and has minimal impact on your page load times.
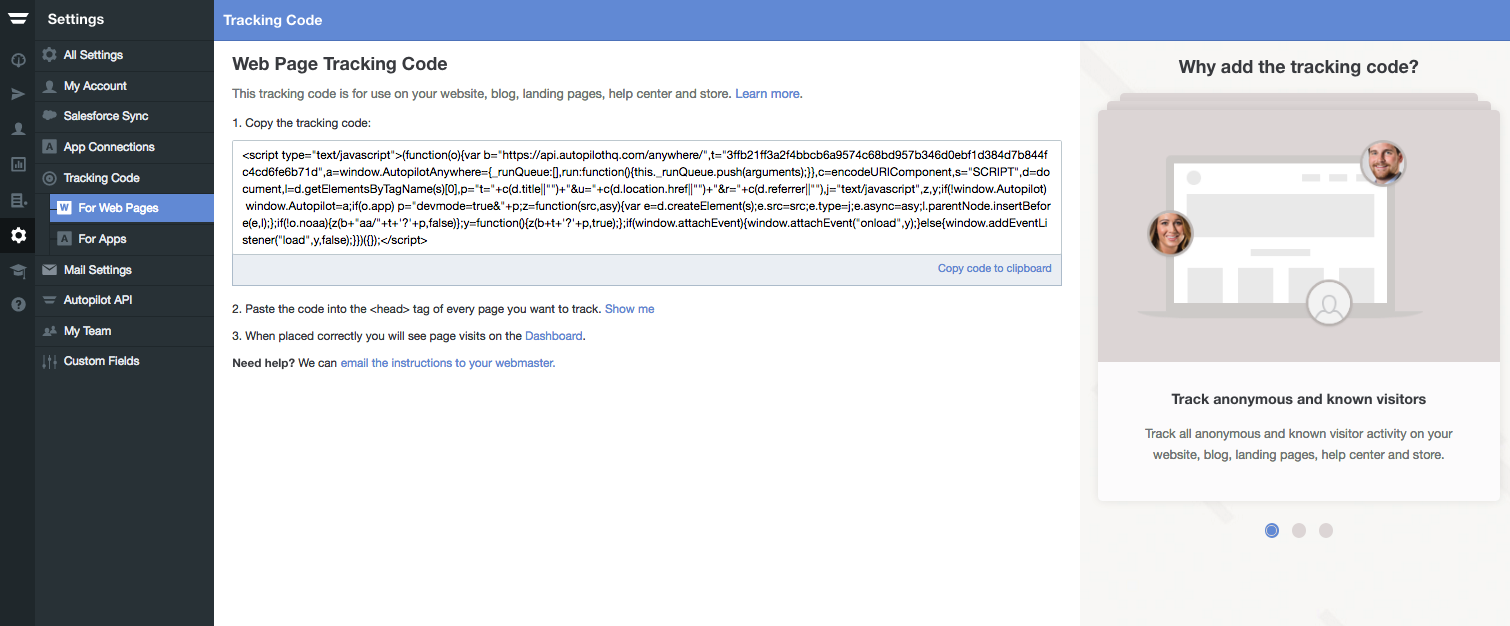
Copy the tracking code
To add it, you simply need to copy the full code and paste it into the head tag of every page that you wish to track. We recommend adding the tracking code to all your web properties, including your blog, landing pages, and knowledge base.
Paste the tracking code into the
tag of every page you want to track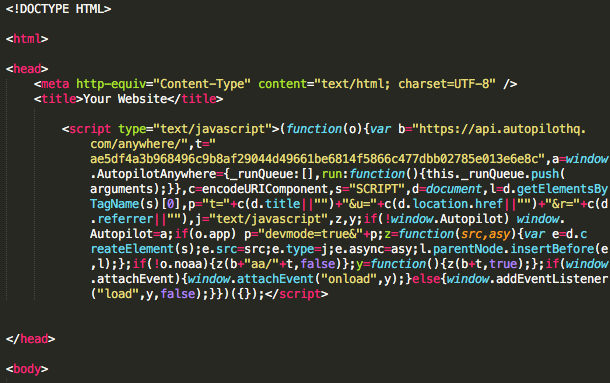
Finding the head tag of your web pages differs across various website creation tools. If you’re using a WordPress site (like TheWorkMode), you can follow this step-by-step guide. If your technical team is going to manage configuration, you can email setup instructions to them by selecting the hyperlink at the bottom of the tracking code page.
Steps to make sure the tracking code works
Once the tracking code has been successfully placed on your web pages, you’ll start to see the activity feed in your Autopilot dashboard fill up with user activity.
Add the tracking code and watch your website activity unfold in real time on the dashboard
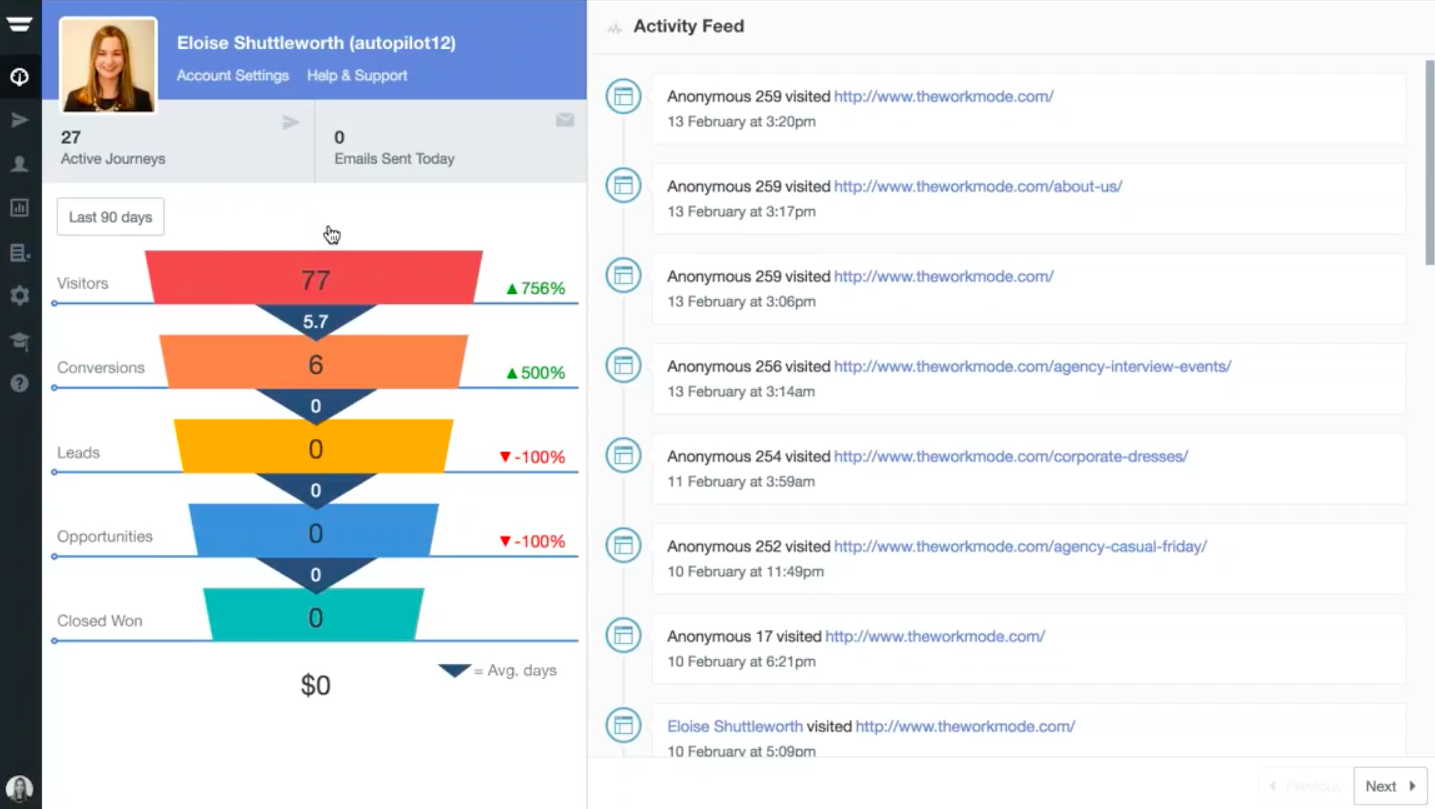
As you can see from TheWorkMode’s dashboard, we’re now using the tracking code to monitor unknown and known user activity across web pages. We’re also tracking known user engagement with emails, forms, and Headsup messages. It’s just like magic.
If you’re more of an interactive learner or still have questions about adding the tracking code, watch our Autopilot Training 101 webinar.


